
Discord was initially released in 2015, and it has been revolutionary up to date. This term is not new for gamers as it is one of the most used ways to interact with other gamers regardless of their locality. The discord platform has continued offering tremendous value to the community as it is an open-source app. Since its inception, Discord has helped develop new methods of connecting its users through video, voice, and messaging.
With so many streaming choices available now, it is hard for users to select the best streaming option. Therefore, with this challenge in place, it is vital to ensure you choose an app that suits your need to attain maximum productivity. Like Discord, you can opt to use alternate applications that offer online streaming services such as Twitch and YouTube.
Due to its lightweight nature and easy-to-use GUI (Graphical User Interface), Discord has arguably become one of the best streaming services. This has mainly been aided by its unparalleled compression quality that guarantees users a stable streaming connection. Besides, the fact that Discord’s voice chat is reliable and of high quality poses a challenge to its competitors, and users love it as it is easy to set up and use.
Installing Discord on Linux
Before using Discord to stream, we must install it on our OS. To install Discord on Linux, follow the guide provided herein:
Step 1: Installing all the required prerequisites.
Run the commands given below to install all the required prerequisites needed to install Discord:
sudo apt update
sudo apt install gdebi-core wget

Install required prerequisites
Step 2: Download Discord’s official Debian package:
wget -O discord.deb https://discordapp.com/api/download?platform=linux&format=deb
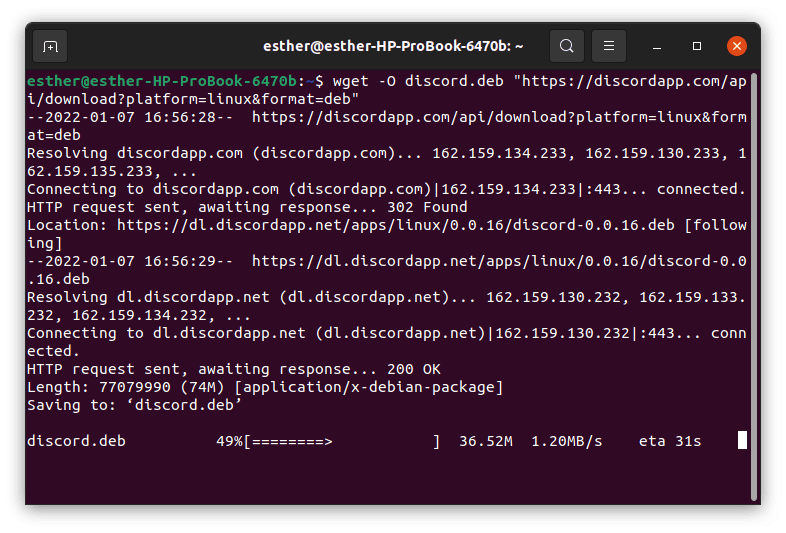
Download Debian package
Step 3: Use the gdebi command to install the downloaded Debian package:
sudo gdebi ~/discord.deb
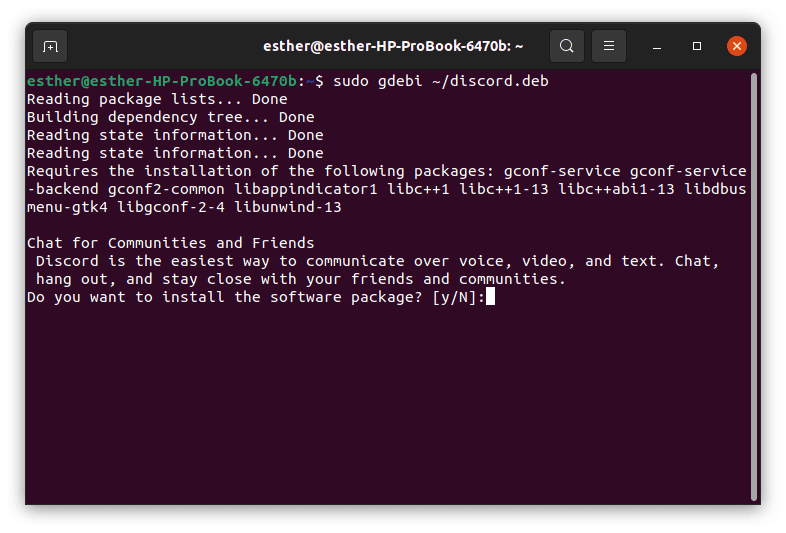
Install Discord application
That’s all. Discord has been Installed on our Ubuntu operating system.
How to install Discord on Windows
- Click on the “Download Now” button
- Run the downloaded Discord setup file
That’s it. You have installed Discord on your Windows PC.
How to install Discord on Mac
- Visit Discord’s official download page
- Click on the “Download for Mac” button
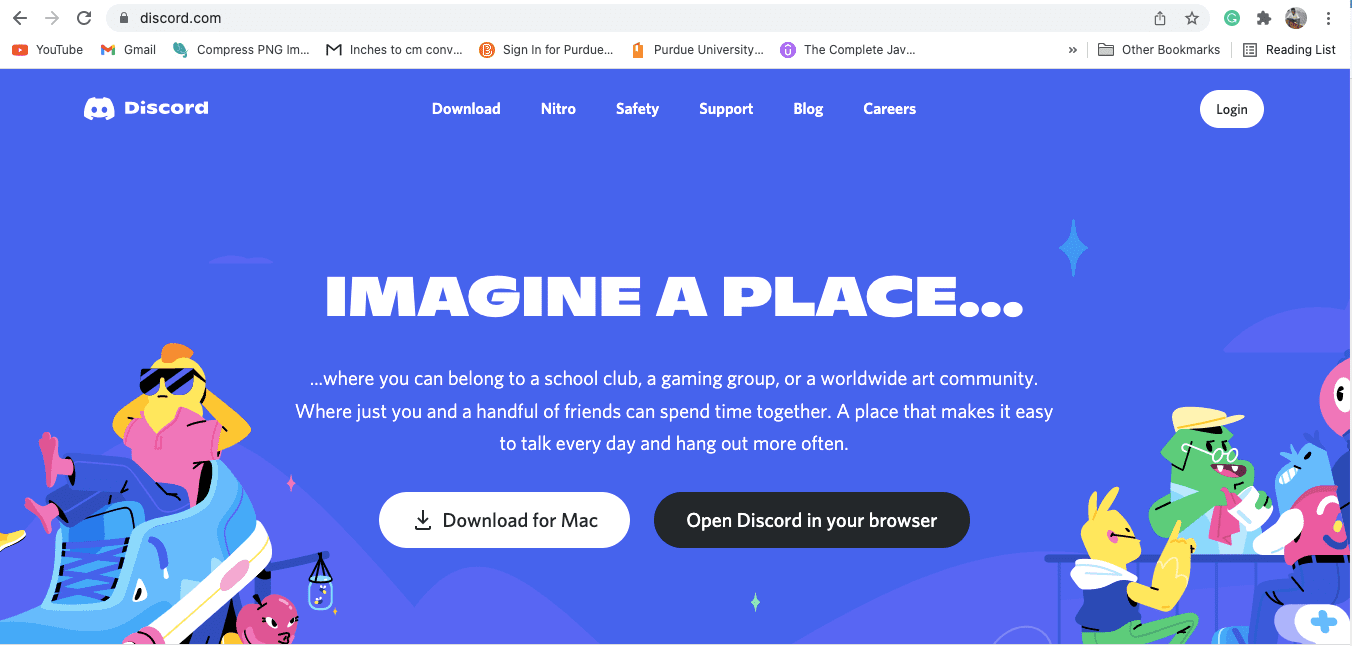
Choose Download for mac option
- Locate and double-click on the “Discord.dmg” file
- Drag the Discord app into the applications folder
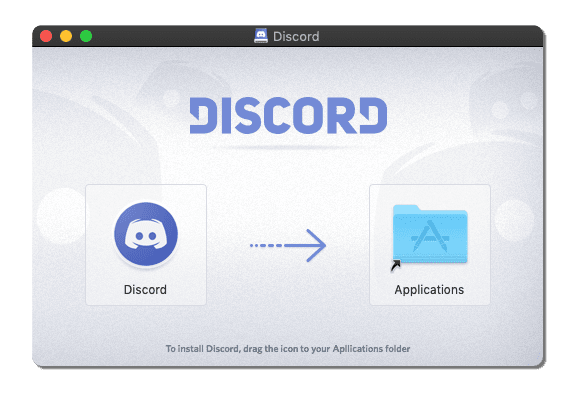
Drag Discord into the applications folder
- Launch and enjoy using Discord on your mac.
Discord App
Note: For “Android and iOS” users, visit the “Play Store or App Store” respectively and download the Discord application
Now that we have the Discord application installed on our operating systems, let us learn how to stream on it.
Streaming on Discord on Windows
It is essential to understand that one must create a Discord Server to stream via Discord. Also, there must be one active voice channel for streaming.
Note: You must follow the procedures provided in this article to install the standalone Discord desktop application since streaming on Discord from your browser is not possible.
Create a Discord Server
After successfully installing the Discord app on your PC, go ahead and create an account plus a Discord server. To do so, stick to the guideline provided below:
- Launch your Discord application
- If you are new to the Discord app, you need to sign up for an account. The process is relatively easy and quick to complete. Follow the provided guides to complete the account registration process.
- Once you have formed your account, log in to the Discord application. The Log-in menu is on the left-hand side.
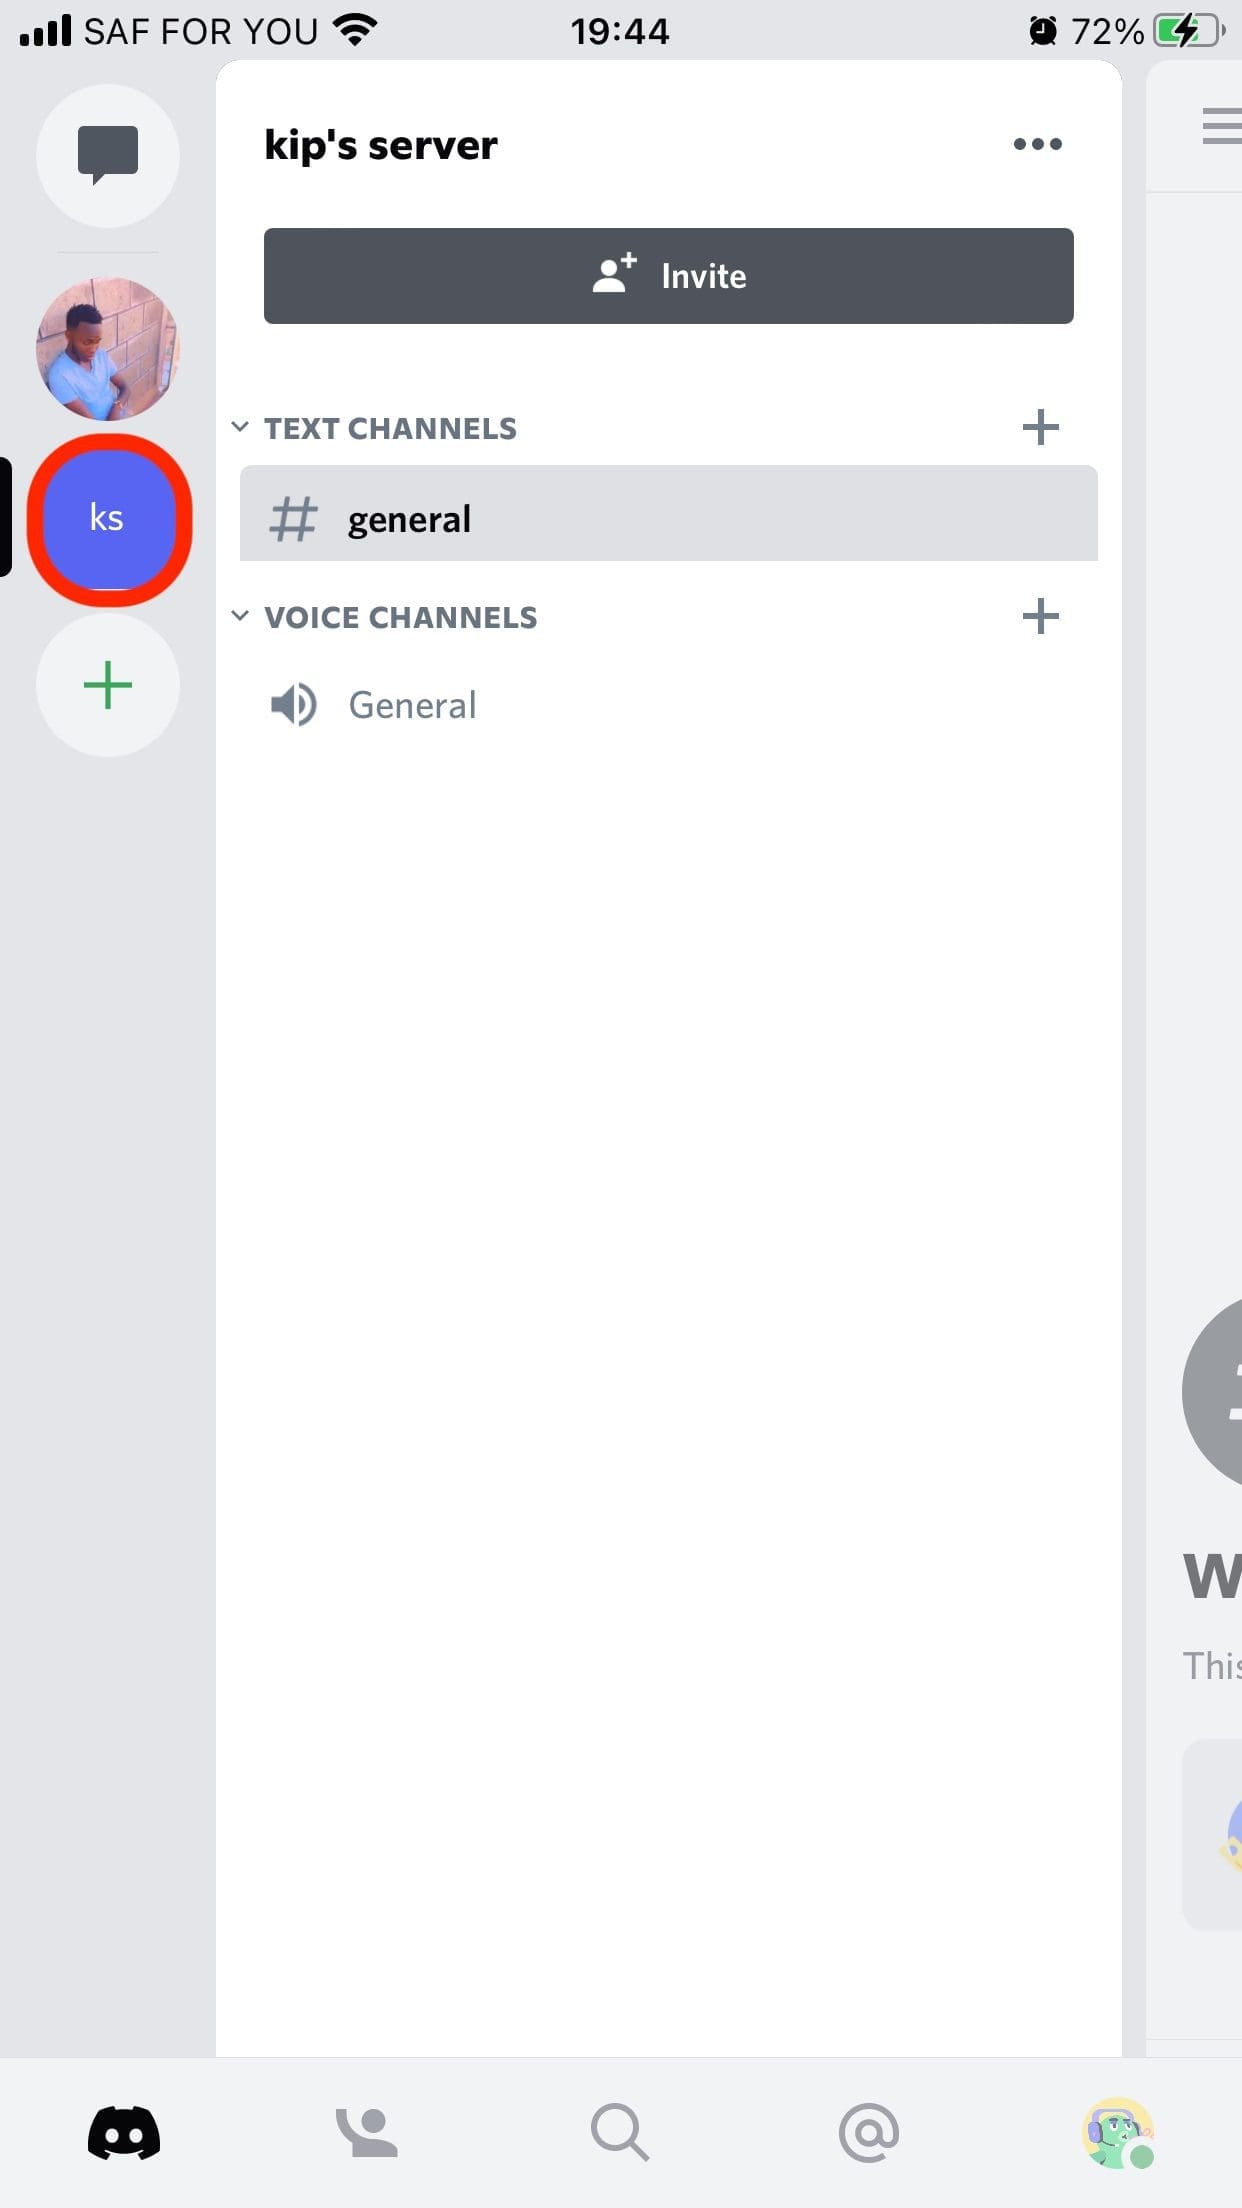
- It is time to create your Discord server. After logging in, you will notice a + sign. Click on it.
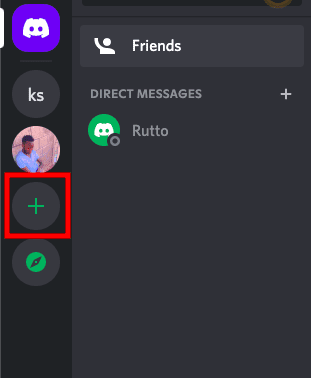
Click on the + sign
- You will see a create server popup screen. Click on “Create My Own”
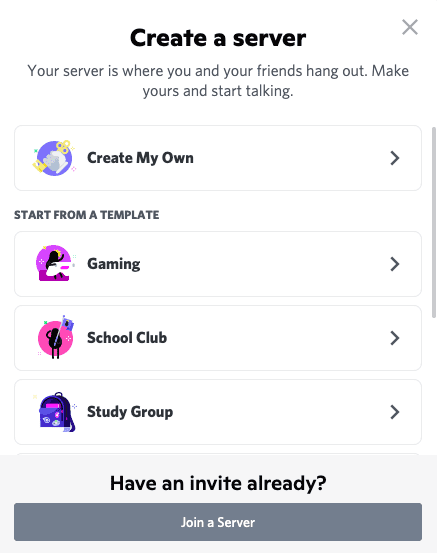
Create your server
- Input your server’s name and upload a profile image used as the server’s icon. Once done, click on the “Create” button.
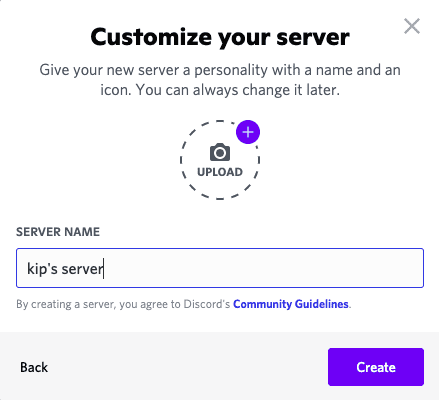
Input server name and picture
- This process won’t take long. Finally, your server will be formed, and you can see your newly created server on the far-left side.
Now that you have your Discord server, you can invite your friends to join your server by sending invites.
Note: You can add voice and text channels to differentiate separate topics on your new Discord server. Besides, you can also create rules for new members and visitors to know what is accepted in the channel and what is not allowed.
Discord Streaming
To stream on Discord is very easy. It is even much more enticing for gamers due to the integration of the game detection software. Now Discord can recognize 99% of the games being played on your PC. This detection software has simplified the streaming process as you can start a game stream with just one click.
Note: It is vital to consider that the community (Free) version of Discord only supports 480p and 720p resolution. Therefore, if you anticipate getting a higher streaming resolution like 1080p and above, you will be required to be subscribed to the Discord Nitro package. However, if you intend on trying out Discord streaming, then stick to the community version.
The free community Discord version can support only a 15 to 30 frame rate per second. To use 60fps, you need to be subscribed to Discord Nitro.
Now that you understand the basic streaming concepts, you can also check out the additional features Discord provides its users with.
Additional Discord Features
Besides game streaming, Discord allows its users to stream other content, share their screens and create video and voice calls for friends to join. In this article guide, we shall not go in-depth on creating and recording voice calls as our sole focus is “How to stream on Discord.”
Streaming on Discord on Ubuntu
After installing the Discord application on your Linux OS, launch it and log in or create an account. Once you have formed an account, click on the “+” sign on the upper left side of the Discord application to create a server.
Note: You can bypass this step if you already have a server.
- Click on “Create My Own
create your server
- Next, click on “For my friends and me.”
- Input the server name and click on the “Create” button
input server name and picture
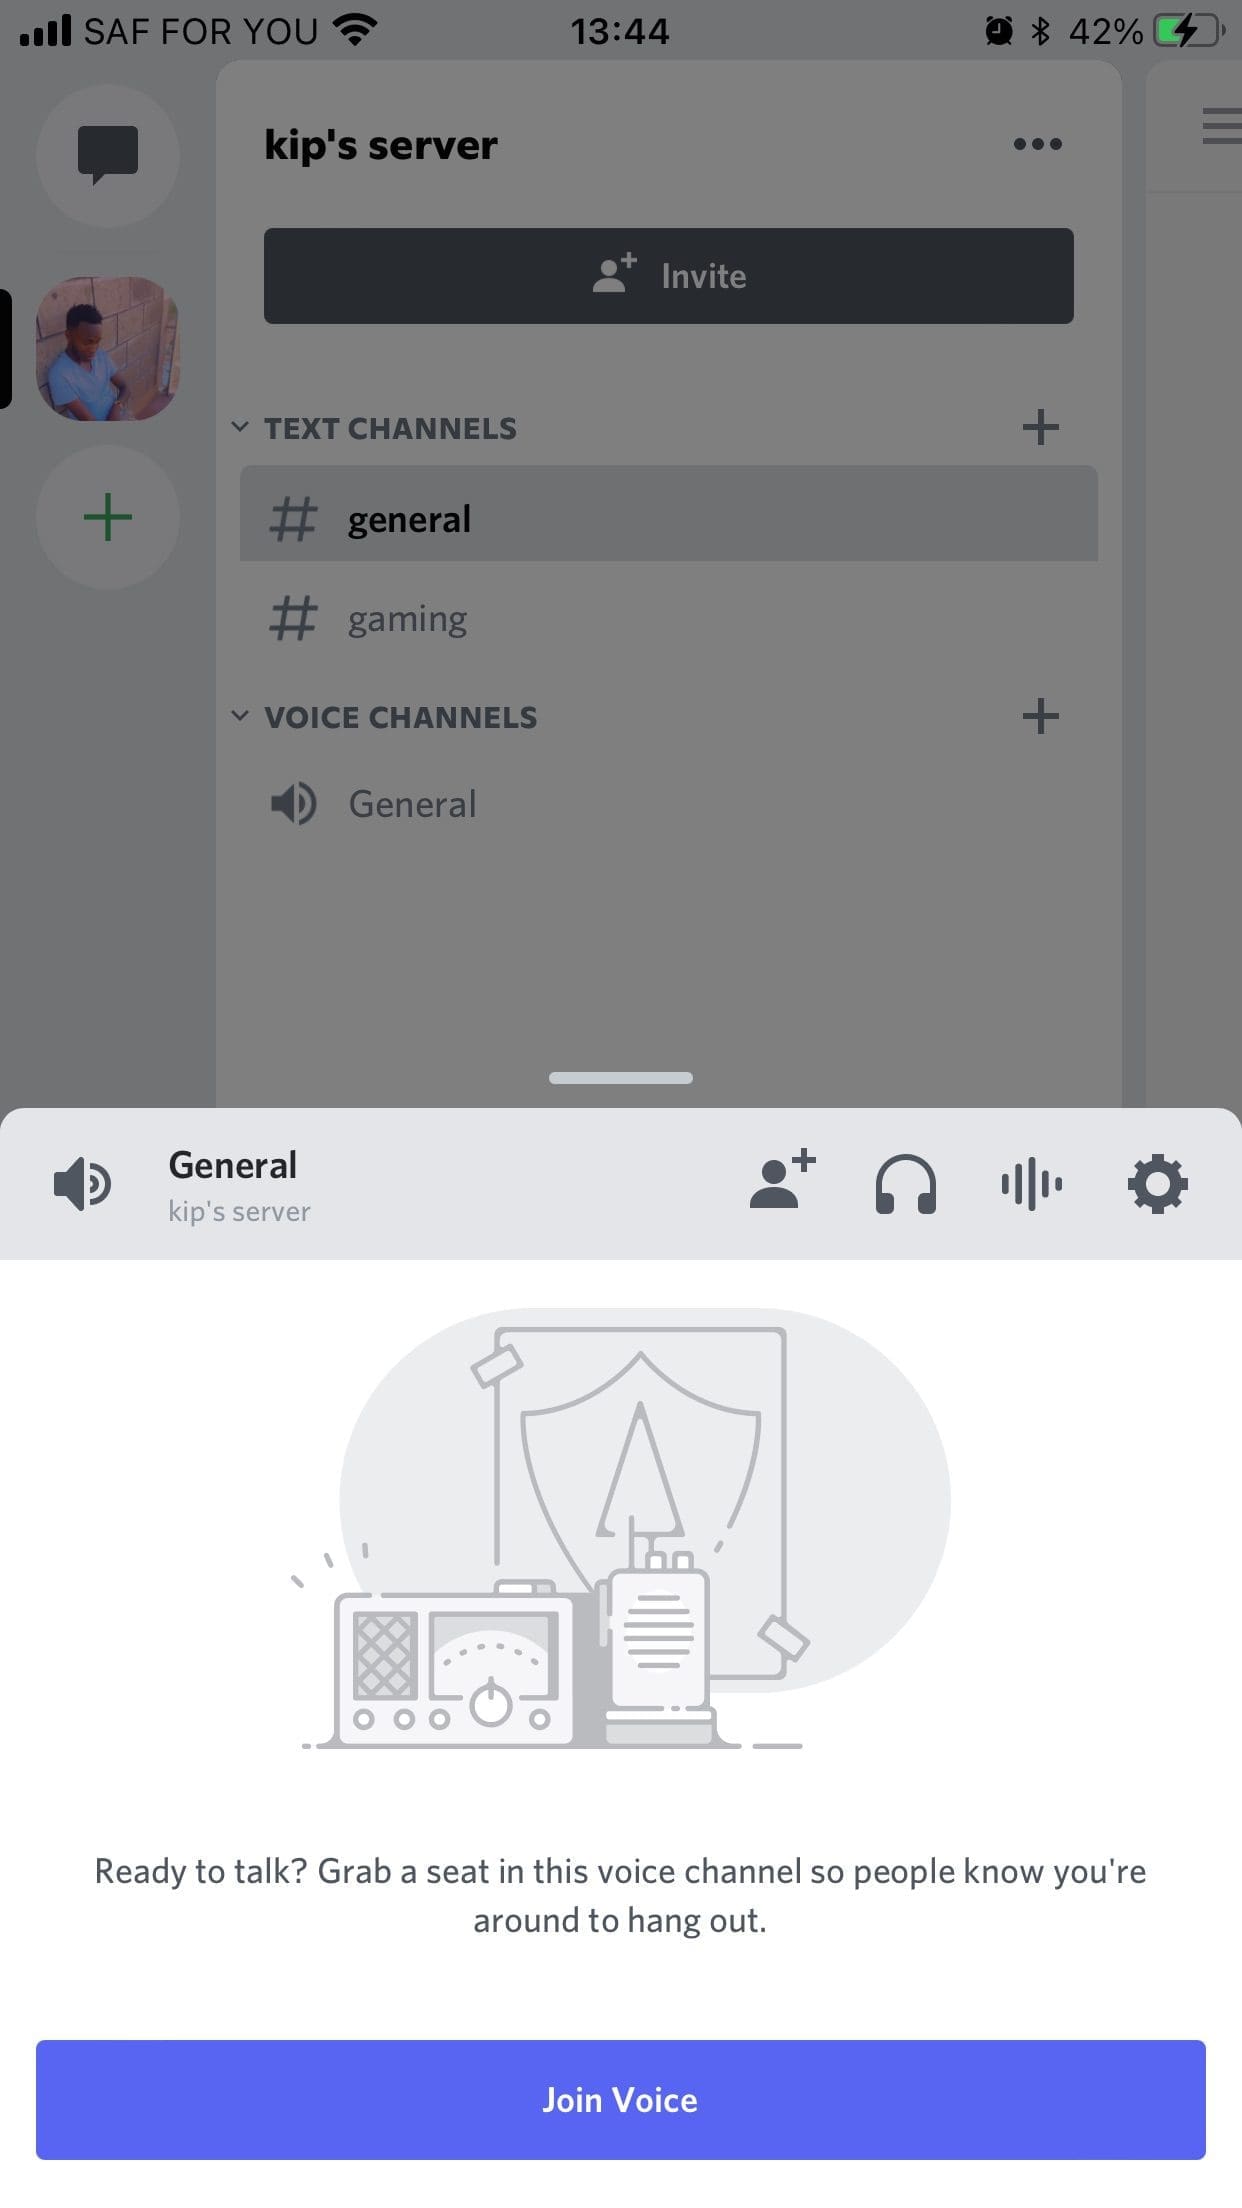
- Under the “Voice Channels,” click on “General.”
- You can decide to either invite your friends or skip.
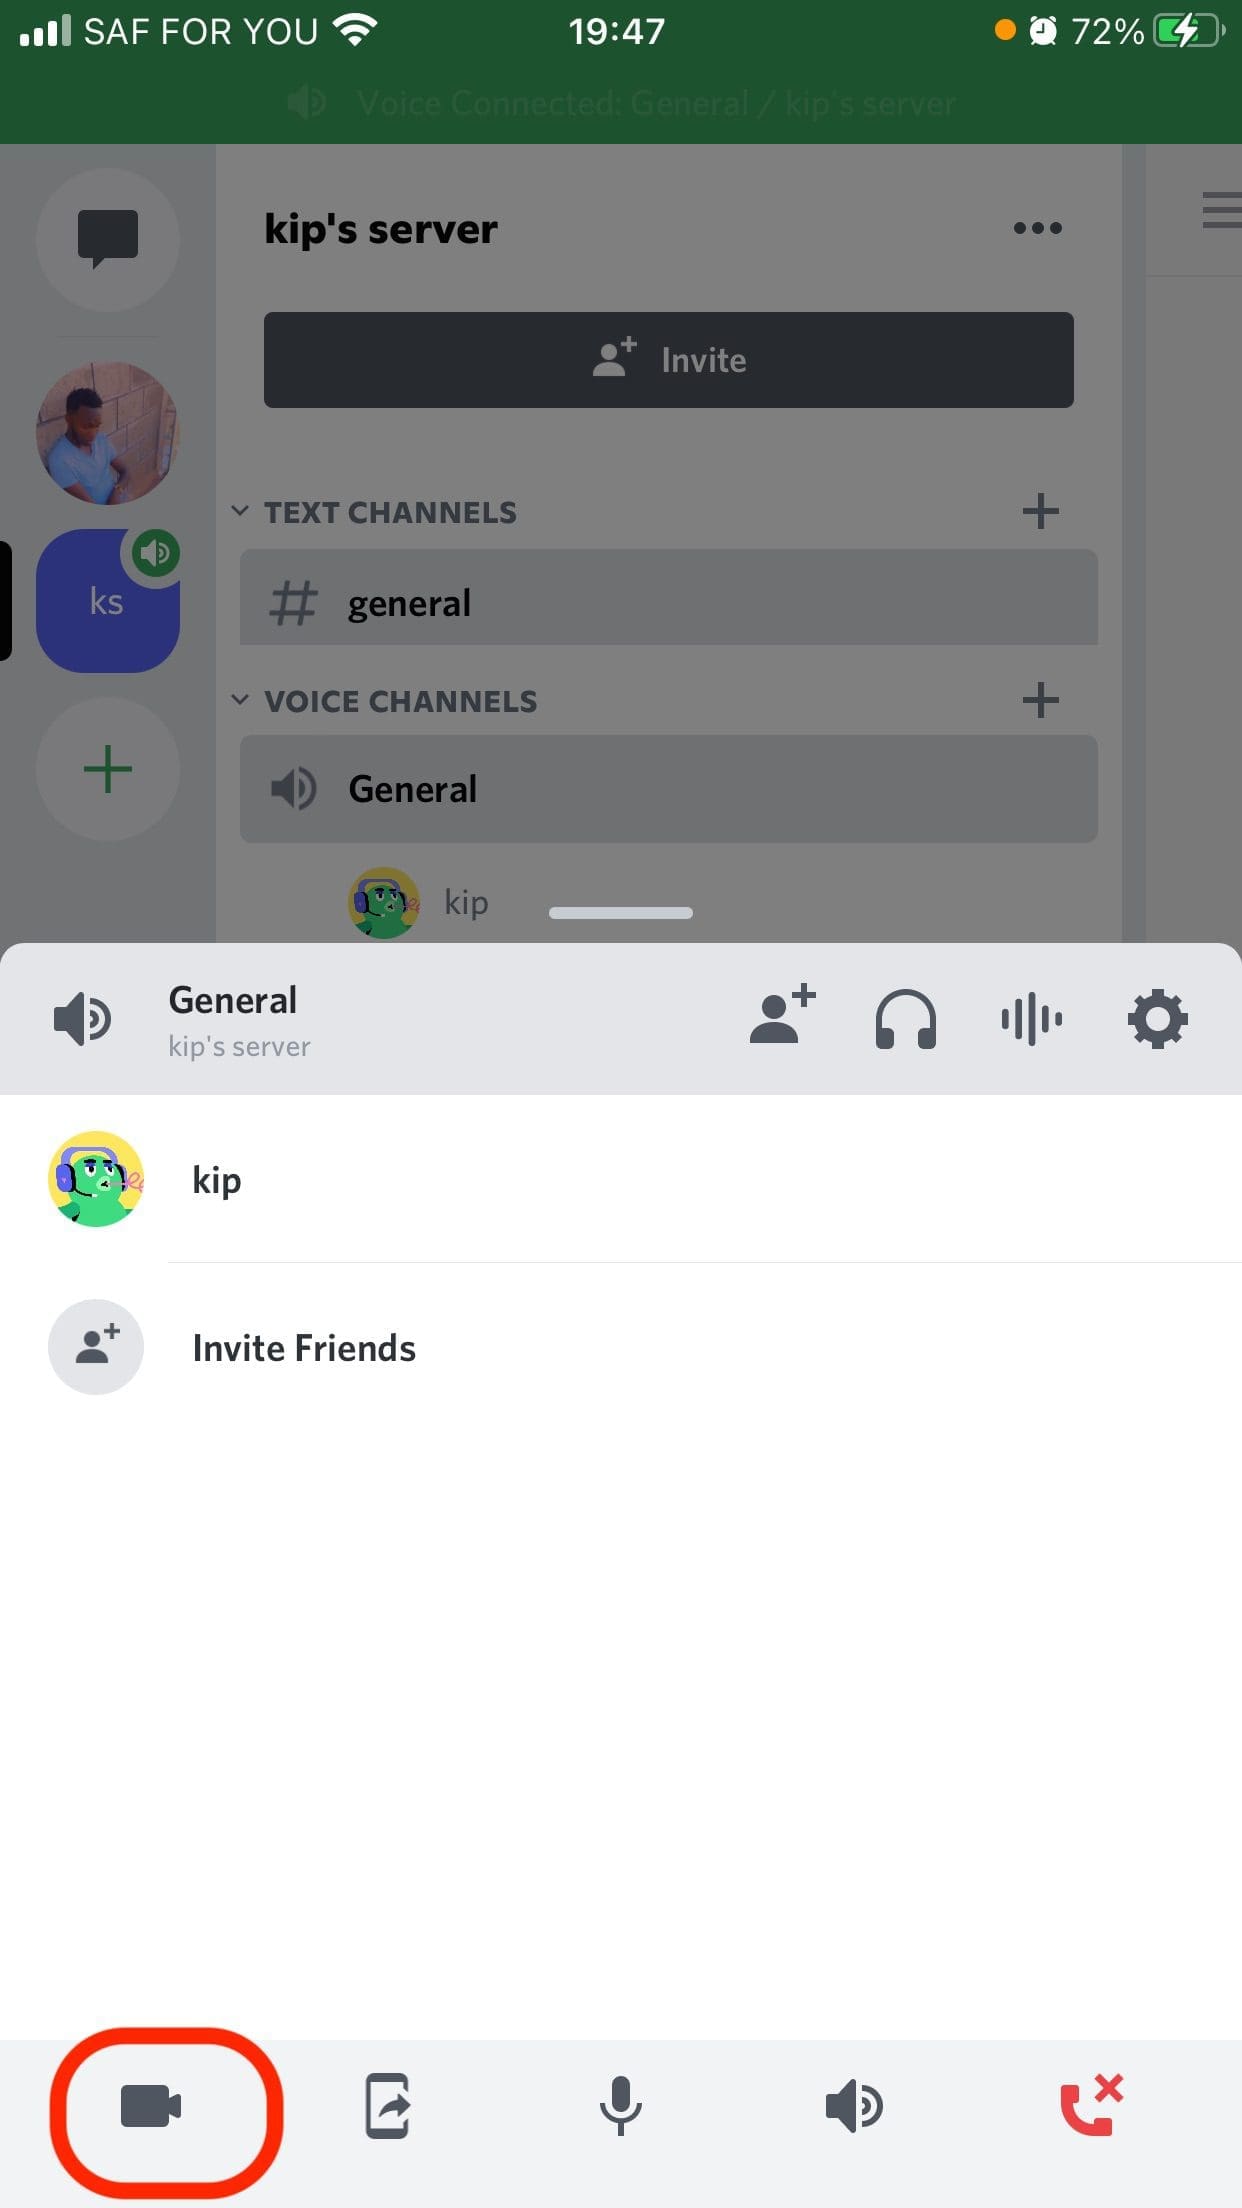
- Just above your avatar and name, select “Screen.”
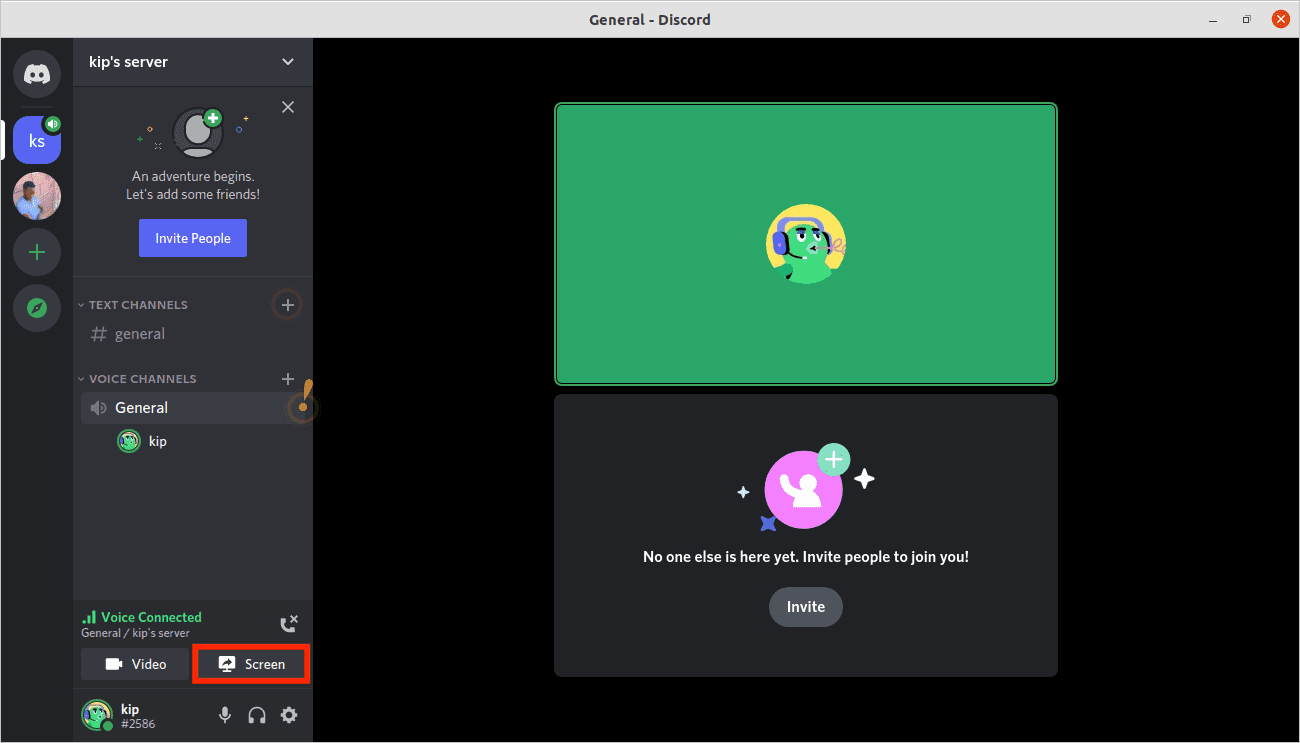
Click on the screen above your name and avatar
- Choose the screen to share, then click on the “Go Live” button

Select the screen to share, and choose the frame rate and resolution, then click Go Live
That’s all you are now live using the Discord application.
Streaming on Discord on Mac
Once you have the standalone Discord desktop application, streaming becomes practically similar on almost all platforms. Follow the guides provided for Windows above. Next, create the server and set it up for Windows to start streaming using Discord.
Streaming on Discord on iOS
You can opt to stream your game using the Discord application on your iOS. If you have an iPhone, you can also use the screen sharing feature, just like it is possible for Windows and Mac users.
Visit App Store as stated earlier and download the latest version of Discord for your iPhone. Give it time for the application to finish installing once it is done; log in if you already have an account. However, if you don’t have an account, proceed and create one. After logging in, create your Discord server as we did for Windows.
If you are unfamiliar with the mentioned steps, below is a simplified guide:
- Launch the installed Discord application on your iOS device
- Log in
Login to your Discord account
- Tap on the “+” icon on the left menu
- Select the “Create My Own” option
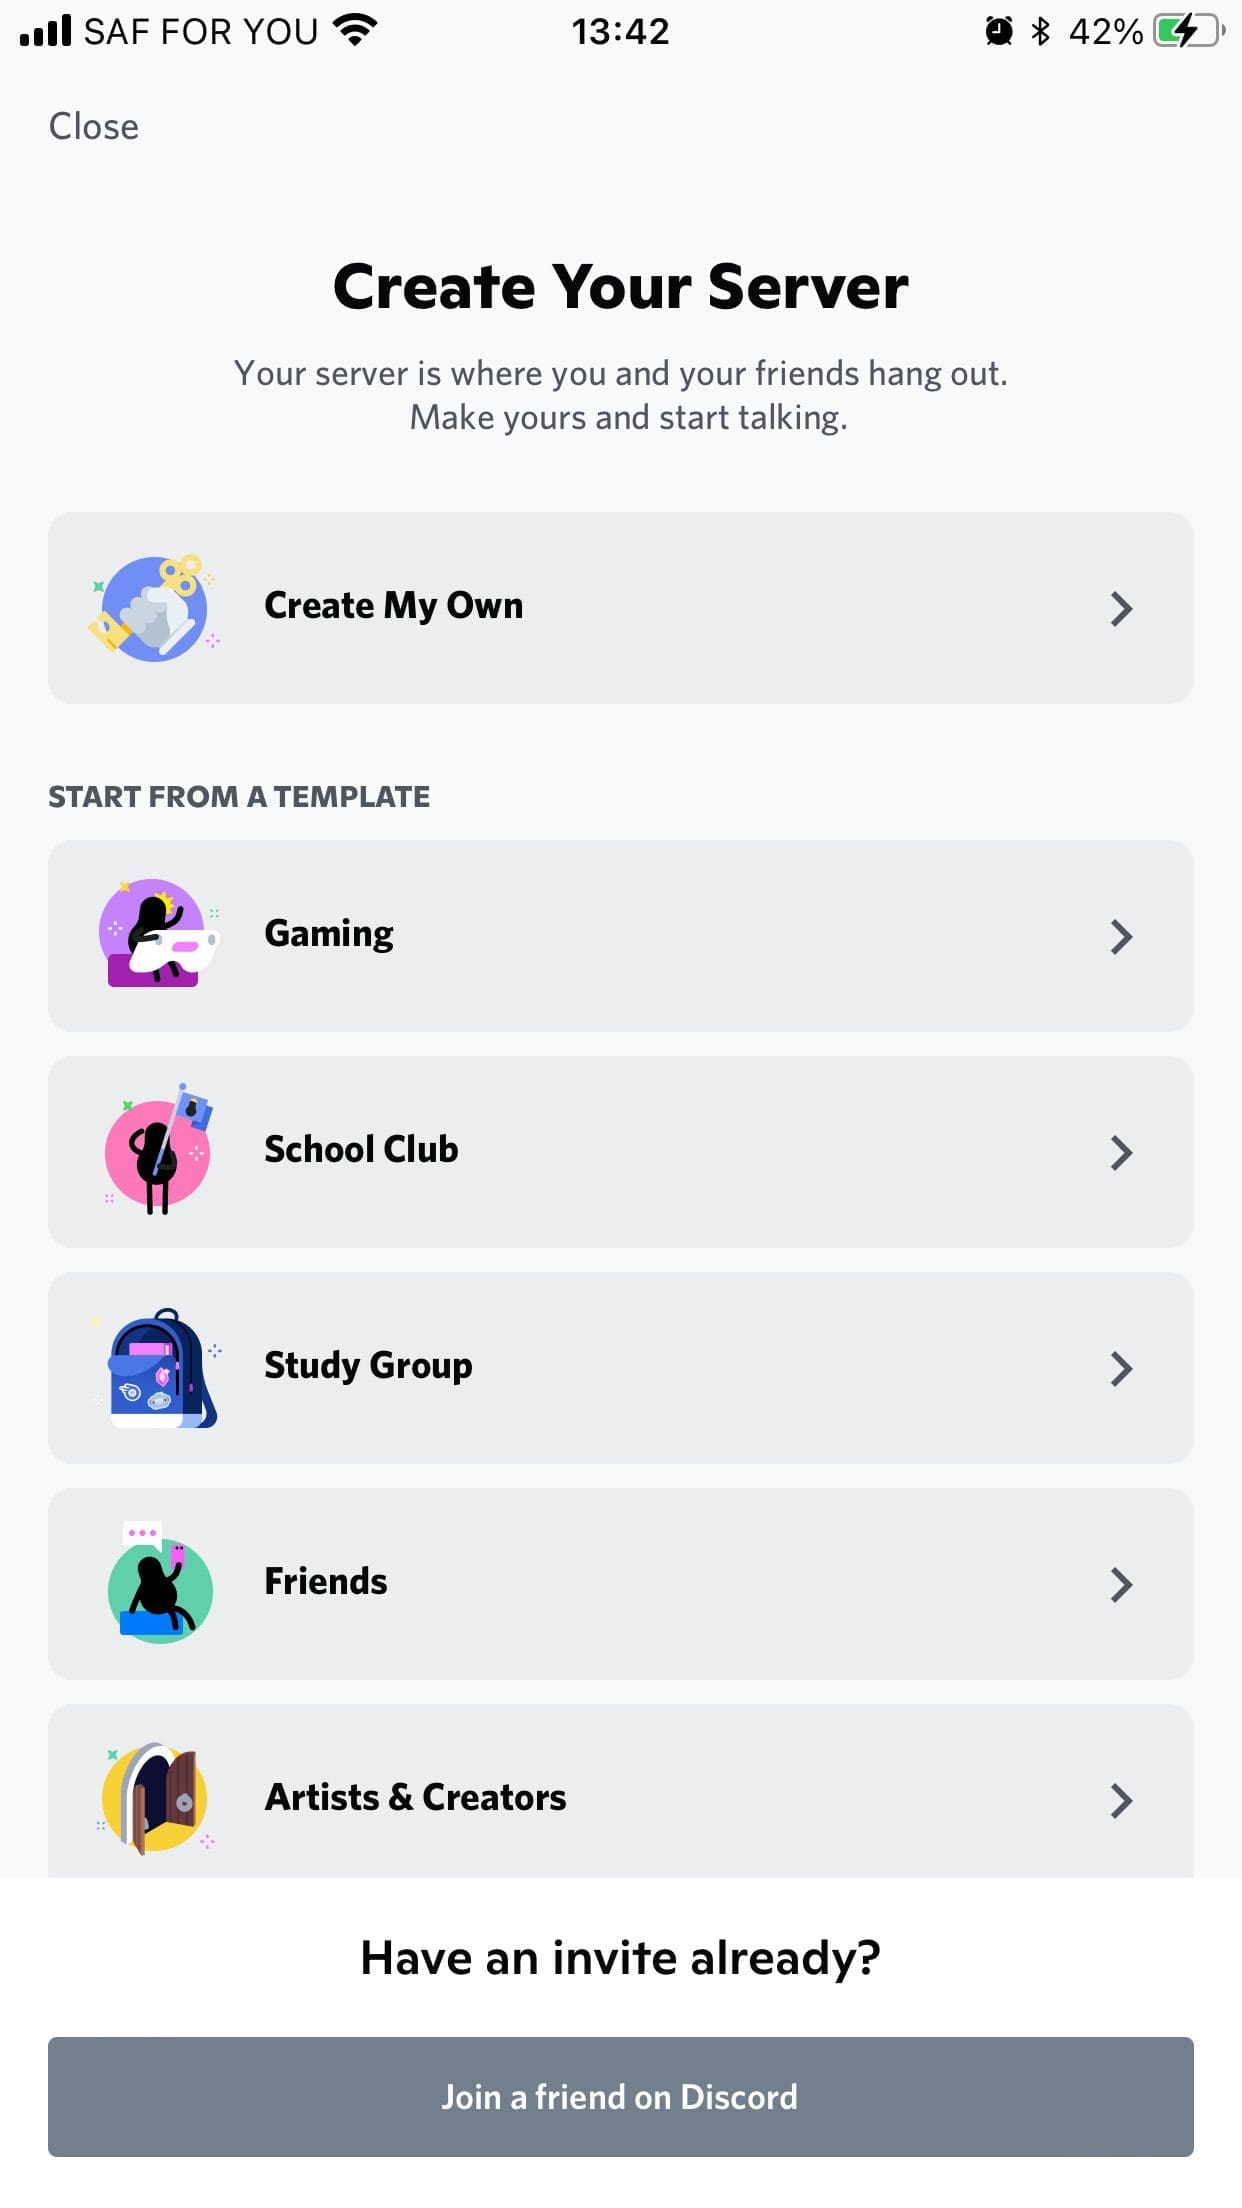
Click on Create my option
- Input a server name and image you wish to be used as the server’s icon. Once done, click “Create Server.”
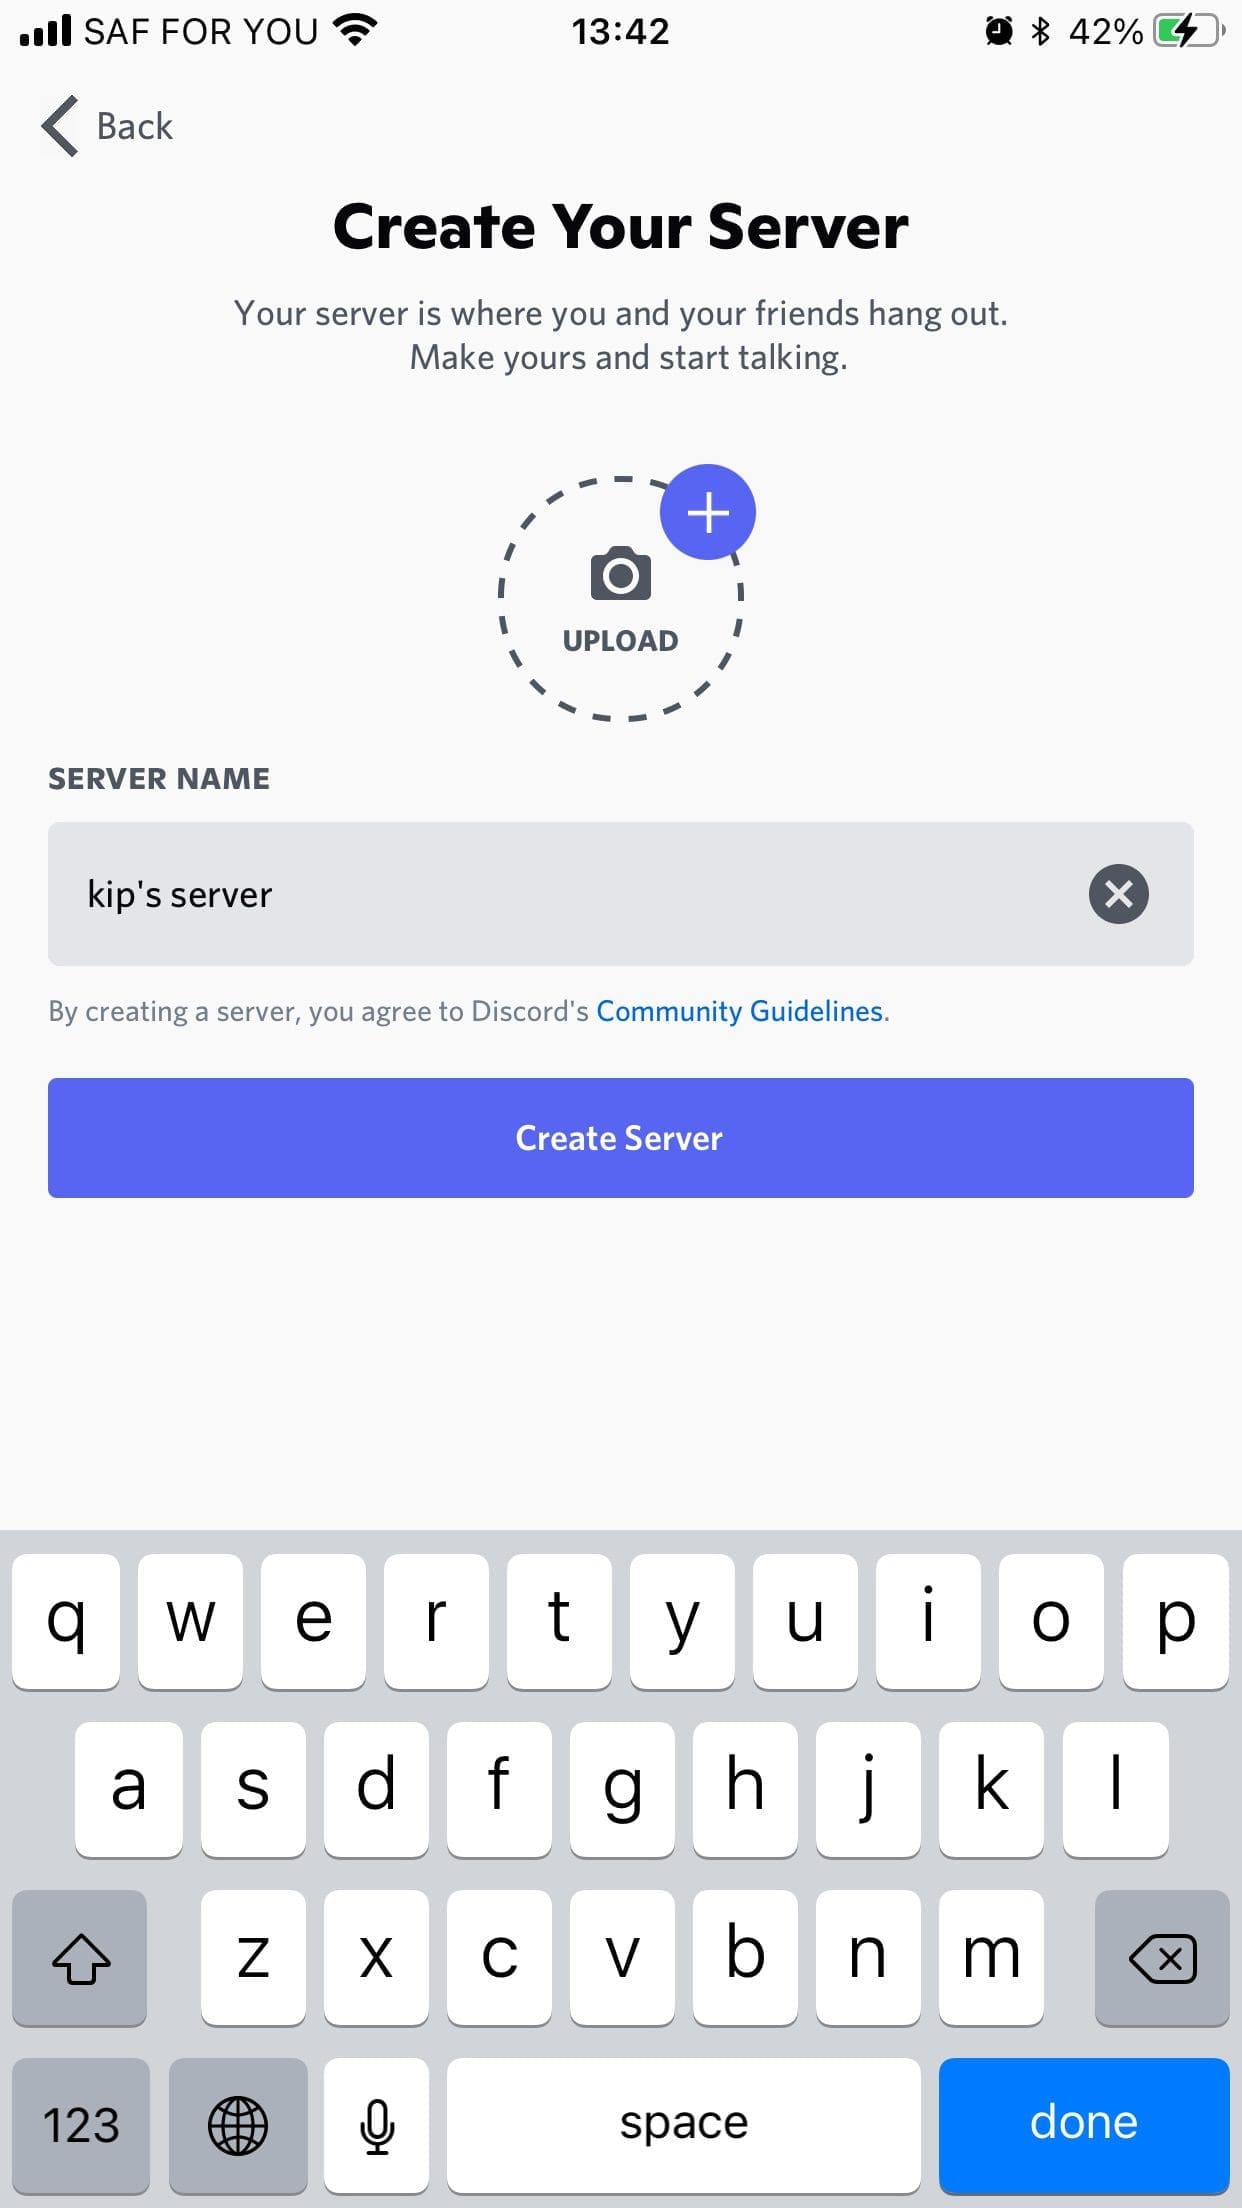
Click on Create your server option.
- You will be asked to invite friends to your Discord server on the next screen. If you don’t intend to invite friends, click on the “X” button in the left upper corner.
- The app will now redirect you to your new server.
You have successfully created a Discord server. Proceed and learn how to make a call.
To make a call on your iOS device, follow the guides provided herein:
- Launch the Discord application on your iOS device
- Locate and tap on the “hamburger” menu icon. (This menu icon contains three horizontal lines.”
- You will see a list of servers to the left of the hamburger menu. (Only the servers you have created and those you are following will be displayed on that list of servers)
- Tap on your server icon to proceed
Tap on your server Icon to proceed
- Now you will see all the existing channels on your server from the screen’s central portion. The “#general” text channel and voice “General” channels are always visible.
- Tap on the “General” voice channel
- A display will pop up asking for confirmation. Tap to join the voice. On some devices, you will be required to give Discord permission to access the Speaker, Microphone, and Camera.
Click on Join voice
- Once you have successfully joined the voice channel, you will be able to see the “General” voice call on your Discord application.
- Tap on the camera symbol located on the lower-left corner to enable a video call
Tap on the camera icon to enable video call
- Tap on the red icon in the lower right corner to end the call.
Streaming on Discord on Android
Just like iOS users, Android users can also use the screen sharing functionality to stream games and other content from Android devices. First, install the Discord application by going to Play Store and searching for Discord. Once the app has been inaugurated, you can check out the guides provided below to learn how to use it.
Note: Unlike the Computer version, the user records the entire screen while using the Discord application.
To start streaming or sharing, do this:
- Login or create your account
- Next, create your Discord server
- Join voice by tapping on the voice channel you intend to share.
- Once you join the voice channel, you will see an icon with an arrow on the bottom of the screen. Tap on the icon
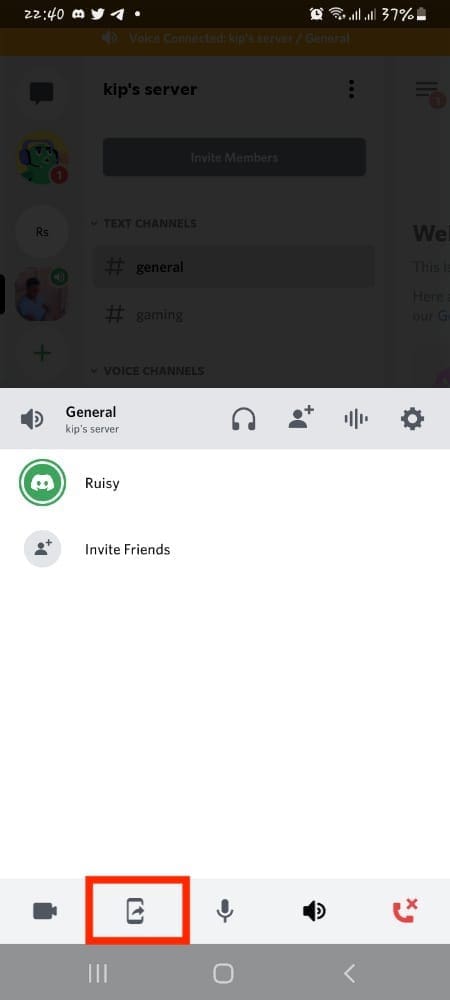
Click on the phone icon with an arrow
- Click “Start Now” on the next screen
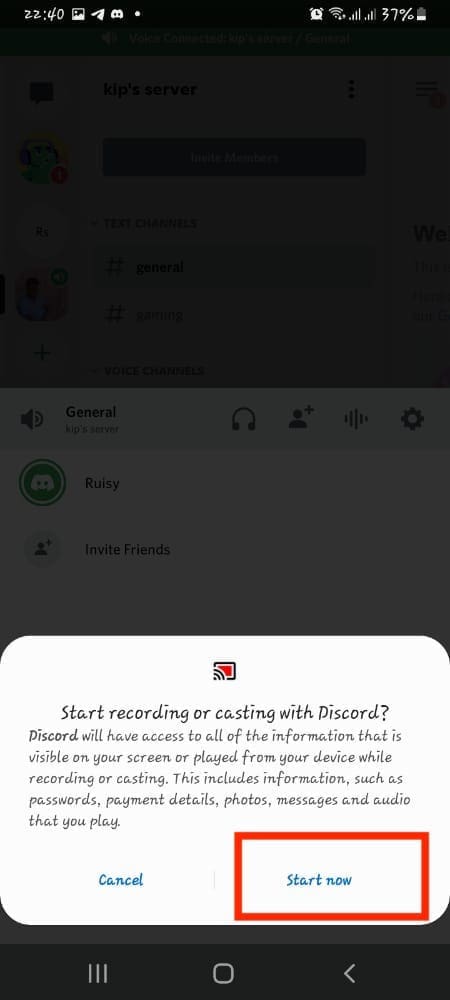
Click on Start now
- The previous step will initiate screen sharing.
Once screen sharing has started, launch the game or application you want to share and let Discord do the other tricks for you. Then, go to the Discord application and tap on the “Stop Sharing” option to stop streaming.
Streaming on Discord on Chromebook
Since Chromebooks are Google-customized Android “laptops,” downloading and using Discord is similar to Android. First, launch the Play Store and install the Discord application. You can now set it up just like we did for Android users.
Watching a Discord Stream
If you want to watch a Discord stream, you will have to follow the guide below:
- Navigate to a voice channel where you want to watch a stream
- Click on the ‘Streamer’s name” and then tap on the “Watch Stream” option
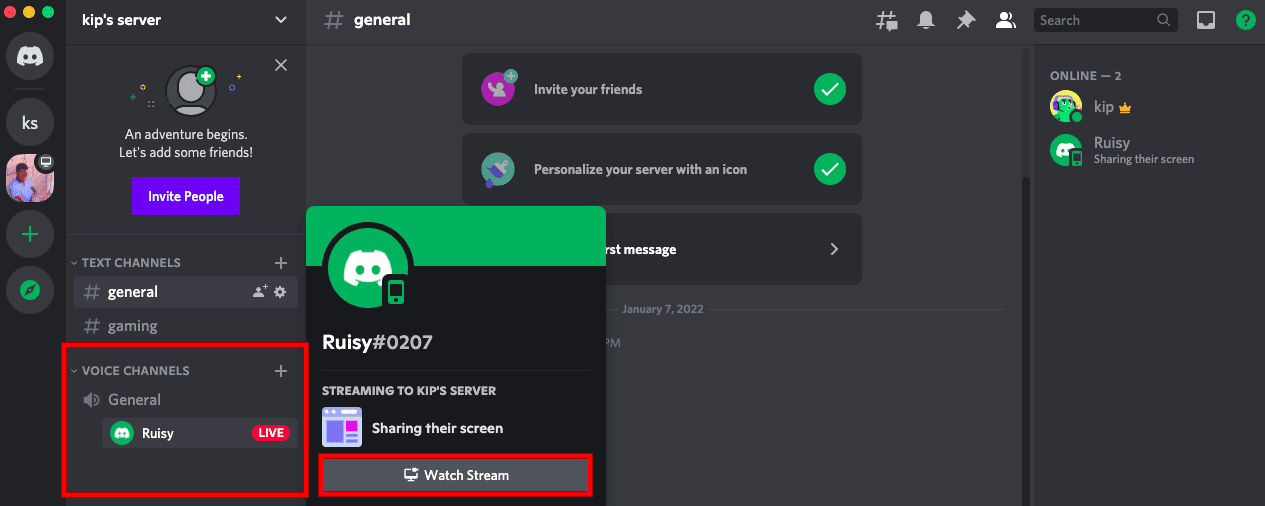
Click on the streamers name and select watch stream
Note: You can also click on the “Watch Screen” option provided in the main Discord “Chat” screen.
Improving the quality of a Discord stream
There are two alternate methods one can use to change the quality of the Discord stream.
Method 1
- Click on the “Screen” button. It mostly appears above your name and avatar on the lower left side of the Discord application.
- Hover your mouse on the “Stream Quality” option and choose a higher frame rate per second and resolution.
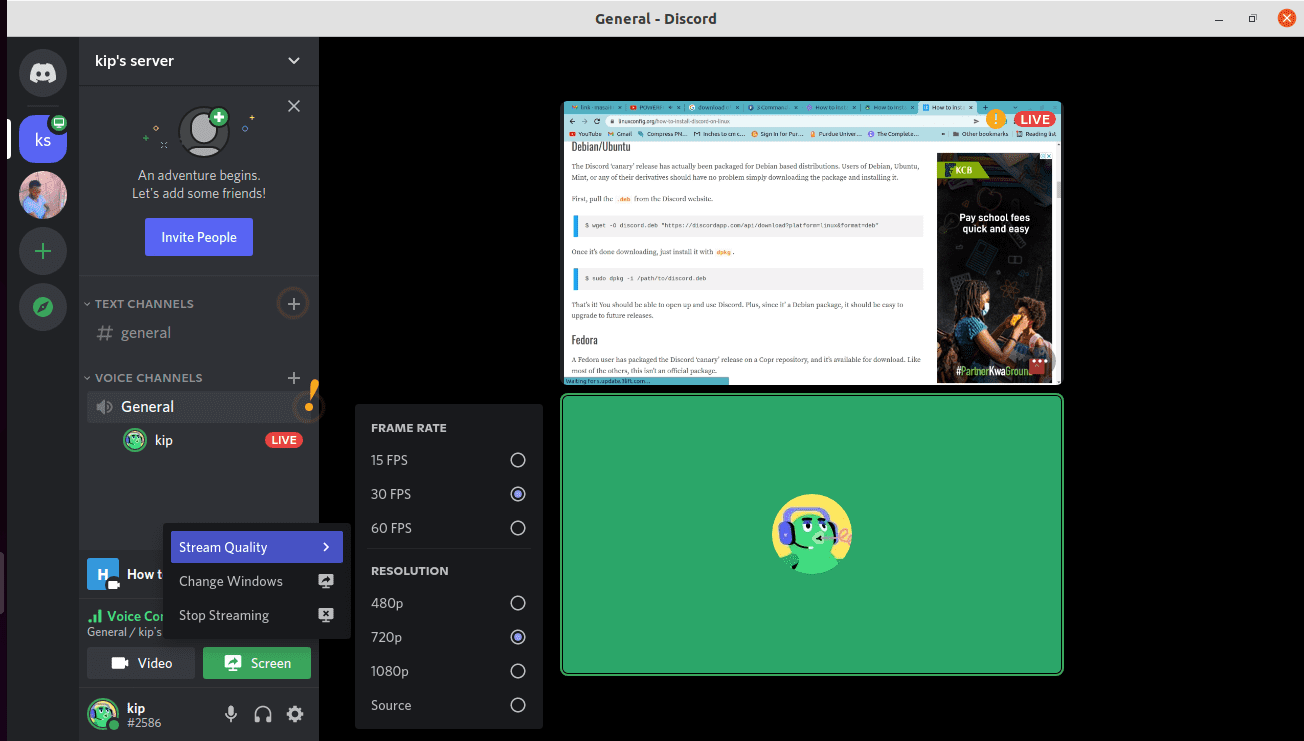
Select the stream quality
Note: As earlier stated, you need to be a Discord Nitro subscriber to choose a higher resolution and frame rate.
Method 2
You can change the quality settings by hovering your mouse over the small windows that appear when streaming just over the Discord chat. Then, click on the Settings option and choose the “Stream Quality” dependent on your preference.
Changing screens on a Discord stream
You can quickly change the windows screen while streaming on your Discord application. First, click on the “Screen” button above your name and avatar. Then, you can quickly change the Windows by clicking on the second option, “Change Windows.” Alternatively, you can also change the screen by hovering your mouse over the small window that appears on the streaming Discord chat. Click on the “Settings” preference and select the “Change Windows” option.
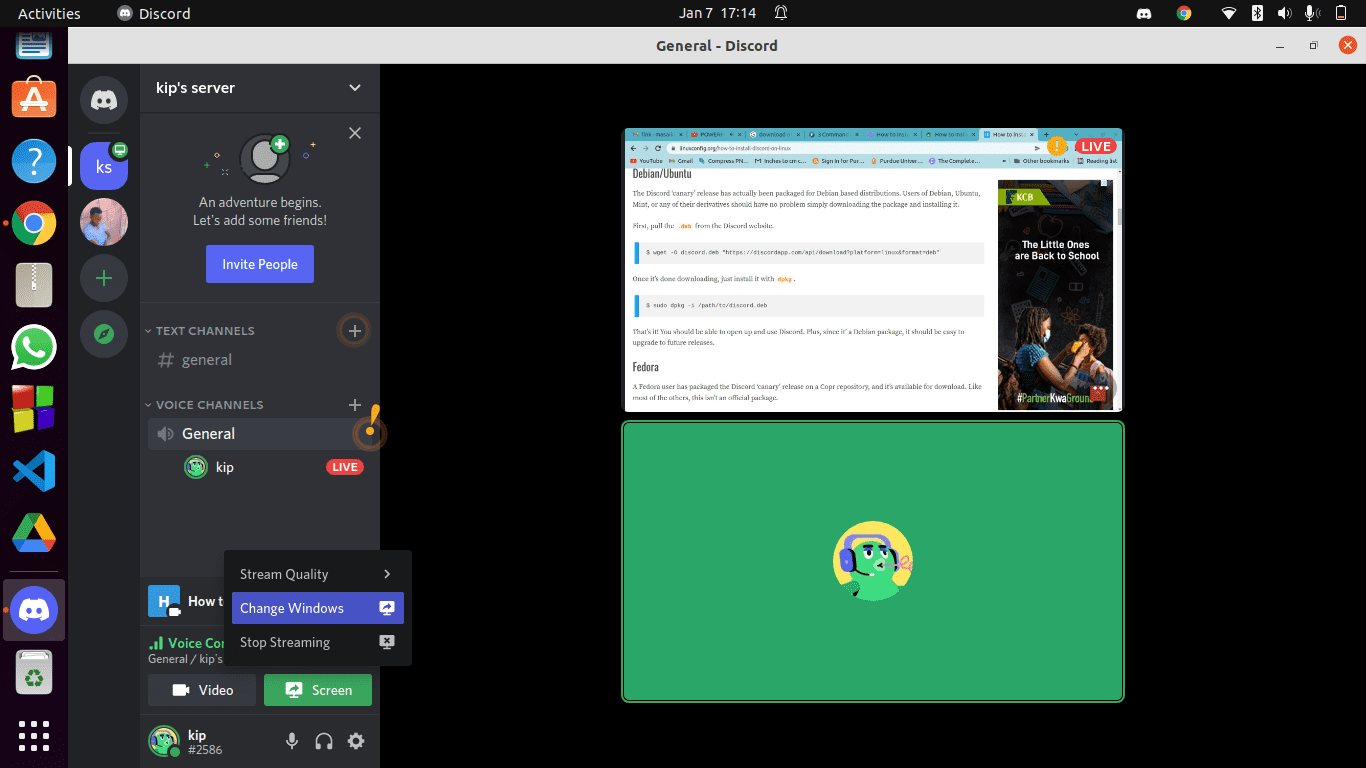
Change screens during the stream
Stopping a Discord stream
To end a Discord stream, you can either click the “X” button on the screen section or click the “Screen” button situated on the lower part of the Discord application. Click “Stop Streaming” to end a stream from the provided options.
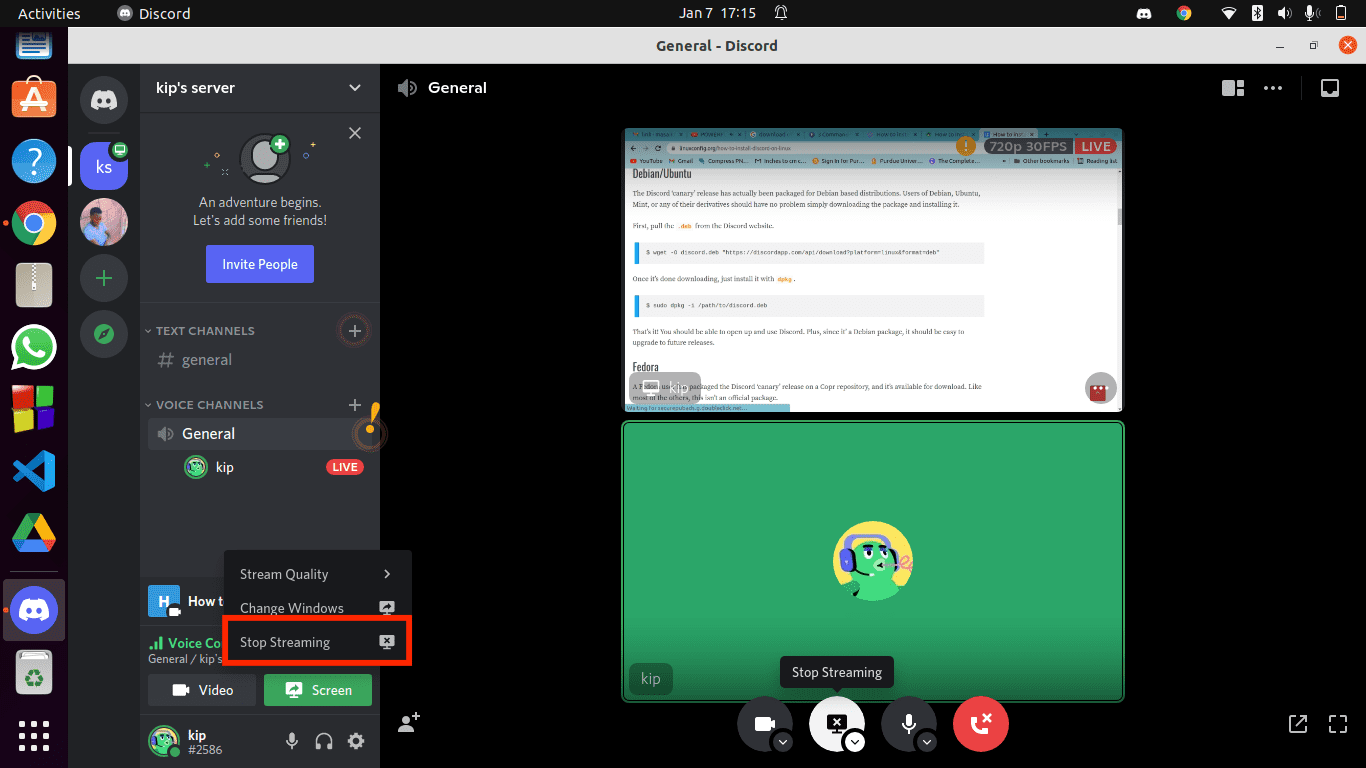
Stop streaming
Additionally, you can stop a stream by hovering your mouse over the Streaming Window on the Discord Chat and clicking on the “X” button to end streaming. Finally, to finish a live video, click on the “Video” button on the lower left side of the Discord application.
FAQ
Despite Discord having a simple GUI, sometimes rookies find it more complicated than stated. Therefore, this FAQ section is aimed at helping you with your stream-related questions.
The game is not showing up. What should I do?
If you are playing a game on your computer and don’t see it on the Discord app, don’t freak out, as there is an easy fix. Navigate to the “Game Activity” section on the Discord application and add the game using the drop-down menu.
What is the highest number of people on a Livestream?
Initially, Discord only allowed a maximum of 10 people to join a live stream. However, that is not the paradigm anymore, as 50 people can now attend a live stream. The number increased from 10 -50 during the 2020 coronavirus outbreak to allow users to enjoy streaming while working/playing from home.
I can’t share my screen while using Discord. Please help?
Generally, Discord does not have permission to record the screen if you encounter such an error. Therefore, what might cause you to fail screen sharing is because of a setting. For mac users fixing this problem is relatively easy. Open the “System Preferences” and activate Discord under the “Privacy & Security” settings—Grant Discord recording permissions by clicking on the “Screen Recording” option.
For PC users, you need to start Discord as an Administrator. To do so, right-click on the “Discord” application and select “Run as Administrator.”
Once Discord has the proper permissions, you can proceed and try sharing your screen.
Conclusion
This article has covered how to install and stream on Discord. All the major platforms have been covered; hence you can refer back if you encounter any challenges. Streaming on Discord is fun, besides being free of charge. Therefore, you can try out Discord streaming any device of your choice at no cost. Remember, you can also refer to the FAQ section to answer some of the questions that other users have already asked.