
Dealing with network and connection difficulties is understandably a time-consuming task. However, this article guide will highlight several straightforward solutions to the difficulty. Stay put into learning more about Wi-Fi connectivity on Linux Mint.
Before venturing into this topic, you should first check your router to ensure it works flawlessly. Below are some essential tips to kickstart your diagnosis journey:
Is your Wi-Fi disabled after installing Linux Mint?
Check if your internet connection has any limitations after installing Mint on your PC. If your PC cannot connect to the internet through Wi-Fi, no methods will assist.
Router Error
A malfunctioning router might also cause issues at times. As a result, confirm that your Wi-Fi adapter is operational. Connect to the internet using a phone or another device to test this and see whether everything works properly. Also, double-check that you’re using the right wireless password.
People sometimes believe that signal strength has a factor. While this is true, it is not a big influence on Mint OS connectivity issues. If your router is not producing adequate signals, it is time to replace it. It will most likely solve the internet problem.
Everything should be updated.
Finally, whether it’s a Windows PC or a Linux computer, internet troubles are usually caused by obsolete hardware and drivers. As a result, ensure that your hardware driver is up to date. Sometimes simply upgrading the device drivers is enough to resolve the problem.
Connecting to Wi-Fi on Linux Mint
Once you’ve covered the fundamentals, it’s time to look at various solutions for Wi-Fi connectivity issues in Mint. Here are a few ideas beginning with the essential prerequisites:
Prerequisites
You need the following prerequisites before delving into this subject matter:
- A working wireless adapter
- Linux Mint OS.
If you have the mentioned prerequisites, proceed and learn to connect Wi-Fi on your Linux Mint OS.
How to set up Wi-Fi on Linux Mint
There are two ways to connect your Linux Mint to Wi-Fi, which are detailed below:
- Using Linux Mint’s command line support
- Using a graphical user interface
Both strategies are briefly described in the following sections.
How to use the command-line interface to connect to Wi-Fi on Linux Mint
The Linux-Mint command-line interface is as feature-rich as any terminal of a Linux-based distribution. To allow Linux-Mint to connect to Wi-Fi, you must run several commands.
Step 1: To begin, it is advised that you trace your wireless network by heading to the directory containing network information. The directory’s location is “/sys/class/net,” and the ls command may be used to display a list of accessible networks.
sudo /sys/class/net
Step 2: Using the netplan software, locate the network configuration file. This will generate a .yaml file in which you may save your wireless network configuration. So, use the command below to see if the file exists in the “/etc/netplan” directory.
ls /etc/netplan
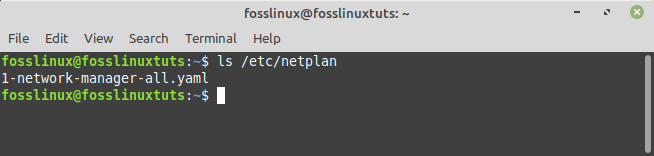
Network configuration file
Note: Netplan is a Linux program for configuring network interfaces. A.yaml file is utilized to add the network interface details in this case.
Step 3: The above operation returns the file “1-network-manager-all.yaml” as its result. Open the “1-network-manager-all.yaml” file in nano (or any other favorite text editor).
The first three lines are already there; after entering the details in the network-manager file, append the following lines and press “Ctrl+S” and “Ctrl+X” to save and leave the file.
It is advised that you keep indentation in mind since you may not be able to connect if suitable indentation requirements are not met.
Wifis:
    Wlp2s0:
        optional: true
          access points:
              "SSID (wireless network name)"
                     Password: "Your Password"
          dhcp4: true
Example
Wifis:
    Wlp2s0:
        optional: true
          access points:
              "fosslinux"
                     Password: "FossLinux@tuts123"
          dhcp4: true
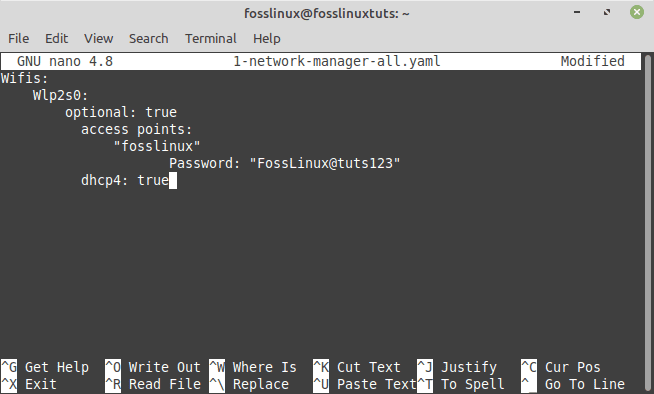
Edit the network config file
Note: the SSID is the wireless network name. Your network name might defer from mine; hence it is important to consider that.
Once you have executed the above commands, you will need to apply the netplan configuration changes by running the line of code below:
sudo netplan --debug apply
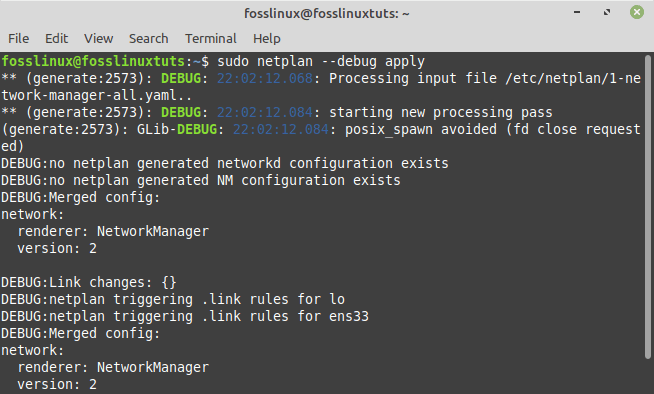
Apply netplan configuration changes
Following the application of the modifications, the connection will be established, and you can use the ip command to verify the status of your wireless network as shown below:
ip a
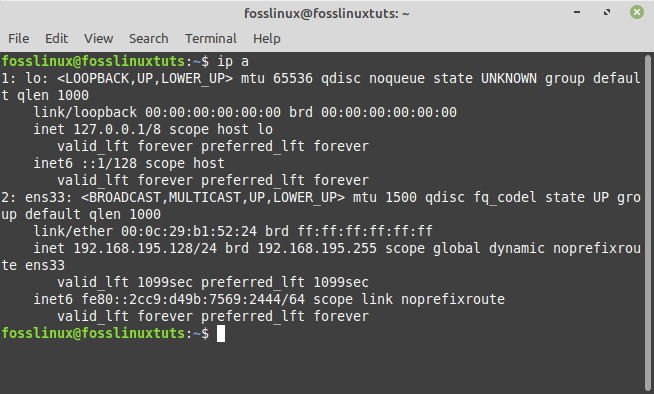
Network status
That’s all. However, if you find this method much demanding, you can proceed and try the GUI method shown below:
How to setup Wi-Fi on Linux Mint using the Graphical User Interface
Assuming you have a functional Wi-Fi device, it is now time to configure the Wi-Fi connection itself. If you have your Linux Mint desktop open and have not yet connected to your Wi-Fi network, you will notice the following symbol on the right side of the desktop panel in what is referred to as the system indicator area. The “two arrows with a little x” indicator indicate that the wireless connection is not yet operational.
Not connected
The Wi-Fi indicator will appear if the wireless connection is operational. This symbol contains four levels that provide information about the quality of your received signal. If you are using a virtualized Linux Mint OS you will have an icon similar to mine since you are using the hosts wireless configuration.

Connected
Assuming it is the first-time using Linux Mint, follow the steps provided herein to connect to our ISP (Internet Service Provider), provided you have a working Wi-Fi adapter.
Step 1: Click the connection symbol to see a list of available Wi-Fi connections.
Step 2: Choose the wireless connection to which you wish to connect, and if it is encrypted, enter its passcode to connect successfully.
The “Connection Established” prompt will show when you connect.
That’s all. You have successfully connected to Wi-Fi on Linux Mint.
How to fix Wi-Fi connectivity issues on Linux Mint?
Probable solutions for Wi-Fi connection issues in Mint. Here are a few ideas:
Remove Network Manager
You can attempt dumping the network manager and running the network utility manager with the wicd alternative. This is how you do it:
Enter ‘sudo apt-get install wicd’ on the command line prompt. The line of code will ask you for your login and password. Then, to confirm the installation hit ‘y’.
The ‘Package Configuration’ wizard will appear next. To get to your username, hit the space bar here. As a result, it will add the wicd to the ‘netdev’ group, which will be able to utilize the ‘wicd’ client.
When the setup is finished, you may receive an error stating that the battery failed to start ‘wicd.’ You can, however, disregard it and continue. Execute’sudo apt-get uninstall network manager’. Enter your password and then hit ‘y’.
When you restart your computer, you should notice a ‘wicd’ icon in the system tray. Open the ‘wicd’ menu and choose ‘Refresh All Networks.’ You ought to connect to the internet after configuring the network settings.
Wi-Fi Driver Updating
As a general guideline, anytime we begin troubleshooting a hardware issue, we should begin by upgrading the device drivers. Even if you’re not using Mint or experiencing issues with your internet and Wi-Fi connections, updating your Wlan drivers is a tried and tested remedy on most systems.
Connect your Linux Mint OS to the internet using a LAN or Ethernet connection.
You may access the ‘Device Manager by clicking on the menu button.’ Selecting ‘Administration’ will take you to the manager.
Following that, you will see a password pop-up window on your screen. Enter your password and click ‘Authenticate.’ After authentication, it will refresh the cache. It may take a while to update.
The ‘driver manager’ will appear when the cache is updated. You may check all of the drivers that are presently installed on your computer; if you find your Wi-Fi drivers on the list, that’s fantastic! But there’s an issue if you don’t.
Depending on your hardware, your PC may have a unique driver
Next, pick ‘Apply Changes’ from the menu next to your driver.
You are now ready to apply the modifications to your computer after making the adjustments. As a result, you must reboot. Restart your computer, and then, after logging in, click on the Network icon at the bottom of the screen. Check to check if your network is operational.
Kernel update for Linux Mint
Another option is to upgrade the Linux Mint Kernel. This method fixes any missing driver difficulties in Linux systems. In Linux, the Kernel is the system’s heart, communicating with all hardware and software components over the Kernel bus.
Copy and paste the following instructions into the Linux Mint command line to upgrade the Kernel.
uname -r

apt update -y && apt upgrade -y

apt dist-upgrade
These steps will upgrade both your system and the Kernel version.
Wi-Fi USB Adapter
If changing network settings and the Kernel does not solve the problem, it is time to test some external devices, such as the USB stick adapter.
Some of these sticks feature an antenna and resemble flash drives. They provide the same functions as a wireless network.
The USB adaptor is really easy to use. It functions similarly to a wireless card in that it may connect your devices to the internet. However, you may need to look for the right kernel bus ID. Furthermore, determining the right bus id for your USB wireless adapter is an easy process.
When looking for the bus id, you may encounter terms like ‘bus id 00 1b,’ ‘bus id 00 02.0,’ and others. These are just addresses that carry information about the connected USB devices.
When you put in the USB adapter, the Kernel looks for the necessary drivers, so you don’t have to do anything.
Once connected, click on the Network Icon on the bottom taskbar. A drop-down menu will display. To enable wireless functionality, please pick the option Wireless Functionality.
You can now see all of your computer’s accessible networks in Network Settings. Select your connection and enter your Wi-Fi password. Finally, select ‘Connect’ to begin establishing a new internet connection.
Furthermore, execute the ‘$ lsusb | WLAN’ command to check driver installation. A USB adapter is the last option for getting your Wi-Fi to function if nothing else works.
Conclusion
Wireless tech is slowly taking over with the rapid change in technological advancements. Therefore, as a result, most people opt to use wireless connections compared to LAN and other olden methods. As a Linux Mint user, we have provided the steps on connecting to Wi-Fi plus additional tips on how to fix errors when your OS fails to connect to the internet wirelessly. We hope you found it helpful. If yes, please leave a remark in the comments section below. Thanks for reading.
1 comment
I think the first command listed “sudo /sys/class/net” should be “cd /sys/class/net”?