
Port forwarding is a network address translation (NAT) mechanism that enables proxy firewalls to forward communication queries from one IP address and port to another. Port forwarding is typically configured on Linux systems using iptables, a program for defining IP packet filter rules.
NAT (Network Address Translation) is a broad name for the process of rerouting packets to a different address. This is often used to permit traffic to cross network boundaries. A NAT-enabled host usually has access to two or more networks and is set up to transport traffic between them.
Transferring requests for a specific port to another host, network, or port is known as port forwarding. Because this procedure adjusts the packet’s destination while in flight, it is classified as a form of NAT operation.
This article will demonstrate how to use iptables to utilize NAT to forward ports to hosts behind a firewall. This is handy if you’ve set up a private network but still want to allow specific traffic into the network via a selected gateway computer.
Using Iptables for Port Forwarding
Enabling port forwarding allows devices or hosts not connected to the internal network to communicate with one another, normally blocked when deactivated. You may use port forwarding to restrict specific websites, improve security, and provide a detour around the NAT firewall as needed.
Routers include a built-in port forwarding feature that allows you to route specific ports to computers or devices on your local network. Most routers are computers intended to transport data from one port to another. Here’s how to use iptables to forward ports to hosts on a Linux computer.
Prerequisites
You will need the following items to follow along with this tutorial:
- Ubuntu OS installed on your computer.
- Two Ubuntu 22.04 systems with private networking activated in the same data center.
- Each computer should have a non-root user account with sudo rights.
The server where you configure your firewall template will act as both a firewall and a router for the private network. The second host will be set up with a web server only accessible via its remote interface for demonstration reasons. You will configure the firewall machine to route requests received on its public user interface to the web server, which will be accessible via its private interface.
Details about the host
Before you begin, you must determine which interfaces and addresses are being utilized by each server.
Locating Your Network Specifics
Begin by locating your network interfaces to obtain information about your systems. Run the following commands to identify the interfaces on your devices and the addresses connected with them:
ip -4 addr show scope global
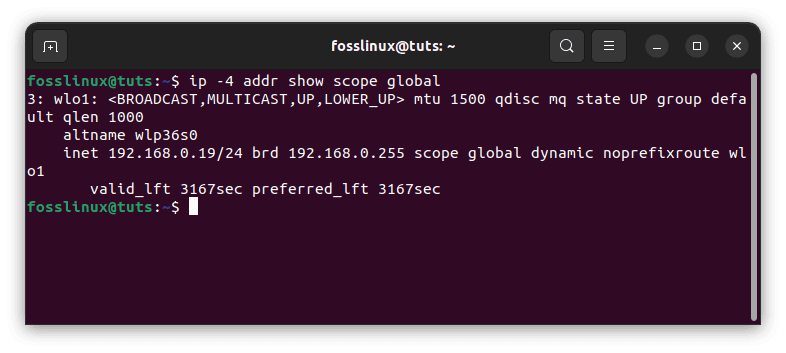
Locate network specifics
The highlighted output displays one interface (wlo1) and its addresses (192.168.0.11 and 192.168.0.19, respectively). Run the following command to determine which of those interfaces is your public interface:
ip route show | grep default
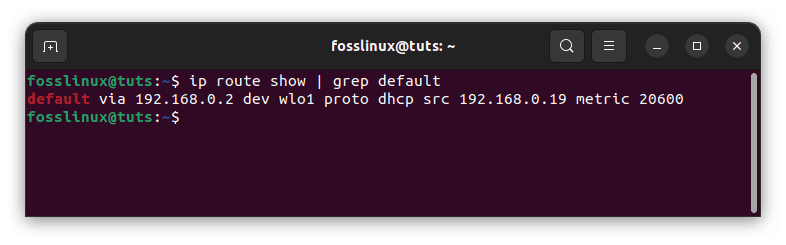
Determine public interface
This output’s interface information (wlo1 in this case) will be the interface linked to your default gateway. Almost sure this is your public interface.
How to determine whether Port Forwarding is enabled in Linux
You may use sysctl to determine whether or not forwarding is enabled. Check if port forwarding is enabled using the following command:
sysctl -a |grep -i wlo1.forwarding
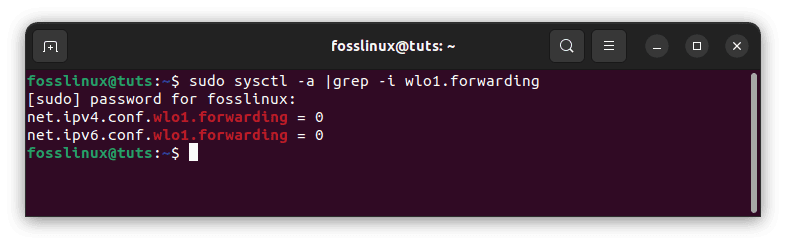
Determine if port forwarding is enabled
Because both values are zero, port forwarding for IPv4 and IPv6 on interface wlo1 is disabled.
You may also use the process filesystem to determine whether or not port forwarding is enabled.
cat /proc/sys/net/ipv4/conf/wlo1/forwarding

cat /proc/sys/net/ipv6/conf/wlo1/forwarding
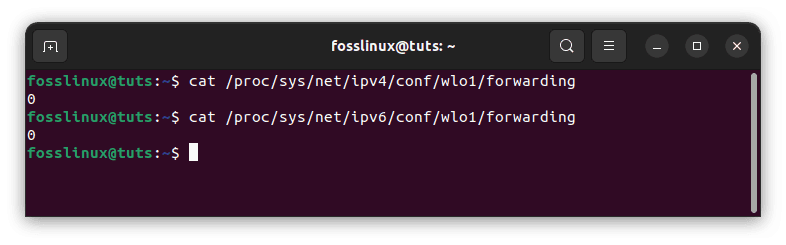
Use process filesystem
Process FS with zero values demonstrates that port forwarding is disabled on our system once more. We must now activate port forwarding on our system before configuring port forwarding rules in iptables. But before we do that, we shall first set up our web server
Configuring the Web Server
Begin by connecting to your web server’s host and logging in as the sudo user.
Install Nginx
The first step is to set up Nginx on your web server host and configure it to listen solely to its private interface. This ensures that your web server will only be accessible if port forwarding is configured correctly.
To begin, update the local package cache:
sudo apt update
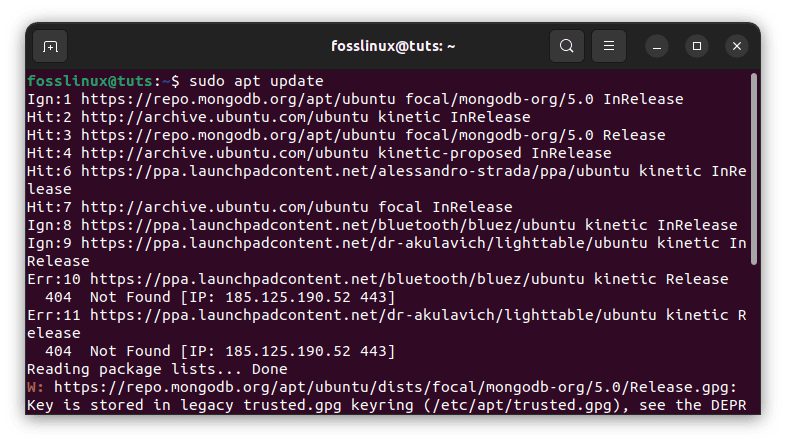
Update system resources
Then, use the apt command to download and install the following software:
sudo apt install nginx
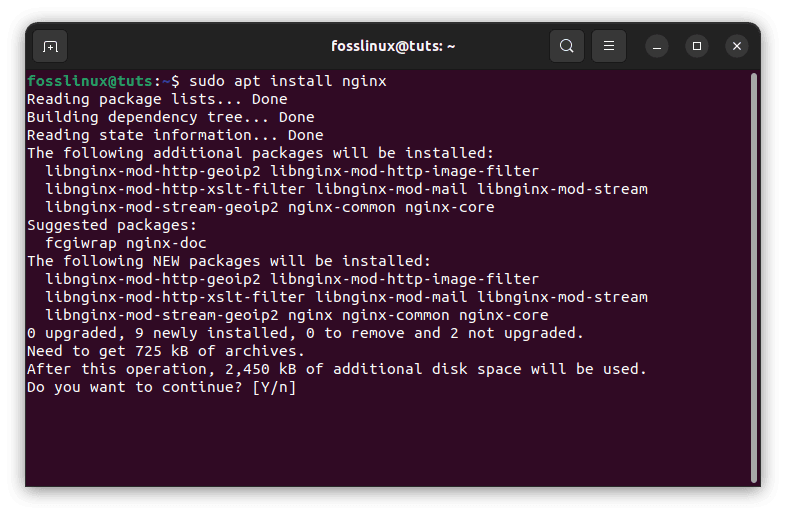
Install nginx
Limiting Nginx to a Private Network
Open the default server block configuration file after installing Nginx to check that it only listens to the private interface. Use your chosen text editor to open the file. We’ll use nano in this case:
sudo nano /etc/nginx/sites-enabled/default
Find the listen directive within. It should appear twice in a row at the top of the configuration:
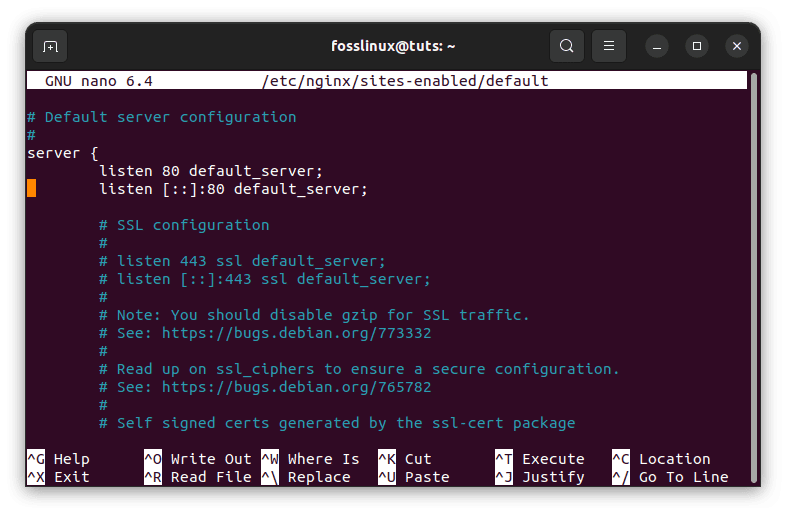
Listen directive appears twice
To instruct Nginx to only listen on the private interface, put your web server’s private IP address and a colon before the 80 in the first listen directive. Because this article only shows IPv4 forwarding, you may omit the second listen command configured for IPv6.
Following that, alter the listening instructions as follows:
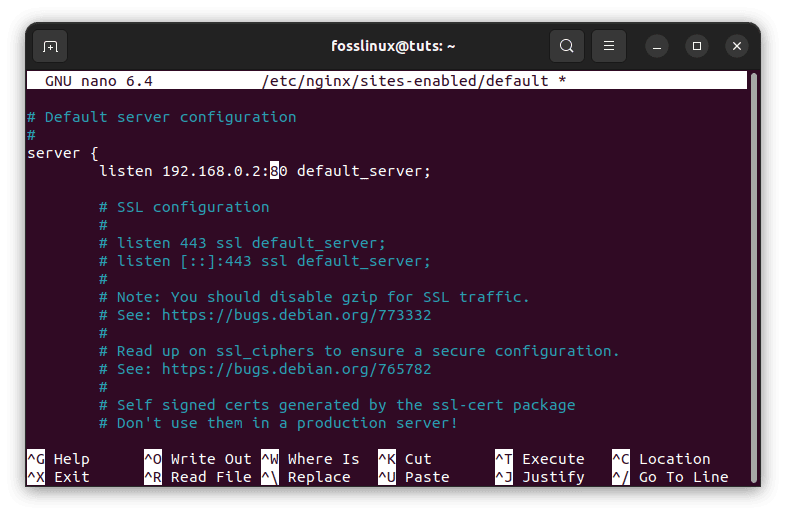
Modify listen directive
When you’re finished, save and shut the file. If you used nano, you could accomplish this by hitting CTRL + X, Y, then ENTER.
Check the file for syntax problems now:
sudo nginx -t
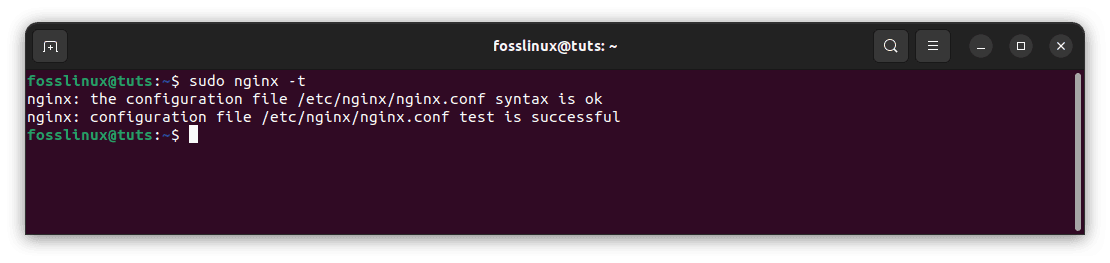
Successful configuration
If the result has no problems, restart Nginx to activate the new configuration:
sudo systemctl restart nginx

Restart nginx
Checking the Network Restrictions
It’s a good idea to check the degree of access to your web server at this stage.
Try the following command from your firewall server to visit your web server using the private interface:
curl --connect-timeout 5 192.168.0.19
Output:
<!DOCTYPE html>
<html>
<head>
<title>Welcome to nginx!</title>
<style>
html { color-scheme: light dark; }
body { width: 35em; margin: 0 auto;
font-family: Tahoma, Verdana, Arial, sans-serif; }
</style>
</head>
<body>
<h1>Welcome to nginx!</h1>
<p>If you see this page, the nginx web server is successfully installed and
working. Further configuration is required.</p>

<p>For online documentation and support please refer to
<a href="http://nginx.org/">nginx.org</a>.<br/>
Commercial support is available at
<a href="http://nginx.com/">nginx.com</a>.</p>

<p><em>Thank you for using nginx.</em></p>
</body>
</html>
If your output is successful, it will display the following message:
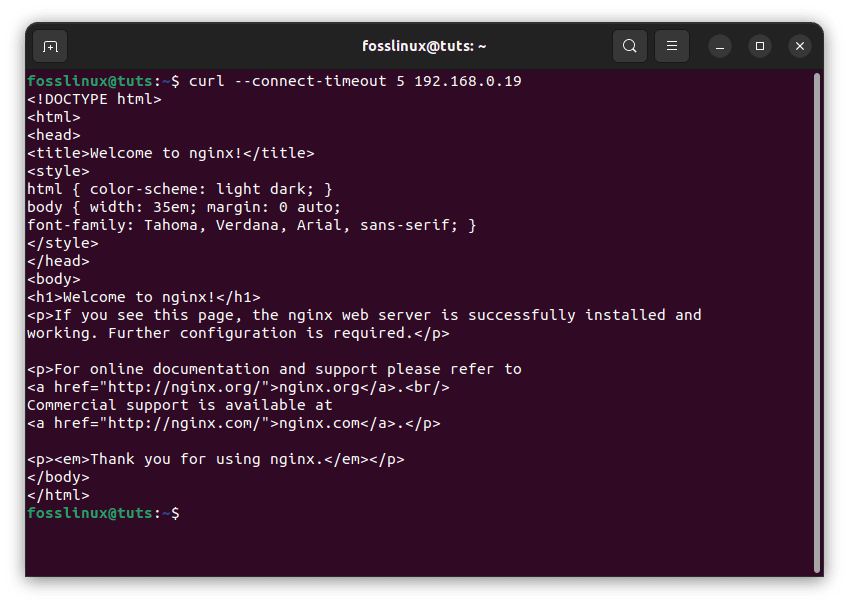
Verify the level of access to your server
If you attempt to utilize the public interface, you will receive the following message:
curl --connect-timeout 5 192.168.0.11
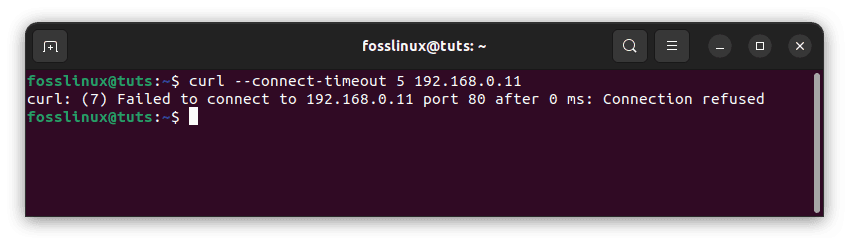
Connection rejected
iptables NAT
The iptables system includes a NAT (Network Address Translation) table. This enables the modification and translation of packets entering and exiting the Linux system. Masquerading packets can be used if the incoming source is on a completely different network (WAN to LAN and vice versa). Not only that, but you may also forward packets to specific system ports or even the whole network.
Destination NAT
A Destination NAT is used to do port forwarding on iptables. This will instruct arriving packets to route through a new port or address based on specified circumstances. This will prompt us to use the NAT PREROUTING chain in iptables. This chain handles packets entering the system before routing via the remainder of our firewall.
For example, we could wish to forward incoming SSH queries to another machine on our network rather than this one. We may just accomplish it as follows:
iptables -t nat -A PREROUTING -p tcp --dport 22 -j DNAT --to-destination myip:22
SSH queries on port 22 will now be routed to myip:22. This is typically used to designate Linux computers as routers or when running a type 2 hypervisor (VM host with guests inside).
Another clever approach is to forward all incoming port 80 queries to a squid server:
iptables -t nat -A PREROUTING -p tcp --dport 80 -j DNAT --to-destination squidserverIPAddress:3128
Again, if your Linux computer is operating as a router and you intend to route all HTTP traffic through a squid server, this will work best.
Perhaps you have an FTP server operating on your VM and wish to redirect a range of ports for passive connections:
iptables -t nat -A PREROUTING -p tcp --dport 2020:2030 -j DNAT --to-destination IPADDR
By inserting a colon between 2020 and 2030, we instruct iptables to route ports between those ranges to the target IP address. There is no need to provide a port for the DNAT this time because the condition uses a range, and the destination server will recognize the port for every incoming packet.
Setting up the iptables firewall to forward Port 80
You will now concentrate on configuring port forwarding on your firewall system.
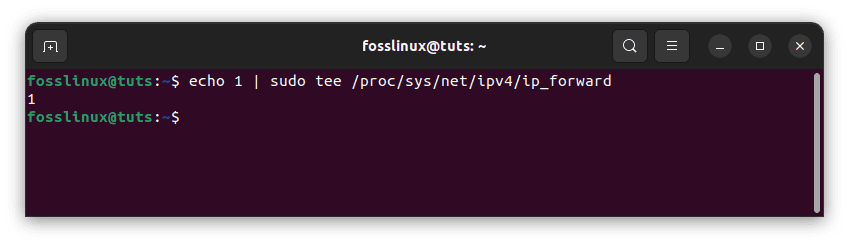
Activating Kernel Forwarding
The first step is to activate traffic redirection at the kernel level. Most platforms have forwarding disabled by default.
To enable port forwarding for this session only, use the following commands:
echo 1 | sudo tee /proc/sys/net/ipv4/ip_forward
Enable port forwarding
To permanently enable port forwarding, modify the /etc/sysctl.conf file. This may be accomplished by launching the file with sudo privileges:
sudo nano /etc/sysctl.conf
Locate and uncomment the following line within the file:
net.ipv4.ip_forward=1
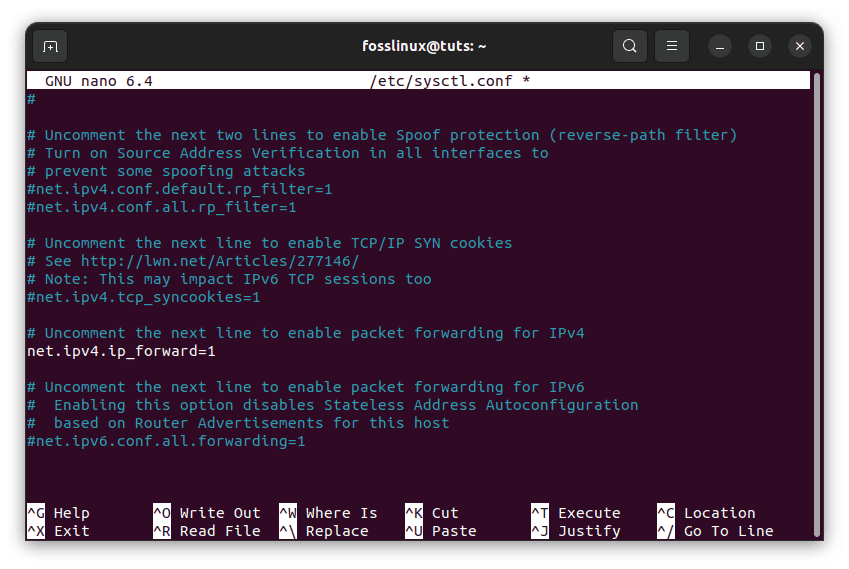
Uncomment Line
When you have completed it, save and close the file.
Then, apply the adjustments from this file. To do so, execute the following command:
sudo sysctl -p
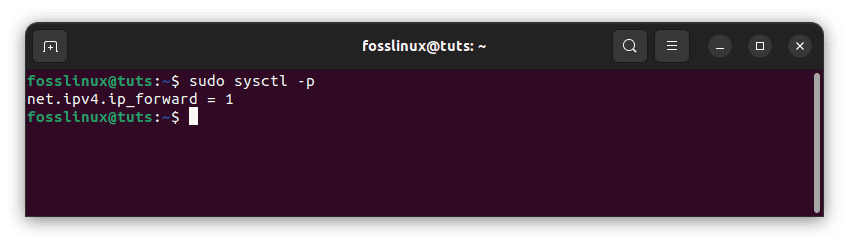
Apply configurations
Then execute the same command, but this time change the -p parameter with –system:
sudo sysctl --system
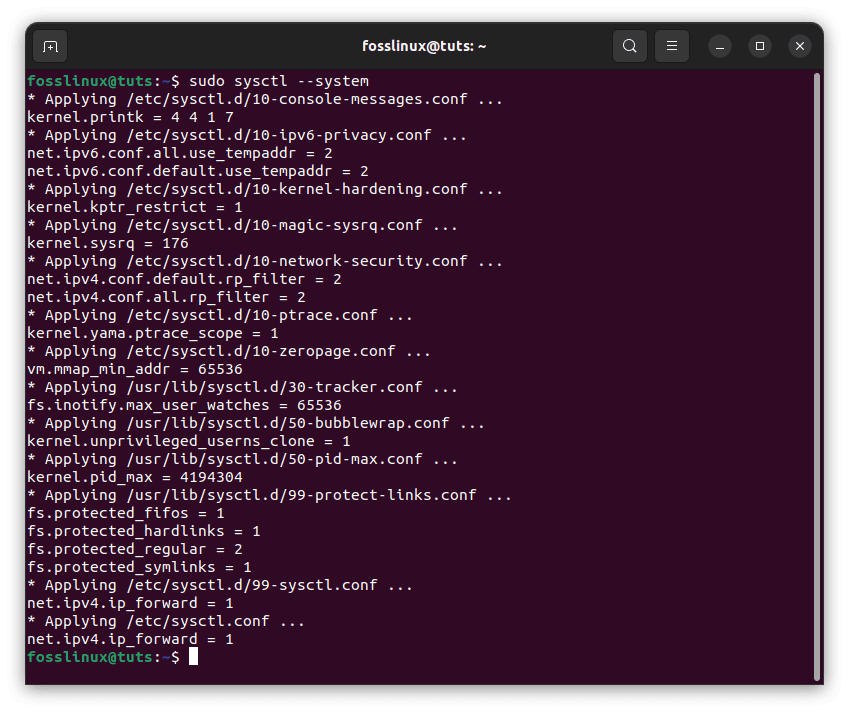
Execute –system command
Appending Forwarding Rules to the Basic Firewall
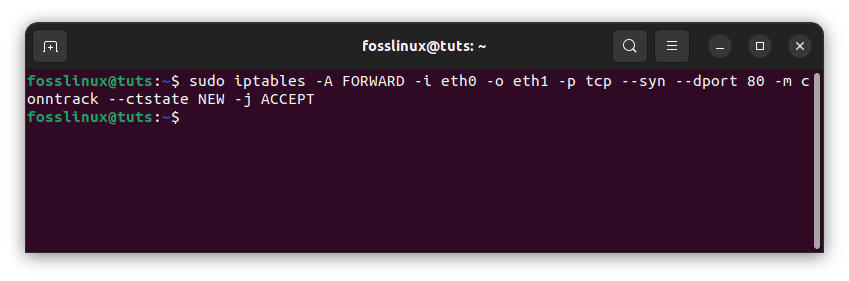
We’ll set up our firewall such that traffic entering our public interface (eth0) on port 80 is routed to our private interface ( eth1). Our basic firewall’s FORWARD chain is set to DROP traffic by default. We can enable forward traffic to our web server by adding firewall rules. We will lock the firewall rules that allow forward requests to increase security.
We will permit new connections for port 80 originating from our public interface and traveling to our private interface in the FORWARD chain. We’ll use the conntrack extension to identify the new connections and represent them with a TCP SYN packet:
sudo iptables -A FORWARD -i eth0 -o eth1 -p tcp --syn --dport 80 -m conntrack --ctstate NEW -j ACCEPT
Identify new connections
You must accept any additional traffic generated by the incoming connection in both directions. To allow ESTABLISHED and RELATED communications between our public and private interfaces, enter the following commands:
sudo iptables -A FORWARD -i eth0 -o eth1 -m conntrack --ctstate ESTABLISHED,RELATED -j ACCEPT
sudo iptables -A FORWARD -i eth1 -o eth0 -m conntrack --ctstate ESTABLISHED,RELATED -j ACCEPT

Accept additional traffic
Let’s see if our FORWARD chain policy is set to DROP:
sudo iptables -P FORWARD DROP
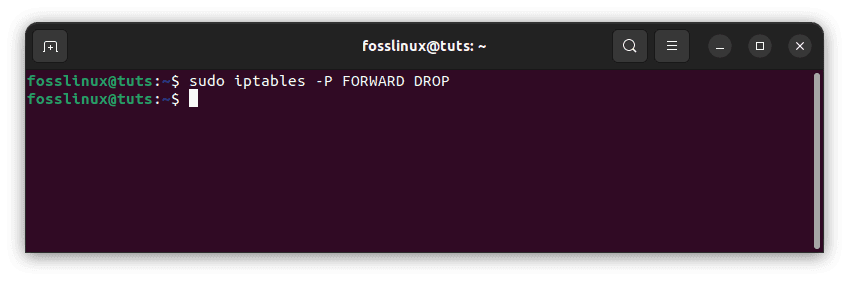
Set forward chain policy to DROP
You’ve now permitted traffic between your private and public interfaces to pass past your firewall. You haven’t defined the rules that will inform iptables how to interpret and direct the traffic. The NAT rules will be added, and the permanent rule set will be adjusted to direct traffic in the following phases.
How to correctly add NAT Rules to Direct Packets
Next, you will append the rules to instruct iptables on how to route your traffic. You must complete two different activities to allow clients to connect with the web server.
The initial operation, known as DNAT, will take place in the nat table’s PREROUTING chain. DNAT is an operation that modifies a packet’s destination address to allow it to route appropriately while it travels between networks. Users on the public network will connect to your firewall server and do not know the topology of your private network. As a result, you must modify the destination address of every packet so that it may reach your web server appropriately when transmitted over your private network.
Because you’re merely enabling port forwarding and not doing NAT on every packet that passes through your firewall, your rule should match port 80. You will match packets destined for port 80 to your web server’s private IP address (192.168.0.19 in the example below):
sudo iptables -t nat -A PREROUTING -i eth0 -p tcp --dport 80 -j DNAT --to-destination 192.168.0.19
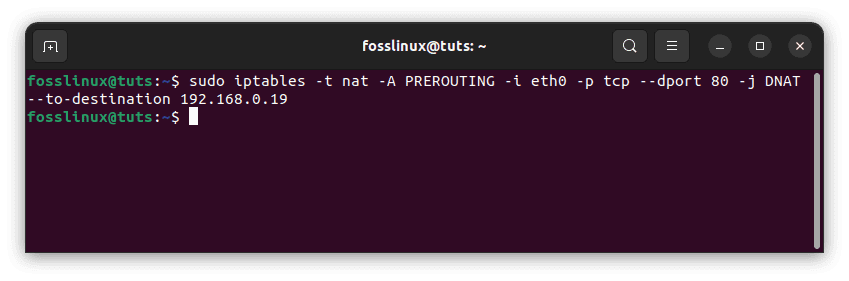
Add NAT rules to direct packets
This procedure takes care of 50% of the problem. The packet should be appropriately forwarded to your web server. However, the packet will still retain the client’s original address as the source address for the time being. The server will try to send the response directly to that address, making a normal TCP connection challenging to establish.
To establish correct routing, you must change the packet’s source address once it exits the firewall en route to the web server. You must change the source address to the private IP address of your firewall server (192.168.0.11 in the following example). The response is subsequently returned to the firewall, which may then relay it to the client as planned.
To enable this capability, add a rule to the nat table’s POSTROUTING chain, assessed just before packets are sent onto the network. You will match packets bound for your web server based on their IP address and port:
sudo iptables -t nat -A POSTROUTING -o eth1 -p tcp --dport 80 -d 192.168.0.19 -j SNAT --to-source 192.168.0.11
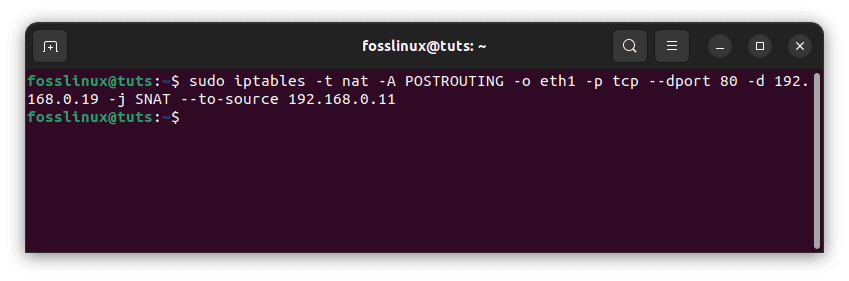
Append rule to a post-routing chain
Once this rule is set, you should be able to access your web server by directing your web browser to the public address of your firewall machine:
curl 192.168.0.11
Output:
<!DOCTYPE html>
<html>
<head>
<title>Welcome to nginx!</title>
<style>
html { color-scheme: light dark; }
body { width: 35em; margin: 0 auto;
font-family: Tahoma, Verdana, Arial, sans-serif; }
</style>
</head>
<body>
<h1>Welcome to nginx!</h1>
<p>If you see this page, the nginx web server is successfully installed and
working. Further configuration is required.</p>

<p>For online documentation and support please refer to
<a href="http://nginx.org/">nginx.org</a>.<br/>
Commercial support is available at
<a href="http://nginx.com/">nginx.com</a>.</p>

<p><em>Thank you for using nginx.</em></p>
</body>
</html>
Your port forwarding configuration is now complete.
Making Changes to the Permanent Rule Set
Now that you’ve configured port forwarding, you may add it to your permanent rule set.
If you don’t mind deleting your current rule set’s comments, use the netfilter-persistent instruction to utilize the iptables service and store your rules:
sudo service netfilter-persistent save
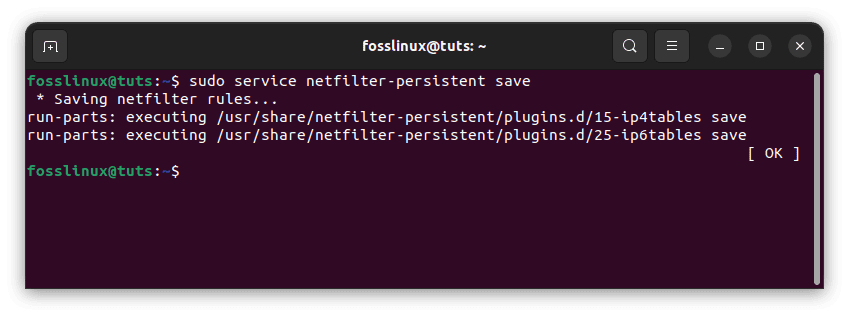
Save netfilter rules
Load the rule set if no mistakes are detected:
sudo service netfilter-persistent reload
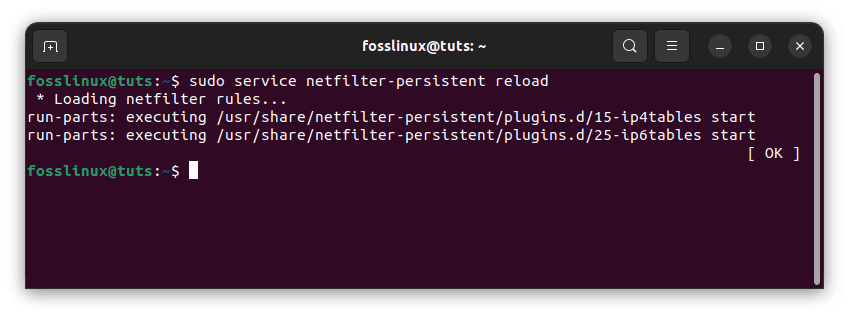
Load rule set
Check that your web server is still reachable through the public IP address of your firewall:
curl 192.168.0.11
This should operate just like it did previously.
Conclusion
You should now feel comfortable forwarding ports on a Linux server using iptables. The procedure entails enabling forwarding at the kernel level, configuring access to permit forwarding traffic from the particular port between two firewall system interfaces, and configuring the NAT rules to ensure that the packets are routed appropriately. This may appear a cumbersome procedure, but it highlights the adaptability of the netfilter packet filtering architecture and the iptables firewall. Besides, it may be used to hide the topology of your private network while allowing service traffic to pass freely via your gateway firewall machine. I hope you can forward ports to a Linux server using iptables. Thanks for reading.