Ah, Ubuntu, one of my personal favorites when it comes to Linux distributions! It strikes a fine balance between user-friendliness and power, making it an ideal choice for both newcomers and experienced users. I remember my excitement when Ubuntu 22.04 was released, eager to experience the new features and improvements.
Today, we’ll delve into one crucial topic – ensuring your Ubuntu 22.04 system remains updated automatically. Like keeping your room tidy, regular updates help in keeping the system clean, secure, and running efficiently. To fully understand the topic of automatic updates, I highly recommend reading through the entire article as I have included several other crucial aspects.
Why are updates so important?
Before we delve into the mechanics, let’s understand the “why.” Software updates usually provide:
- Security patches: As someone who values privacy and security, this is, without a doubt, my top reason. No software is entirely immune to vulnerabilities. Regular updates ensure that these vulnerabilities are patched.
- Bug fixes: While I admire the hard work that goes into developing an operating system, it’s an undeniable truth that no software is perfect. Updates tend to fix any known issues or bugs that users might face.
- Performance improvements: Everyone loves a faster, smoother system, right? Updates often come with performance optimizations.
- New features: And who doesn’t like new shiny things? With updates, you get to enjoy the latest features and improvements in software and applications.
Getting started with automatic updates on Ubuntu 22.04
1. Updating your system
First things first, it’s a good idea to ensure your system is up to date:
- Open a terminal. I usually use the shortcut Ctrl + Alt + T.
- Enter
sudo apt updateto fetch the latest package information. - Follow that with
sudo apt upgradeto upgrade existing packages.
Ah, the satisfaction of seeing those packages being updated! It’s like spring cleaning for your OS.
2. Installing the unattended-upgrades package
This is the magic behind the automatic updates on Ubuntu.
- In the terminal, type
sudo apt install unattended-upgrades.
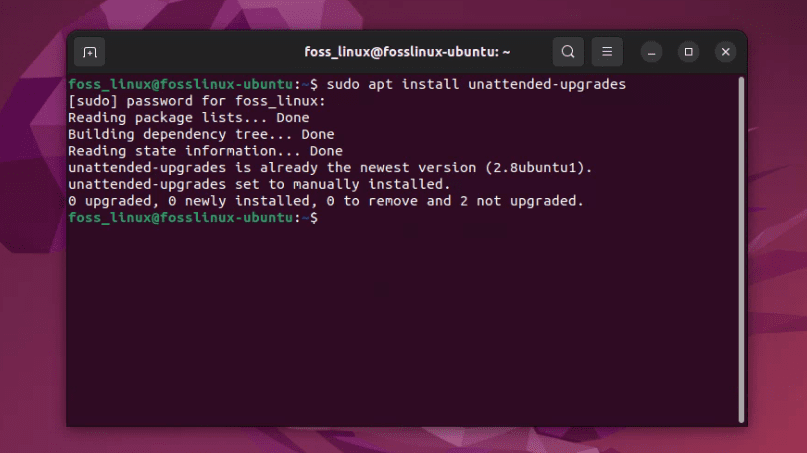
Installing unattended-upgrades on Ubuntu 22.04
Pro tip: If you selected the option to install third-party software during Ubuntu installation, you may already have the unattended-upgrades package installed, as shown in the screenshot above. In this case, your terminal will inform you that the package is up to date.
3. Configuring unattended-upgrades
Now that we have the package, it’s time to set it up:
- To configure automatic updates, type
sudo dpkg-reconfigure unattended-upgrades.
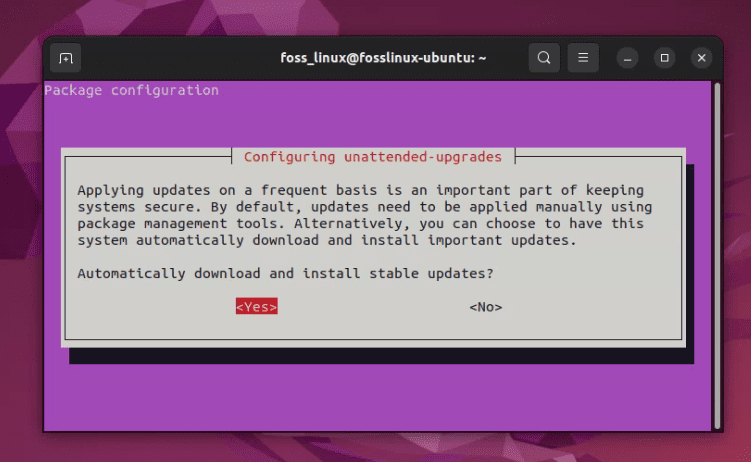
Configuring unattended upgrades on Ubuntu
You’ll be presented with a dialogue asking if you want to automatically download and install stable updates. Choose “Yes” here. You should be done here, but for finer control, you may want to edit the configuration file.
Editing the configuration for automatic security updates only
- Open the configuration file
You can use Nano or any other editor of your choice. For this guide, let’s stick with Nano:
sudo nano /etc/apt/apt.conf.d/50unattended-upgrades
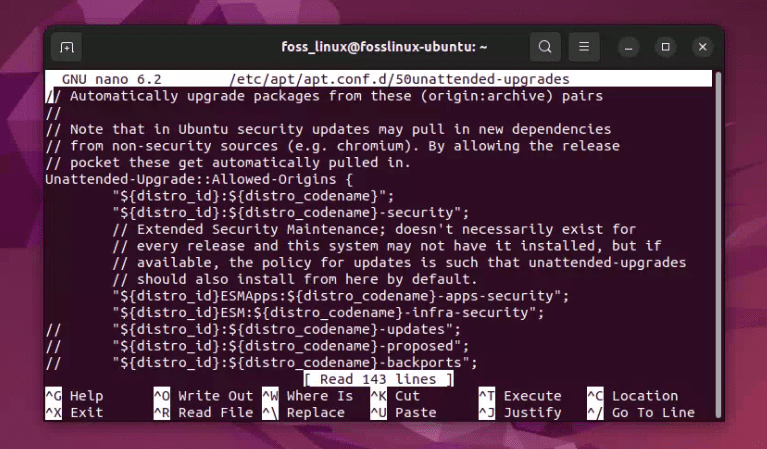
Editing unattended upgrades configuration file
- Locate the update types section
You will come across a section that looks something like this:
Unattended-Upgrade::Allowed-Origins {
        "${distro_id}:${distro_codename}";
        "${distro_id}:${distro_codename}-security";
        // "${distro_id}:${distro_codename}-updates";
        // "${distro_id}:${distro_codename}-proposed";
        // "${distro_id}:${distro_codename}-backports";
};
The lines with // at the beginning are commented out, meaning they won’t be considered.
- Modify the section
To ensure only security updates are installed automatically:
- Make sure the line
"${distro_id}:${distro_codename}-security";is uncommented (it should not have//at the beginning). - Comment out (add
//at the beginning) any other lines related to updates like-updates,-proposed, or-backportsto prevent them from being automatically installed.
After editing, the section should look something like:
Unattended-Upgrade::Allowed-Origins {
        // "${distro_id}:${distro_codename}";
        "${distro_id}:${distro_codename}-security";
        // "${distro_id}:${distro_codename}-updates";
        // "${distro_id}:${distro_codename}-proposed";
        // "${distro_id}:${distro_codename}-backports";
};
- Save and close
If you are using Nano, press Ctrl + O to write the changes and then Ctrl + X to exit.
Pro tip: Be cautious while editing configuration files. Always ensure that the syntax is correct. One wrong character can sometimes lead to unexpected behaviors.
There you go! By making the above modifications, you’ve set your Ubuntu 22.04 system to only automatically install security updates, ensuring that your system gets the essential patches without potentially introducing instability from other types of updates.
Similarly, you can specify which updates you want (security, updates, backports, etc.), blacklists for packages you don’t want to be updated automatically, and more.
4. Setting up auto-cleanup
One of the things I’m not too fond of? Redundancy. And with time, older kernel versions might pile up. Let’s ensure they’re cleaned up:
- Add a line
Unattended-Upgrade::Remove-Unused-Kernel-Packages "true";to the configuration file mentioned above. This will remove older kernel versions, keeping your system neat.
5. Checking the status of automatic updates
For those of us who like reassurance:
- You can check the logs with
cat /var/log/unattended-upgrades/unattended-upgrades.log. This log file will show you all the automatic updates that have taken place.
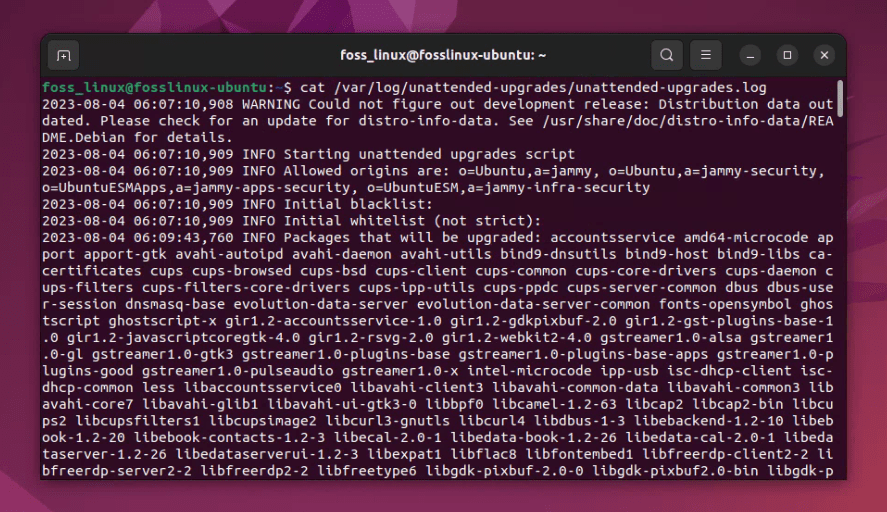
Checking status of automatic updates
Will this also automatically update the Ubuntu version?
A critical question, and I’m glad you brought it up. When we talk about updates in Ubuntu, it’s important to distinguish between two main types:
- Regular package updates: These are updates to the software you have installed on your current version of Ubuntu. This includes security patches, bug fixes, and sometimes, feature additions. The unattended-upgrades package primarily deals with these types of updates.
- Distribution upgrades (or release upgrades): These are upgrades from one major version of Ubuntu to another, e.g., moving from Ubuntu 22.04 to 22.10.
Now, to address the core of the question: No, enabling automatic updates via unattended-upgrades will not automatically upgrade to a new version of Ubuntu. These distribution upgrades are significant, often involving substantial changes, and are something that users typically want to manage manually to ensure they have control over the process and timing.
If you want to check for a distribution upgrade manually:
- Ensure that your system is updated:
sudo apt update
sudo apt upgrade
- You can then use the following command to initiate a version upgrade:
sudo do-release-upgrade
Reverting to manual updating
There are times when you might want to go old-school, preferring the hands-on approach of manual updates over automation. Perhaps you’ve had a bad experience with an automatic update, or maybe you enjoy having the utmost control over what gets updated and when. Whatever the reason, switching back to manual updates is straightforward.
Here’s a step-by-step guide to revert to manual updating on Ubuntu 22.04:
Disabling the unattended-upgrades
First, you want to ensure that the unattended-upgrades service isn’t active and won’t run on its own.
- To do this, you can simply remove the package:
sudo apt remove --purge unattended-upgrades
This command will remove the package and also purge its configuration files.
Recheck APT’s configuration
After disabling unattended-upgrades, it’s a good idea to inspect APT’s periodic configurations:
- Open the periodic configuration file:
sudo nano /etc/apt/apt.conf.d/10periodic
- Ensure the content looks like this:
APT::Periodic::Update-Package-Lists "1";
APT::Periodic::Download-Upgradeable-Packages "0";
APT::Periodic::AutocleanInterval "0";
The key point here is that
Download-Upgradeable-Packagesis set to “0”, which means it won’t automatically download packages. If you’ve made any changes, save the file and exit.
Pro tip: Even if you prefer manual updates, it’s crucial to frequently check for updates. Keeping your system updated will ensure you benefit from the latest security patches and software enhancements.
Pro tips
- Backup: Always, always back up your important data before making changes, especially when automating processes. I’ve had my share of “Oh, why didn’t I back that up?” moments, and trust me, it’s not fun.
- Fine-tuning: While automatic updates are incredibly handy, I recommend reviewing the settings every once in a while. Software environments evolve, and your preferences might change too.
- Manual checks: Even with automatic updates turned on, it wouldn’t hurt to manually check for updates occasionally. Just for that added assurance.
- Monitor system space: Ensure you have enough disk space. Automatic updates will fail if you run out of space. I learned this the hard way during my early days with Linux.
Conclusion
There you have it – a comprehensive guide to enabling and disabling automatic updates on Ubuntu 22.04. It not only ensures that you have the latest features but also that your system is secure and efficient. While I am all for automation, I also value manual oversight. Therefore, keep an eye on how your system behaves, occasionally review the settings, and revert to manual if you wanted to keep it that way for some reason.

