
Linux Mint is the most common desktop Linux distribution usually used as the best alternative to Windows and macOS. It is a modern, comfortable and elegant Operating System that is both powerful and easy to use. Some of the reasons that make it a successful operating system include:
- It is both free and open-source
- It is safe and reliable due to its conservative approach to its updates. However, it also has a robust Linux architecture that requires little to no maintenance, making it not dependable on the use of antivirus.
- It is based on Ubuntu and Debian and hence comes with more than 30,000 packages and the best software manager.
- Capable of working out of the box with the full capabilities of full multimedia support, making it easy to use
Linux Mint 1.0, which is ‘Ada’ based on Kubuntu 6.06, was released in August 2006 and later switched to Linux Mint 2.0, Ubuntu-based released in November 2006.
How to download Linux Mint
Linux Mint is available in three versions; the Cinnamon edition, the Xfce edition, and the Mate edition. The Cinnamon version is beautiful and so sleek. It is also equipped with new features that are primarily developed for the Linux mint version specifically. It can be downloaded from this link and requires at least 2.0GB of system storage.
The Xfce edition is designed with a lightweight desktop environment and is highly stable on light usages. It can be downloaded on this link and requires at least 1.9GB of storage on your PC. The Mate edition has a classic desktop environment and continues GNOME-2, which has forever been the default desktop for Linux mint since 2006- 2011.
The Mate edition runs faster while using the minimum resources possible and is more stable than the Cinnamon edition. It can be downloaded from this link and requires at least 2GB of storage.
Creating a Linux Mint Live USB drive
Various tools can be used in creating live bootable drives, such as Rufus, Unetbootin, gBurner, and Etcher. This article will, however, focuses on using the Etcher app. Etcher; is an open-source software developed by Balena with Apache License 2.0. It is available on almost all cross-sharing platforms. It is used to write images such as ISO files and images. What the software does is that it enables a user to create a bootable Live USB drive.
This open-source software is available and even more suitable for individuals with little to no knowledge of technological advancements. It fully supports the Mac OS, Windows, and Linux and can perfectly adhere to all the complexities of writing ISO images onto USB drives.
Etcher is developed with an ‘electro framework’ design which makes it super fast, thereby making it reliable in creating a Live USB drive. With its high speeds, one could use this software to write the Linux Mint OS ISO file onto it. It also has a command-line and graphical user interface, making it available and helpful to almost everyone. The advantage of using this software is that it automatically detects USB, is very fast, simple, and advanced, and supports NTFS/UEFI and GPT/UEFI.
To burn the ISO file on the Live USB drive, first, you need to make sure that you have the following prerequisites:
- USB Flash Drive
- Linux Mint OS ISO
- Etcher application
Since we will use Etcher in this tutorial, make sure you have it or click here to download it. After downloading, install it onto your operating system. Next, locate your newly installed Etcher app and launch it by double-clicking on it.
Note: in this article, we shall do the process on two fronts:
- Creating Live Mint OS live USB drive on Windows
- Making Linux Mint OS live USB drive on Linux
Creating Linux Mint Live USB drive on Linux
Downloading and Installing Etcher on Linux
To download and install the Etcher application on Linux, We shall use two methods:
- Using the Terminal
- Using the AppImage
1. Installing Etcher on Linux Using the Terminal
If you are a fan of the terminal, this method should suit you as we will download and install the etcher application using the terminal.
Step 1: Adding the Debian Repo for Etcher
The first process is to add the Etcher’s repo to the list of repos that will enable Ubuntu to retrieve the application files. Launch the terminal using the shortcut “CTRL+ALT+T” and paste the following command:
echo "deb https://deb.etcher.io stable etcher" | sudo tee /etc/apt/sources.list.d/balena-etcher.list
You will receive an output similar to the one shown below:
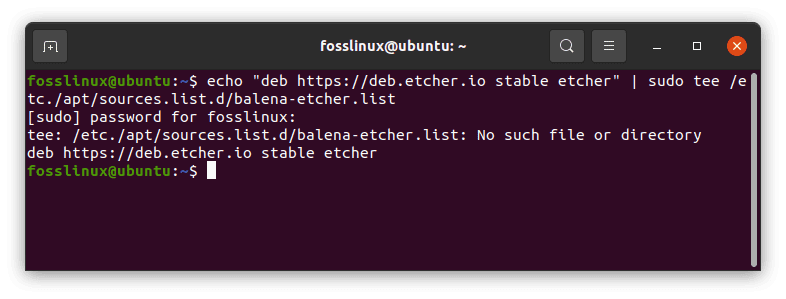
add Debian repo to Etcher
Step 2: Adding the Repo Key for package source authentication
Using the apt-key, we shall add the repo key to Etcher’s repo. to do so, copy and paste the following command-line to your terminal:
sudo apt-key adv --keyserver hkps://keyserver.ubuntu.com:443 --recv-keys 379CE192D401AB61
Output:
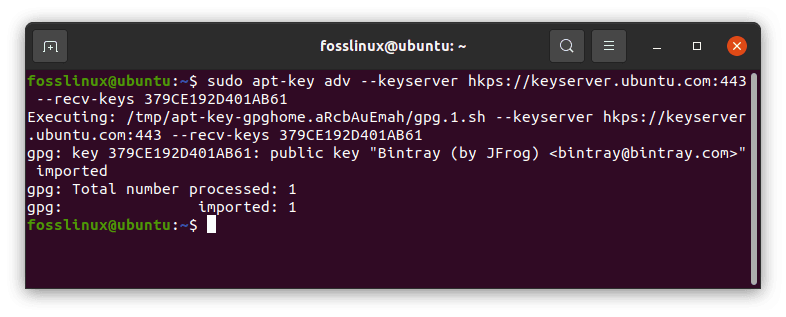
Adding the Repo Key for package source authentication
Step 3: Installing the Etcher application
Once you have completed steps 1 and 2 above, proceed to the next step, which is installing the etcher application
first, you must update your system packages then proceed to install the Etcher application package using the command line below:
sudo apt update
sudo apt install balena-etcher-electron
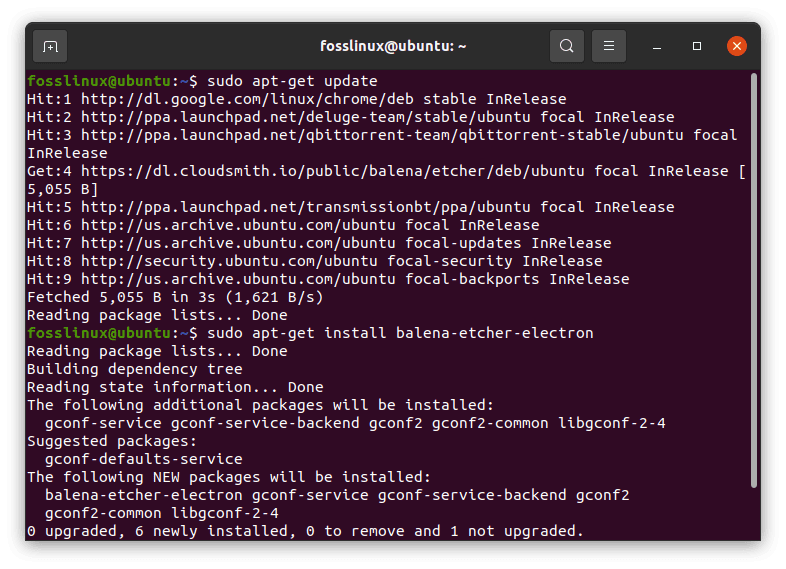
update and install balena etcher application
Note: when prompted, type “Y” to proceed with the installation.
2. Installing Etcher on Linux Using AppImage
Step 1: Downloading the Etcher installer
Navigate to Etcher’s official page and download the Linux AppImage. Since we shall be using Ubuntu 20.04 for illustration in this article tutorial, we shall select the 64-bit architecture since the latest version of Ubuntu does not support 32-bit applications.
Step 2: Extracting the downloaded .zip file
- Go to your downloads location and locate the downloaded .zip file
- Right-click on the file and select the extract here option
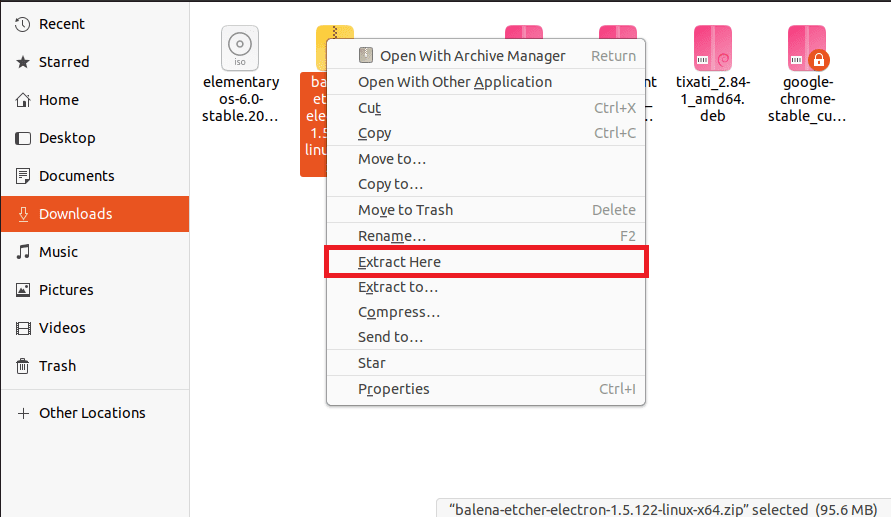
balena etcher select, extract here
Step 3: Assigning the AppImage Execute permissions
Right-click on the extracted file and select the last option, “Properties.”
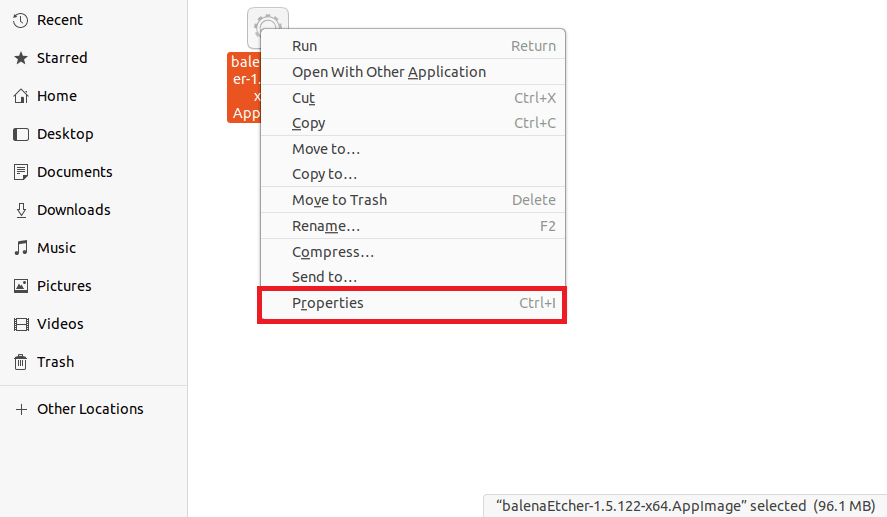
balena etcher select, properties
Next, choose the permissions tab and check the checkbox behind “Allow executing as a program.”
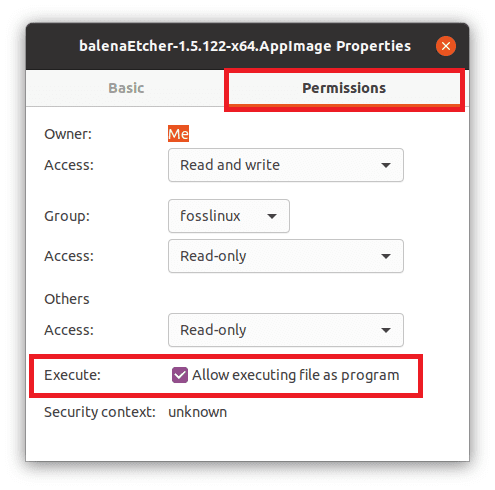
balena etcher allow executing as a program
Once you are done, close the properties windows and launch the balena Etcher Program.
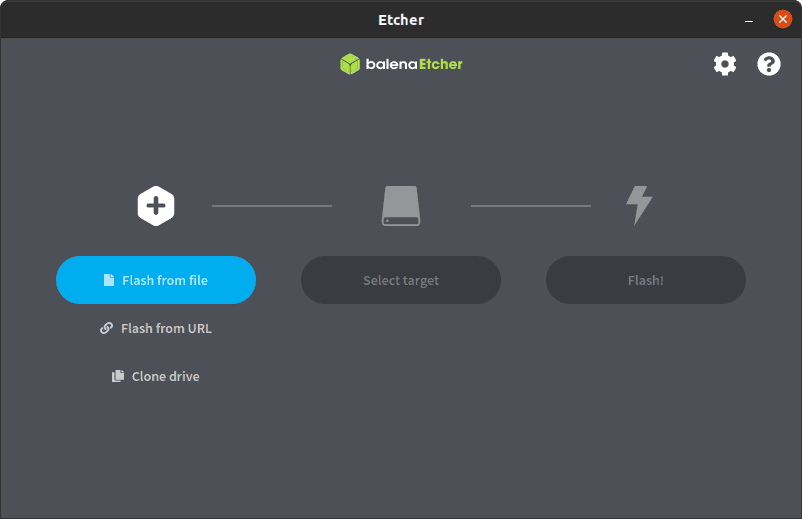
balena etcher application
Then after downloading and installing the Etcher application, follow the steps provided herein to create a live USB drive.
1. After launching the Balena Etcher application, click the “Flash from file” button highlighted in blue as shown below:

click flash from file
Select the downloaded Linux Mint ISO and click open as illustrated below:
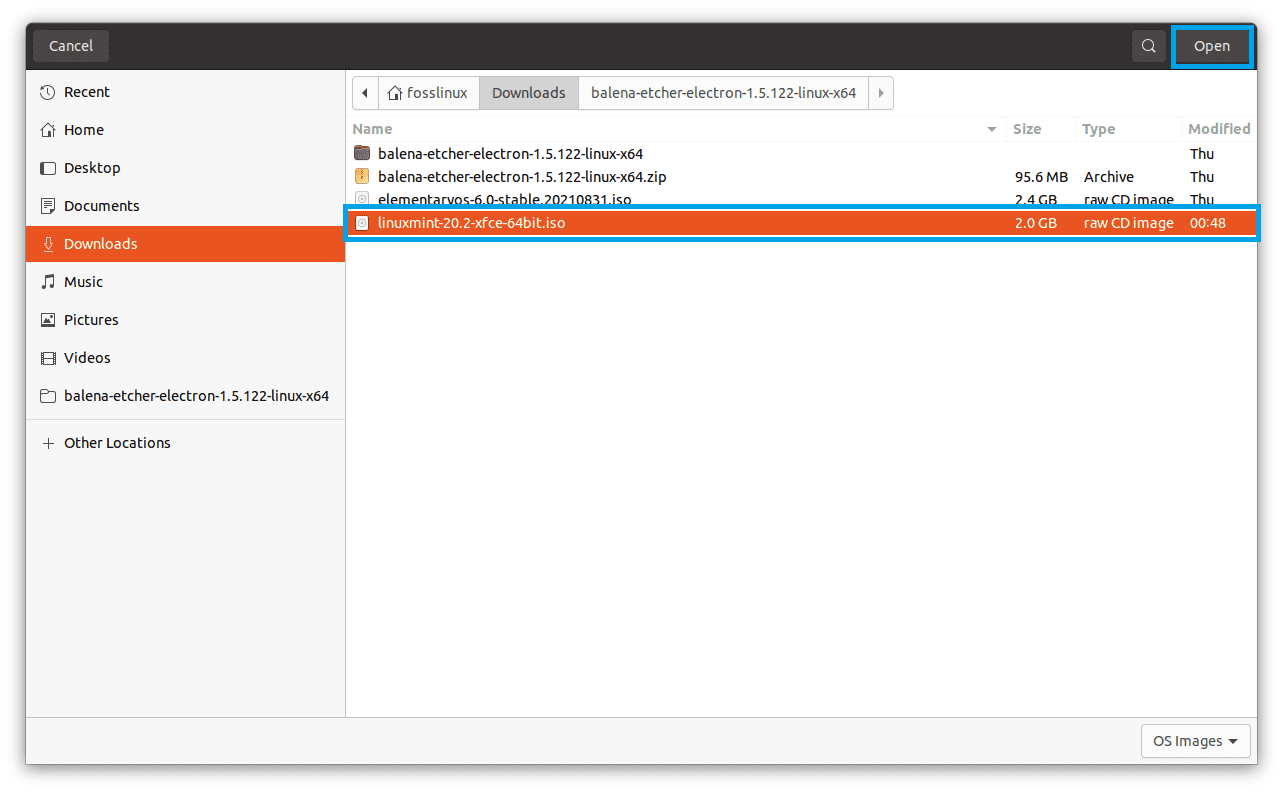
select the Linux mint iso
Now select the target device by clicking the blue “Select(1)” button to proceed to the next step:

select the target USB drive
- Click flash to begin writing the Linux Mint onto the USB drive. Once the writing process is complete, you can eject the drive and use it to run Linux Mint on any computer you wish.
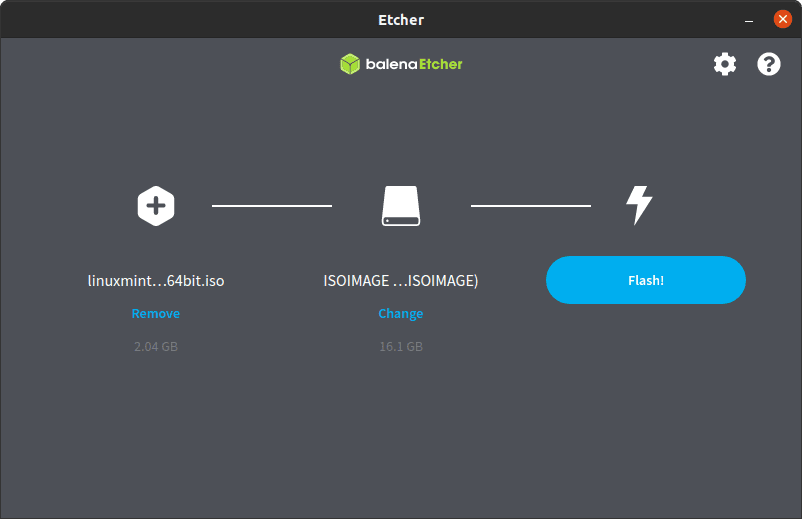
Click the flash button.
Note: If, in any case, your PC fails to recognize your USB drive, then use another USB drive. Besides, if you encounter any warning signs or prompts during the burning process, click ‘OK’ to proceed and wait for the Etcher app to properly format the USB drive, make it bootable, and copy all the selected files in the ISO image.
The total time required to accomplish this task depends on how large the Linux Mint OS file is. While smaller files less than 5GB usually take around 5-10 minutes, the files more than 5GB typically take up to more than 20 minutes. Once complete, remove the now Live USB drive, insert it into your PC, and then power it up to test your new Live Mint OS.
Creating Linux Mint OS live USB on Windows
When using a Windows PC to create a Linux Mint OS Live USB drive, go to this link to download the Etcher application, right-click on the downloaded file, and select install. Follow the on-screen prompts to install Etcher onto your operating system. After a successful installation, go to your applications and launch the Etcher file as administrator. Select yes on the prompt to proceed.
balena etcher application
Once you have launched the Etcher app, the process will be similar to the ones we previously did on creating the live USB drive on Linux. Therefore we shall not repeat the procedures to avoid monotony. If you find any difficulties, refer to method one above to create a live USB drive on Linux. After completing the bootable live USB drive on your windows operating system. We shall need to do some tweaks to enable the live USB drive to boot on our PC.
Follow the procedures below to enable live USB to boot on your Windows operating system:
- Then, right-click on the ‘Start menu’ and choose the ‘power options.
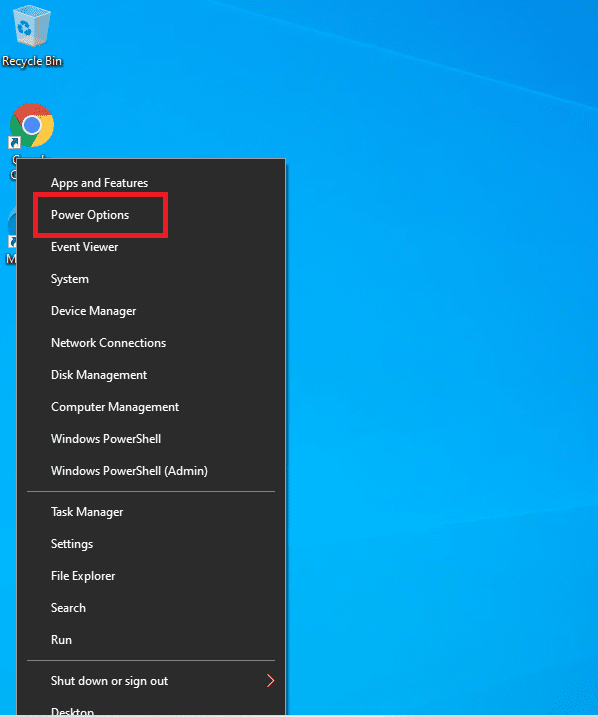
select power options
- Next, select ‘additional power settings’ found on the ‘Power & Sleep’ section.
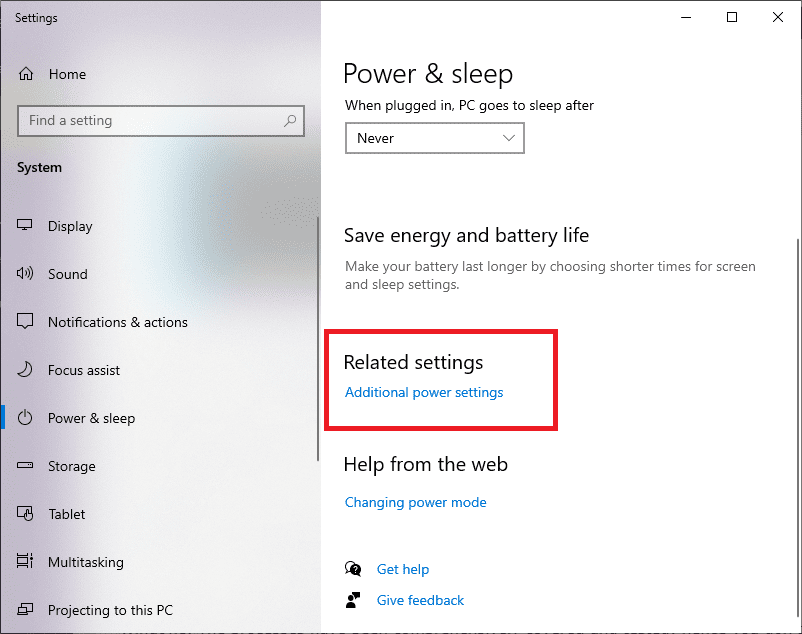
additional settings
- Select the ‘Choose what the power button does’ option on the left side of the window
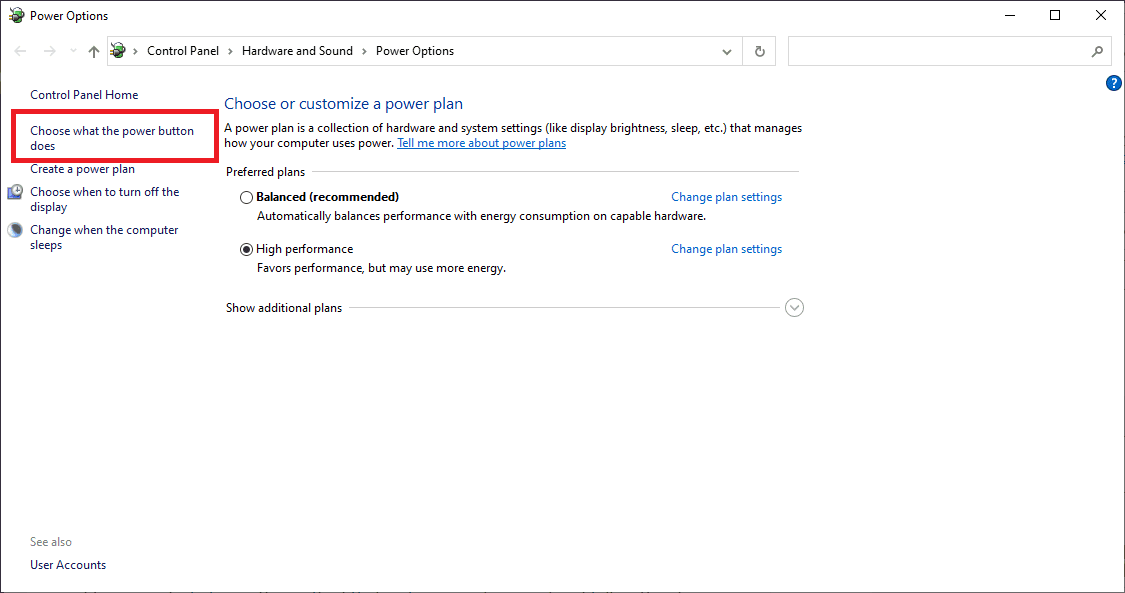
choose what power button does
- Next, select ‘change settings that are currently unavailable.’
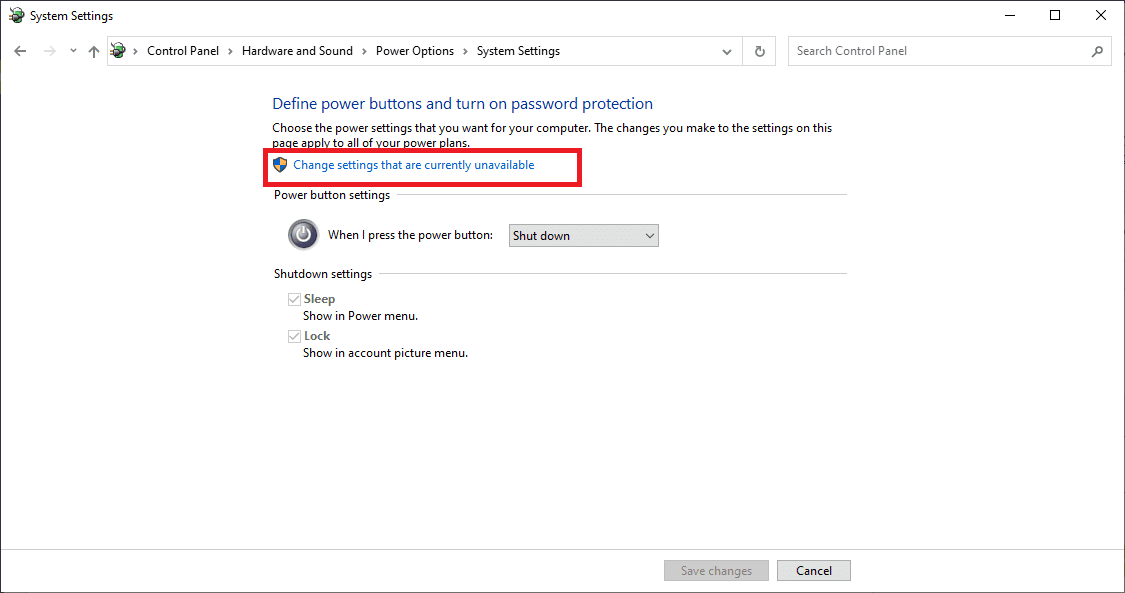
change settings that are currently unavailable
- Now scroll down and uncheck the ‘turn on fast startup’ option and then save the changes.
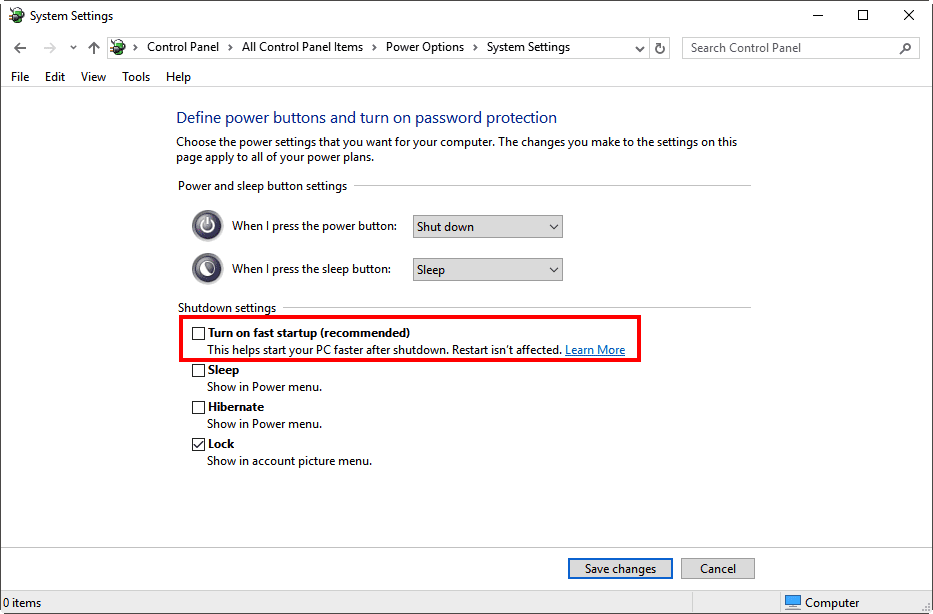
uncheck turn on fast startup
- Reboot your computer while holding the shift key until a blue UEFI screen loads. Here you will choose to boot for the EFI device.
That’s all you have successfully created a Linux Mint OS USB drive on both Linux and Windows. The processes have been comprehensively covered and tested; hence you don’t need to worry. Just choose the method that suits you and proceed and follow the steps highlighted in this article to create your live USB from both Linux and Windows, depending on your preference.
Conclusion
The Linux Mint OS has a unique and beautiful design that makes it more stylish than most Linux distros. Not only is its design appealing, but it also has a simple, clean, and more pleasing look to the eye. This presentation strategy has been carefully chosen and blended perfectly to create the user experience one truly deserves.
If you like to use computers without all the bloats that come with OSs, you need to try Linux Mint OS on a Live USB drive. It is safe and designed to run in the computer’s memory, thereby does not affect your Operating system in any way. Therefore, you should not worry about your computer breaking. The fun thing is that you can boot it directly from your USB drive, thus not affecting your hard drive. We hope the article helped you. If so, please give a thumbs up via the comments section.
26 comments
unfortunately, the USB stick (4GB) is not recognised. I get a message please insert appropriate media and reboot
unfortunately it does not work. the 4GB USB stick is not recognised. I get a message please insert appropriate media and reboot.
No luck here. The Sandisk 4GB USB stick is simply ignored.
No luck here. The USB stick is simply ignored.
Thank you so much for this tutorial. I used a Sandisk Cruzer Switch 8 GB and everything worked perfectly. Your steps were easy to follow – clear and logical. I can finally now boot into my desktop computer which was stuck on grub rescue>. Hopefully I will now be able to resolve the issue. 🙂
Dear Kiran,
Thank you! I never though creating a live usb can be so simple. I used a Sandisk 16 gb USB to create Live USB. your steps were easy to follow and result was perfect.
how to add more software in the Linux mint OS. because less software only in the OS . I want to add education software in the linux mint 18.3 and also tamil fonts for government school teachers. pls guide me
Thank you very much!
It doesn’t work, it seems that Windows 1o on certain machines need a .ef extention to boot from a USB drive
Worked perfectly with 2Gb stick. Thanks!
Worked fine on 8GB stick. Very convenient, thanks.
i have no efi folder
I have a newer version of Rufus, and can’t figure it out at all.
can you tell me how i get software install on the usb disk?
under Linux mint 13.9
Open Rufus. You only need to do 2 thing. Chose the USB you want to install on. Then chose the ISO file you want to use or just drag and drop it in the rufus window. Press start. If you can’t figure out rufus, use etcher.
If you don’t find the USB when booting you have to disable fast boot/secure boot or change from UEFI to legacy. Google this part, a lot of people have problems with that.
This was the extra info I needed – thanks!! 🙂
And btw, this is how to install mint using usb, not a live cd(which is you can run the OS straight from the USB without installing it).
If you know where I can do that it would be great.
Don’t forget you may need to enable booting from usb in your bios
Using Balena Etcher should be even easier to create a bootable USB flash drive.
I tried it in ISO mode the first time, and the computer (or MobaLive) wouldn’t recognise it as bootable. I had better luck with DD mode.
Old and outdated instructions.
Rufus hasn’t been updated in nearly 3 years.
You guys need to turn off ‘SECURE BOOT’ from BIOS. Also enable UEFI booting.
Link to the past 20-30 hours? Nonsense. Even on your first playthrough not knowing where anything is MIGHT take 8-10 hours if you’re really taking your time. The game can be beat in 3-4 hours with all collectibles and you don’t need to be some masterful speed runner to manage that. I was doing it as a kid and I’m not very good at video games It’s an amazing game but I often see it described like it’s some sort of mega epic when it’s something most average people could clear in an afternoon or two.
Harold Burton
All these games = fond childhood memories . Nintendo had so many quality games . The 90s was the golden age of gaming. Damnit makes me want to hunt down a snes now .I do have Roms but it’s not the same . … Btw Eye of the beholder was one of the greatest rpgs released for SNES.
Ashley Jones
How to enable live USB to boot on Win7?
Anyone else remember a little game called Secret of Evermore? It was Secret of Mana Perfected. It still ranks as, in my opinion, one of the greatest RPG’s with a fantastic setting, characters and some wonderful gameplay. It was simple, fast to pick up and almost impossible to put back down.
No?
Just me?
Alright.
Paul Brown