
Kali Linux is open-source operating system software designed to perform security auditing and penetration setting on an advanced level. In addition, the software contains many tools that could be used to perform tasks related to information security, such as security research, computer forensic, and reverse engineering. It is a multi-platform solution operating system with easy admittance and availability to anyone; on professional grounds or as just a hobby.
Booting Kali Linux from a USB drive on Windows 10
The Kali Linux documentation describes Kali Linux as a new generation utility equipped with Debian operating standards that allows leading Linux penetration-testing. This operation could be used to perform security auditing. This is the ideal operating system that ethical hackers could opt for.
This operating system is used to get into advanced networks and computers. Its integration is mainly used to check and test; the degree of security that secure systems often are. This article explains how to boot Kali Linux from a USB drive on Windows 10, whether 64-bit or 32-bit.
Materials needed
- A USB flash disk (At least 4GB of storage )
- Windows 10 computer
- A reliable internet connection
- Patience
After assembling all the required tools mentioned above, now follow the steps highlighted below:
Step 1: Downloading the Kali Linux Operating System software
This step is crucial since we need the Kali Linux ISO to begin the installation process. The process involves locally acquiring the ‘installer ISO’ software into your Windows 10 PC. Therefore, it is essential to know what type of bit rate (32-bit or 64-bit) your computer has. This will help you determine the compatible installer file to be downloaded into your Windows 10 PC.
Step 2: Formatting the USB Drive using the Windows 10 OS
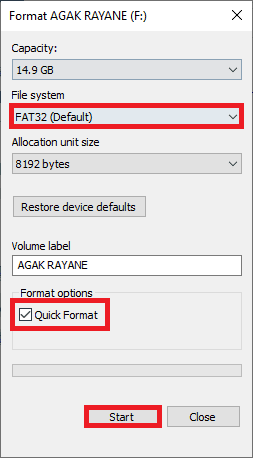
The first step is to create space in the USB Drive. Plugin your USB drive into any USB ports on your PC, but most importantly, we recommend plugging it on USB 3.0. Ensure all the important files are backed up before creating space in the drive. Next, right-click on the drive and select the “Format” option. After that select, “FAT32(Default)” and click the ‘Quick Format’ box, then click on “Start.”
Refer to this article “How to create Kali Linux Bootable USB drive” if you have no idea how to create a bootable Kali Linux drive.
format USB drive
This will take a few minutes, depending on the flash drive’s size and content it had. Once the formatting process is complete, proceed to the next step.
Step 3: Writing the Installer software onto the USB Drive
This process can be done with various tools such as; Unetbootin, GBurner, Rufus, and WinDiskImager. In this tutorial, we shall use “GBurner.” Click this link to download the GBurner software. Once the download process has been completed, install the GBurner software onto your Windows 10 PC.
Launch the installer GBurner software as administrator to write the Kali ISO into the USB flash drive.
Note: You are using an unregistered version of GBurner so remember to select the “Continue” unregistered” option as shown in the image below:
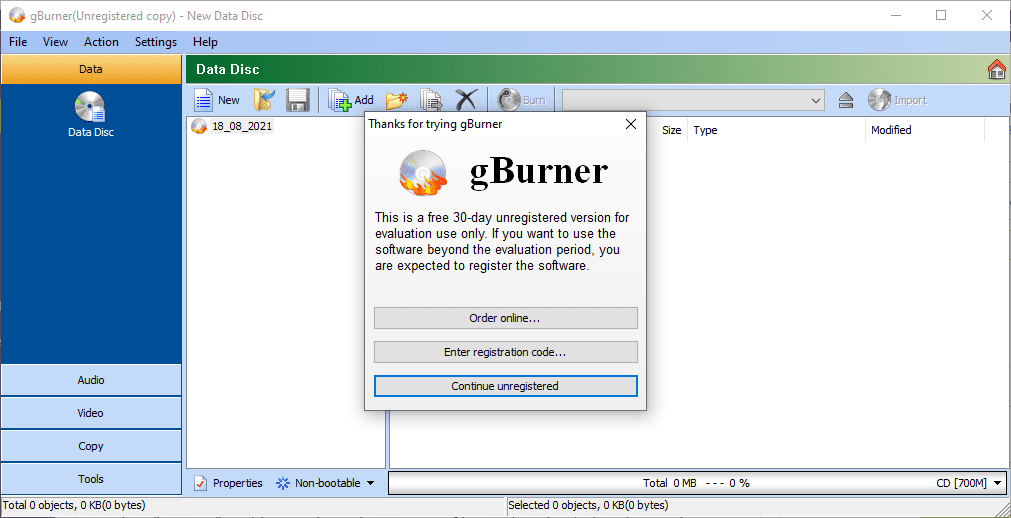
GBurner Continue unregistered
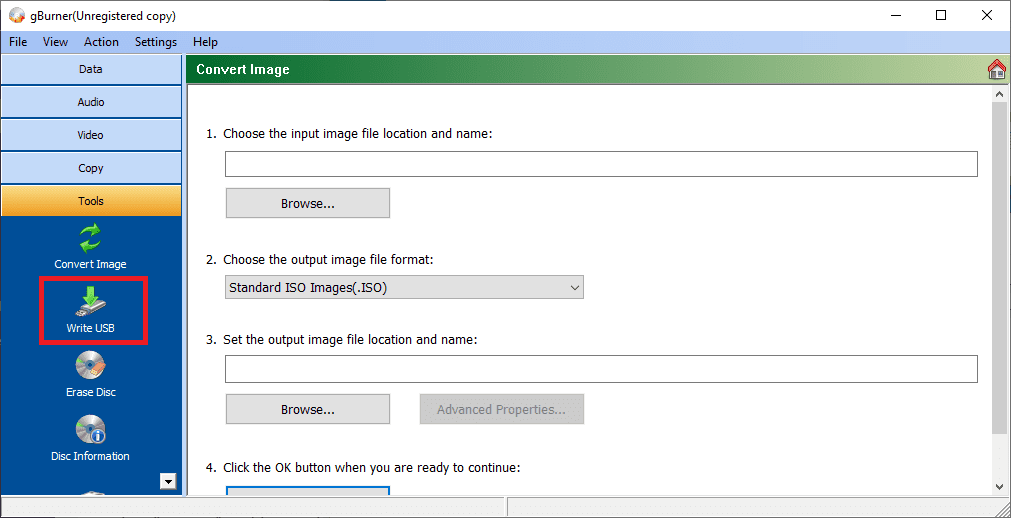
Next, select the “Tools” options on the left pane of the GBurner screen as displayed below:
Then, select the second option, “Write USB.”
gburner write USB
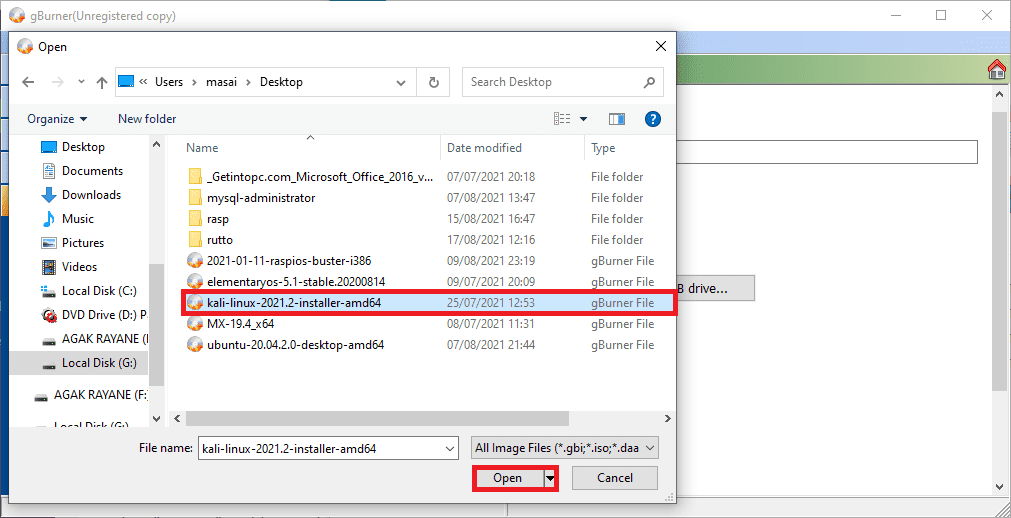
Select “Browse” and locate the Kali Linux ISO file we downloaded earlier in this tutorial
After selecting the Kali Linux ISO, click “Open” as shown below:
GBurner select kali Linux iso
Next, choose the USB we formatted earlier
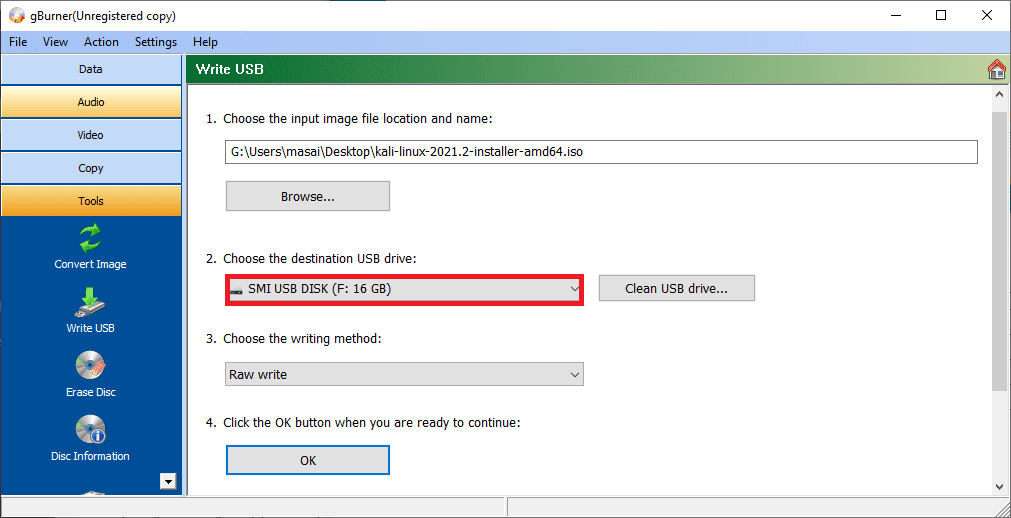
GBurner clean USB drive
Once you have completed this process, select the “OK” button to start writing the Kali Linux ISO into your formatted USB drive.
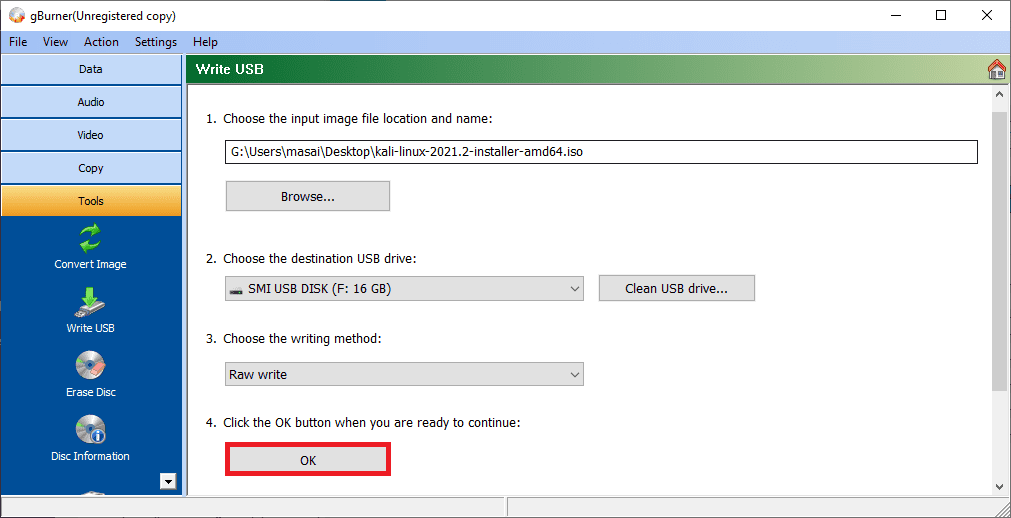
GBurner click ok
Note: If you have not cleaned the USB drive, GBurner can sort you out by clicking the “Clean USB drive” option shown in the image below:

GBurner writes USB screen.
Select the Writing method. The GBurner software auto-detects the writing method; hence you don’t need to worry.
Depending on your computer’s processing speed and size of the ISO file, the writing process might take a while, where patience comes in. Just relax as the burning software writes changes to your USB. Once the process is complete, safely eject the USB drive from the computer the shutdown your PC.
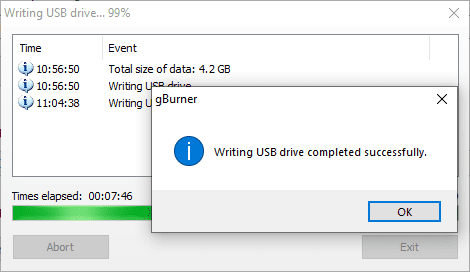
GBurner successful writing
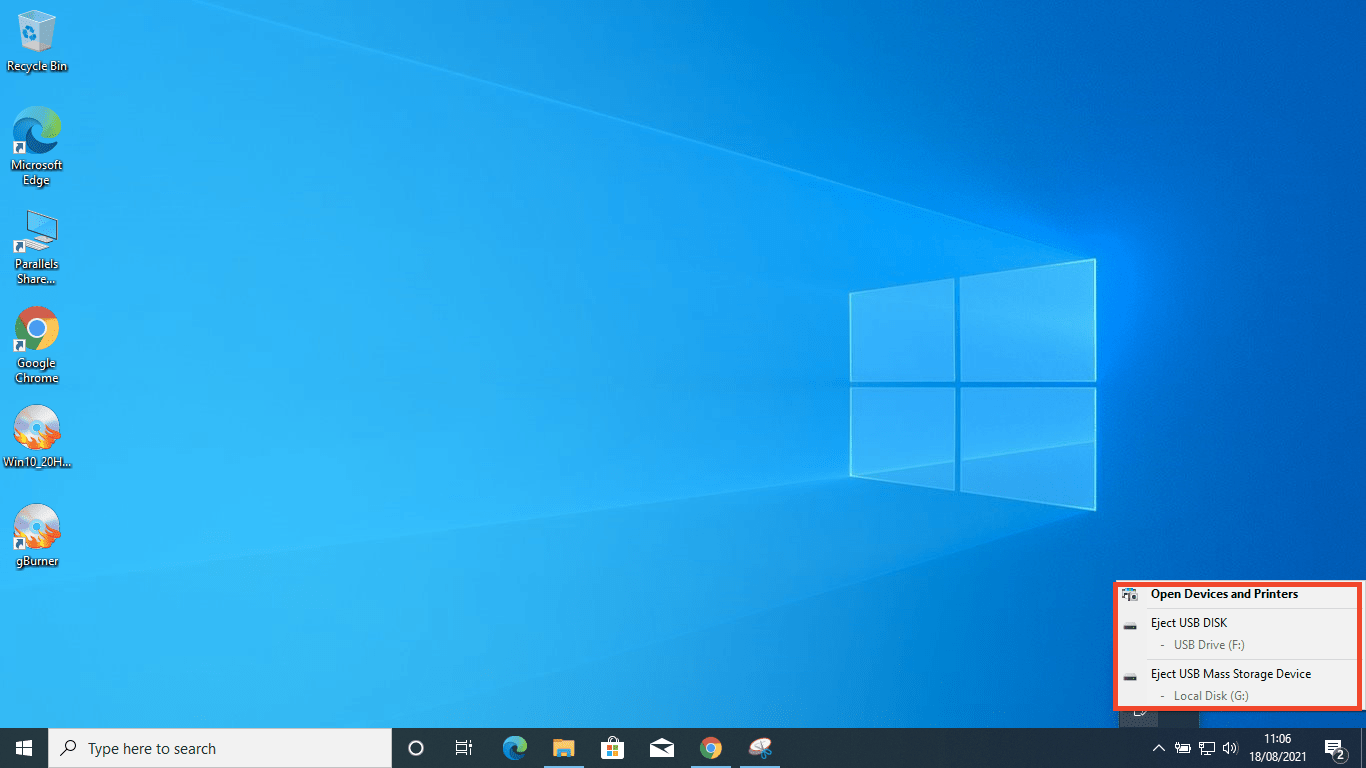
Note: to safely eject the USB drive, click the USB icon on the bottom right side of your screen (taskbar) and then select the ‘eject’ option. Now, wait for a successful ejection notification.
GBurner successful writing
Note: Click here to learn more about “How to use Kali Linux.”
Step 5: Booting the computer
Plugin the USB drive back again into the windows 10 computer (or any other computer you want to install the Kali Linux software. Next, power on your computer. Then, with the flash drive still plugged in, press the F12 key to trigger the boot option. (Remember this might change depending on your PC’s model; hence refer to your providers’ official page to know the correct keys to use.
Once the boot options are displayed, select the USB Drive option. You will then be directed to the installer bootloader menu. Select the ‘Live Boot’ option for Kali Linux indicated by ‘Live (amd64)’ the Click “Next.”
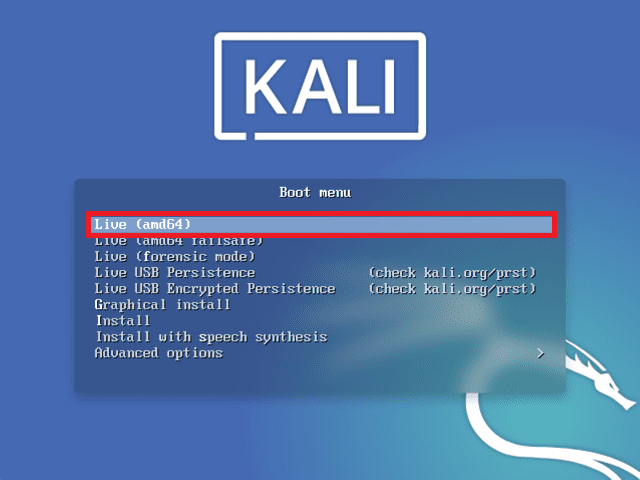
live (amd64)
Step 6: Partitioning Disks
Since you are installing only Kali Linux, skip the dual-boot option on the GNOME3 toolbar. It is vital to defragment both disks to help prevent data loss when performing a dual boot between windows and kali.
Now that you are in the Kali Linux Live environment, launch GParted. This application will aid in the partitioning process to give us enough space to install Kali Linux alongside our existing Windows 10 operating system.
After GParted has successfully opened, select the Windows partition, which in our case is [/dev/sda2], then resize it to leave out around 20GB (the recommended size for installing Kali Linux)
Note: in most occasions, you will see three partitions:
- /dev/sda1: This is the Windows boot partition
- /dev/sda2: This is the Windows central operating system
- /dev/sda3: This is the Windows system recovery partition
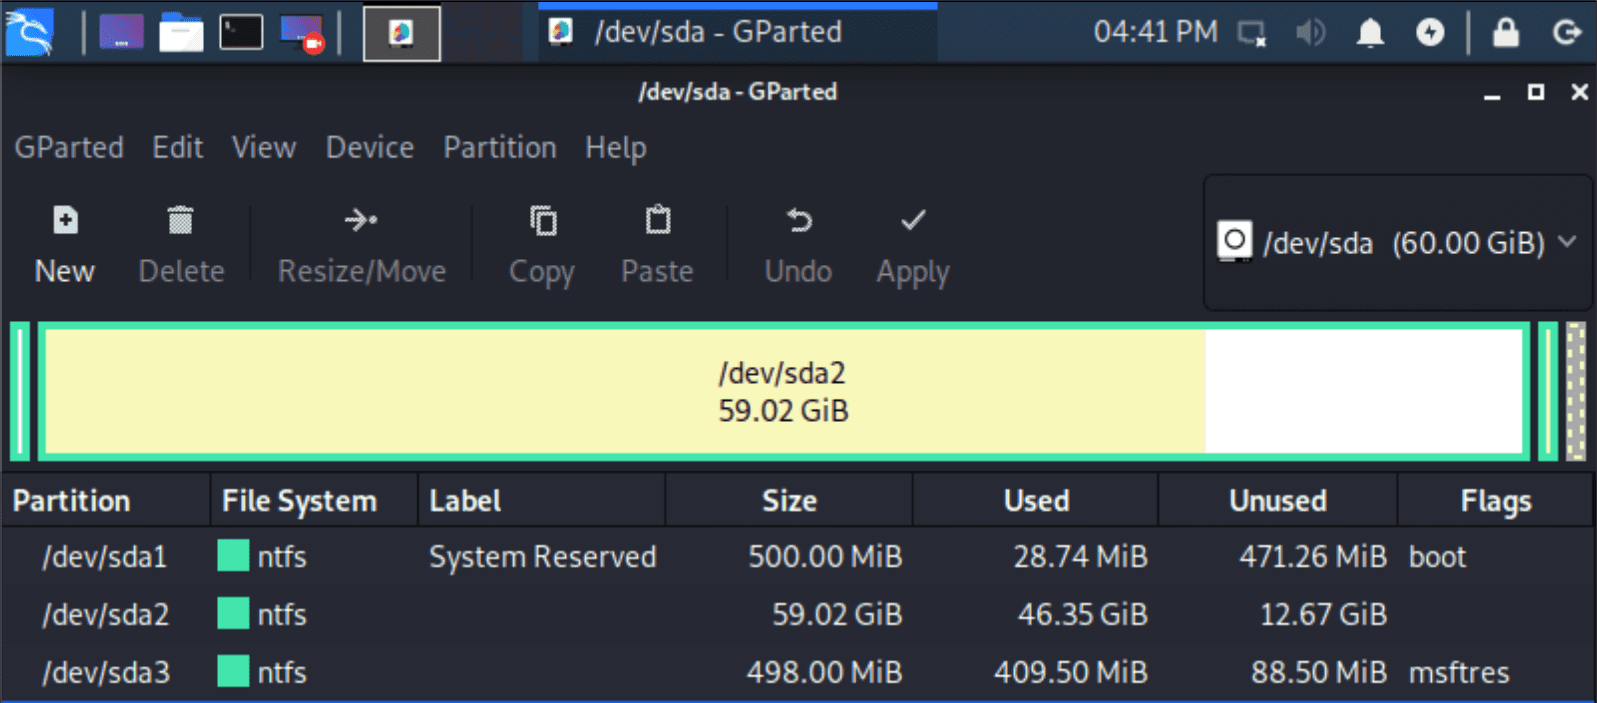
GParted windows partitions
Therefore, on most occasions, it is always the second partition that should be selected.
Also, a meaningful way to differentiate the windows partition is by looking at the allocated size. The primary operating system is always the largest.
After successfully resizing the Windows partition, remember to select “Apply All Operation” to apply the changes made to the disks. Exit the GParted application.
Note: after partitioning the disks, you can either install from the live environment or reboot your PC and install Kali similarly to the Kali Linux Hard Disk Install.
We shall use the live environment to install Kali without rebooting
Step 7: Kali Linux Installation
Back on the GNOME3 toolbar, click ‘show applications’ then search for the ‘install’ option. Next, launch the application to install Kali. This launches the ‘graphical wizard installer.’
If your installer does not show all the installation settings, you must press the ‘windows’ key to open the GNOME menu. After it is opened, drag the installer from your existing workspace to a new one. This process will require you only to perform clicks to the last cycle.
First, you will select the language and click continue as shown below:

Kali Linux selecting a language
Next, choose your location and press continue.

Kali Linux select location
Under “Configure Locales,” stick to the default “United States – en_US.UTF-8” if you have no clue of what it means.
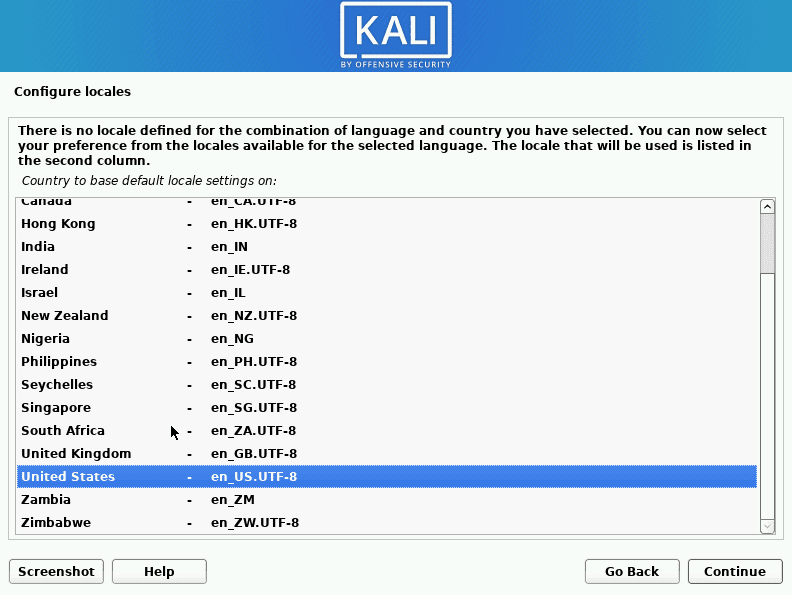
Kali Linux configure locales.
Configure the keyboard. For this tutorial’s sake, I will select “American English” and click “Continue.”
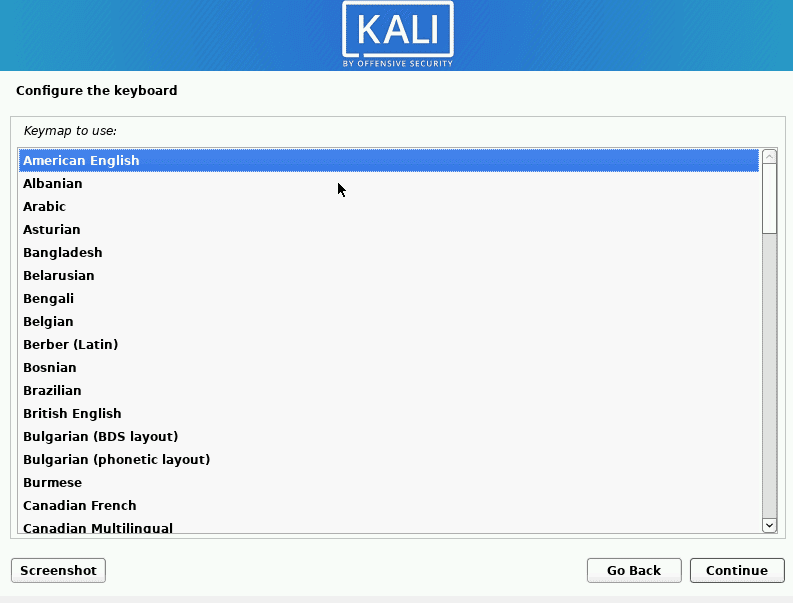
Kali Linux configures the keyboard.
The installer will automatically detect and install the required media, be patient as this process might take a while.
Next, the Configure network screen will appear with the Hostname option. Change your Hostnmane to your desired name and press “Continue.” For instance, I will use “kali,” which is the default hostname.
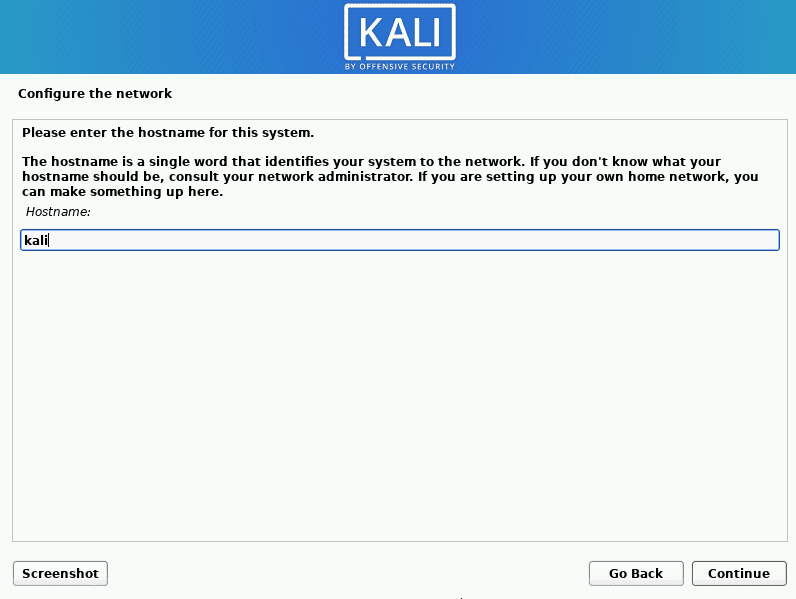
Kali Linux configures the hostname.
You will finally be directed to a screen that asks you to enter a ‘domain’ name. This domain name will be used as default (to ‘localhost’). However, this part doesn’t need to be filled; if you do not have a domain name, you can leave it blank as we did.
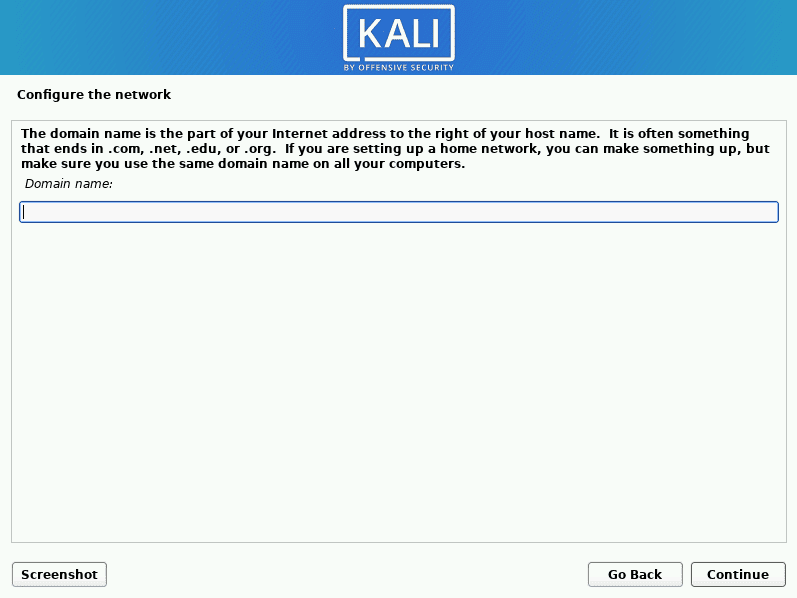
Kali Linux configures the domain name.
The next screen will request you to set up users and passwords. Here you will be required to enter the “Full name for the new user,” which will be used as the username and password to log in to your Kali Linux operating system. In this case, we shall use “fosslinux” as our username, then click “Continue.”
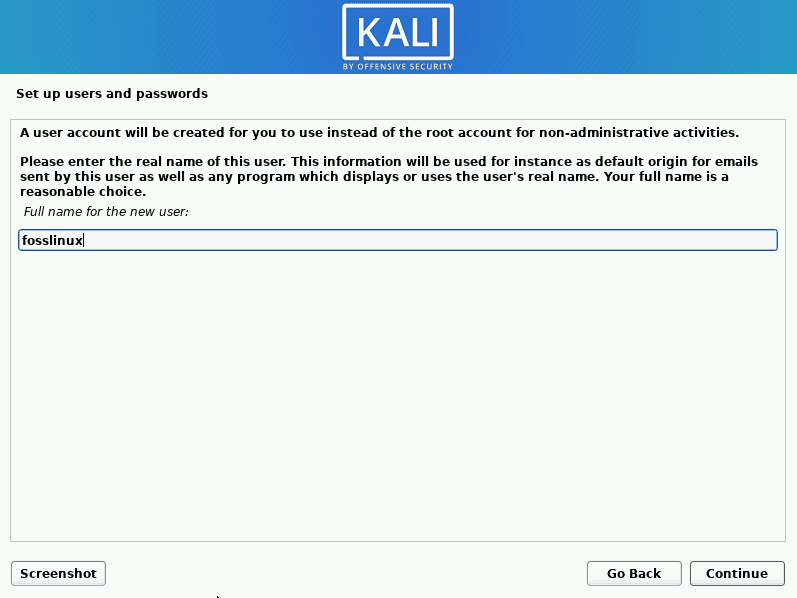
Kali Linux set up a username.
On the next screen, which asks for a username, leave it as it is (Use the full name we gave in the previous step) and click “Continue.”
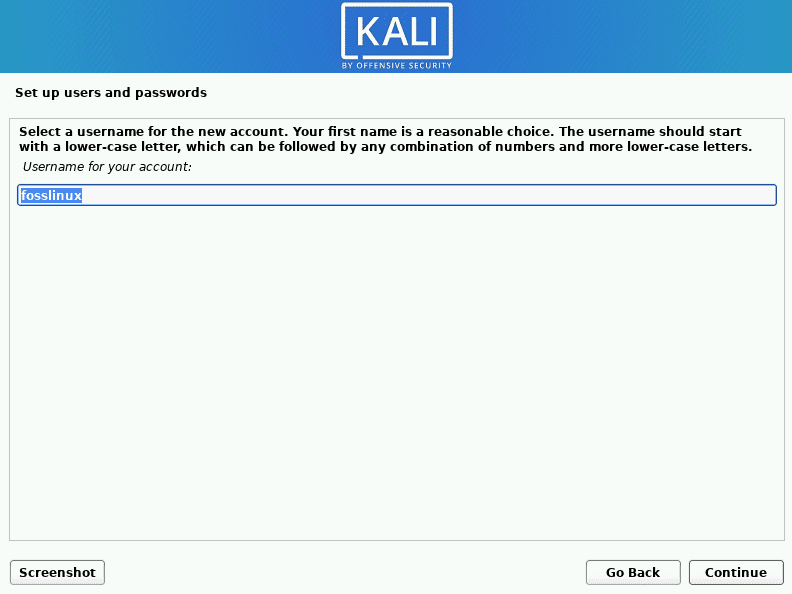
Kali Linux set up the username as in the previous step
You will then create a root password and confirm it, then click “Continue.”
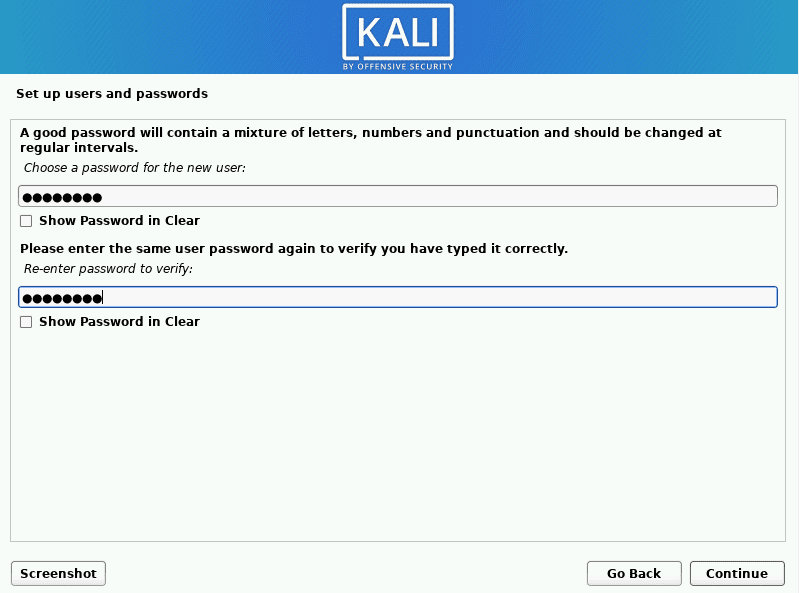
Kali Linux set up a password.
Note: You should remember this password as it will be used in logging in to your Kali Linux.
Await, clock, and disk configuration before proceeding to the next step.
Step4: Select Partitioning Method
This step asks you to configure your disks. It will list names of recognized partitioning methods as shown below:
- Guided- use entire disk
- Guided – use entire disk and set up LVM
- Guided – use entire disk and set up encrypted LVM
- Manual
For the sake of this tutorial, we shall select the first option: “Guided- use entire disk” and click “Continue.”

Kali Linux select partitioning method
Now select the disk you partitioned in the first process and select “Continue.”
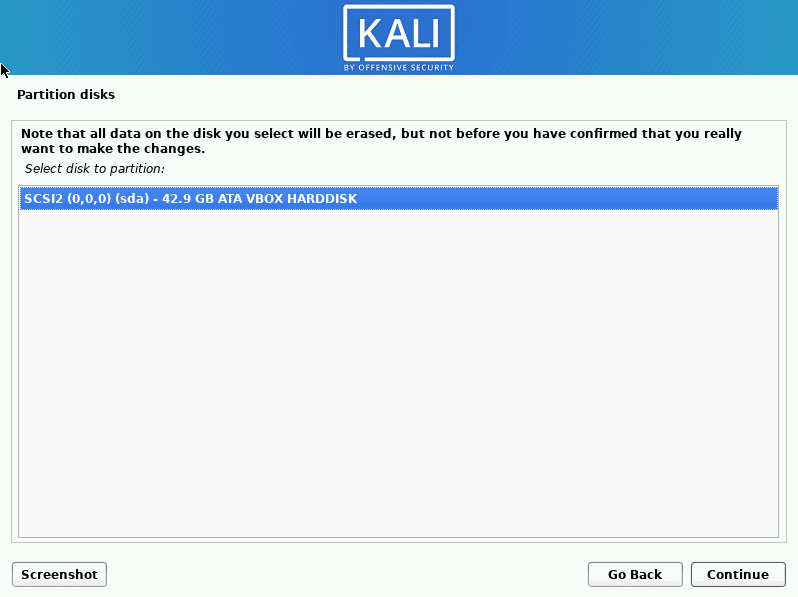
Kali Linux select disk to partition
In the next screen, select the first option, “All files in one partition (recommended for new users), the again click “Continue.”
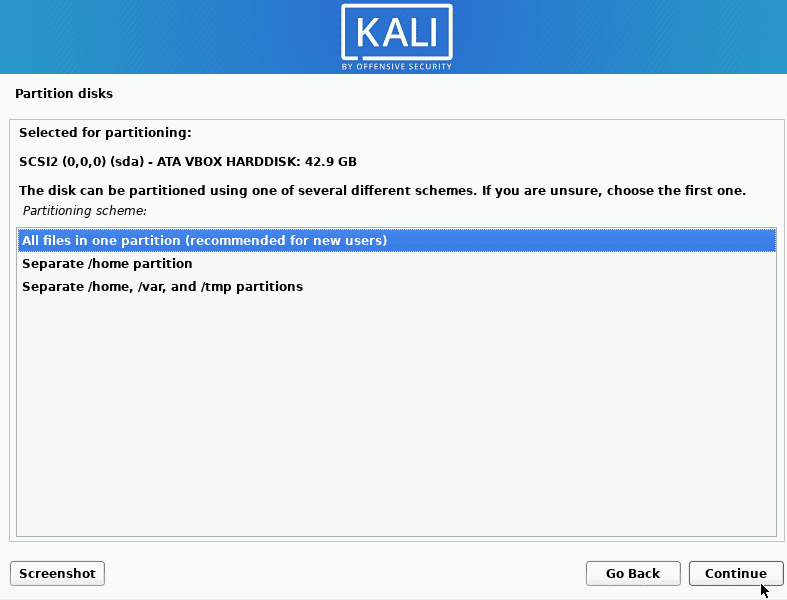
Kali Linux selects the partitioning scheme.
Now select the “Finish Partitioning and write changes to disk” and click “Continue.”
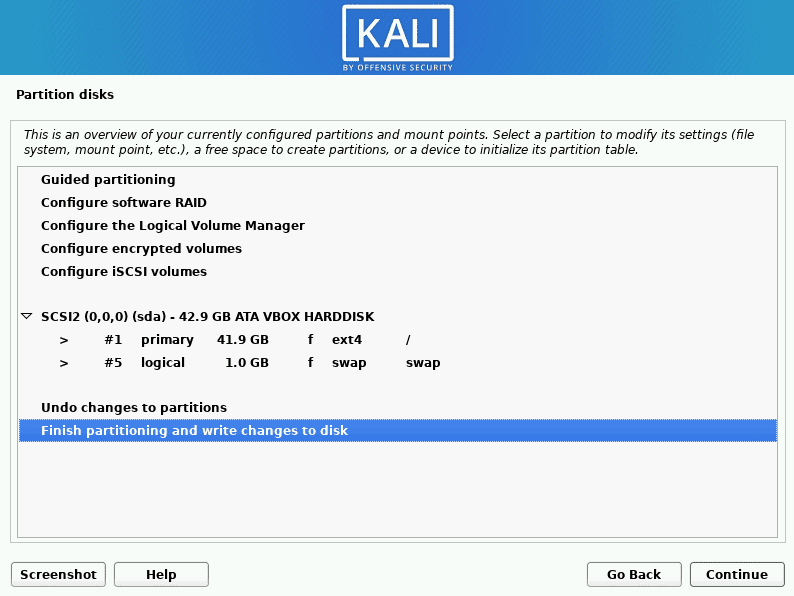
Kali Linux finish partitioning and write changes to the disk
When asked whether to “Write the changes to disks?” select “Yes” and click “Continue. The disks will be partitioned then the base system will be installed. Be patient as this process takes a while to complete.
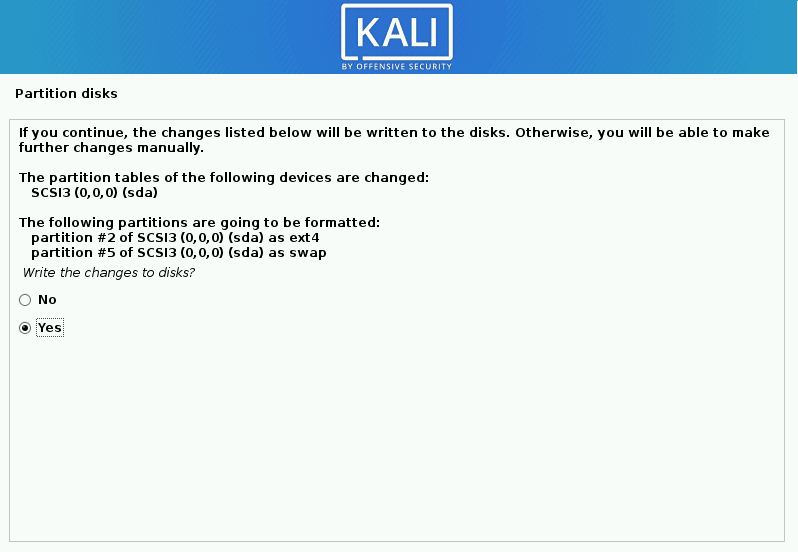
Kali Linux writes the changes to the disk.
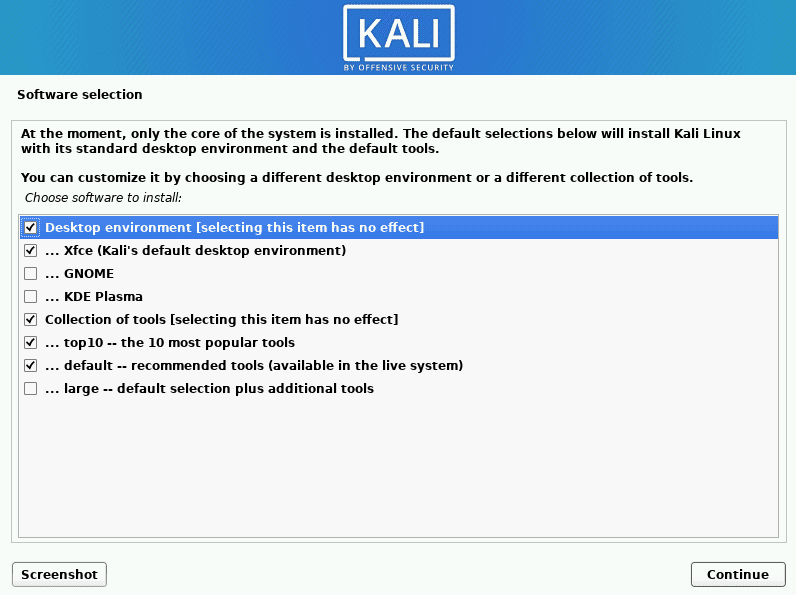
Under the “Software selection” screen, you will be asked to choose the software to install. If you have no idea which software to choose, leave everything as it is and select “Continue.”
Kali Linux choose software to install
Wait as the Kali Linux software is installed into your operating system.
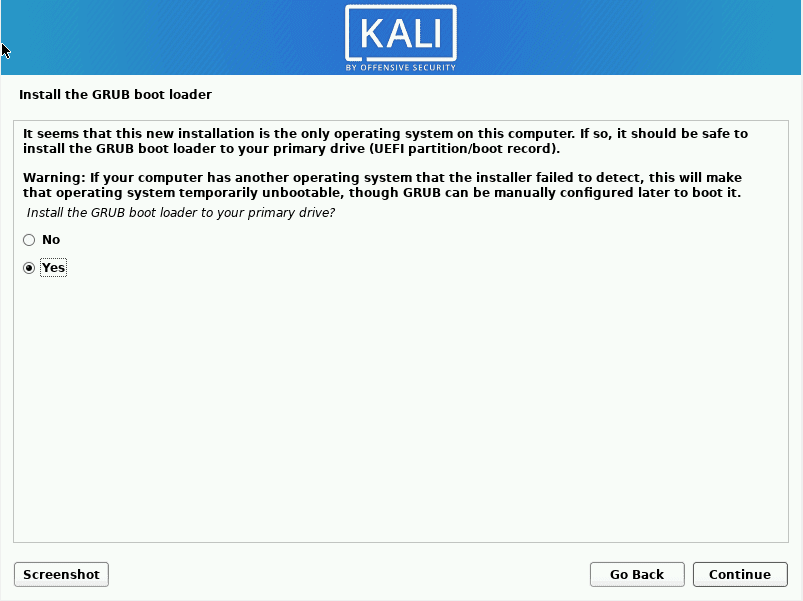
Select “Yes” on the next screen to install the Grub boot loader to your primary drive, then click “Continue.”
Kali Linux install grub bootloader.
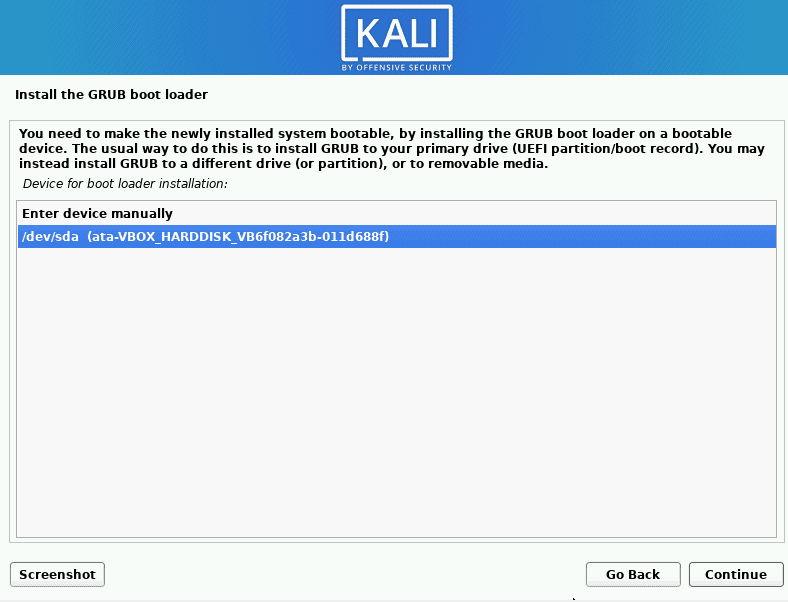
Next, select the second option,” /dev/sda” (Remember the name might be different but ensure you do not select “Enter device manually”), then click “Continue.”
Kali Linux selects the device for bootloader installation.
Once the installation is complete, you will be prompted to remove the USB drive used for installation and click “Continue” to reboot your PC.
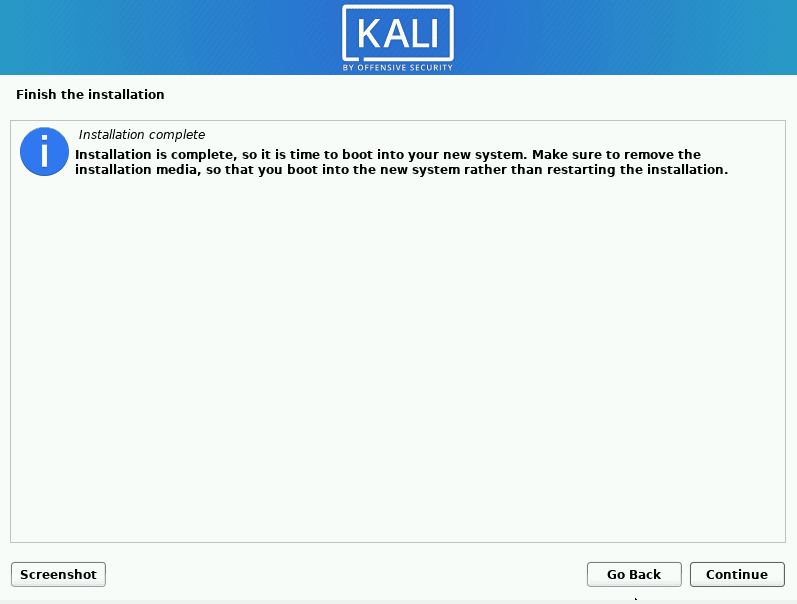
Kali Linux complete installation
Kali Linux Welcome Screen
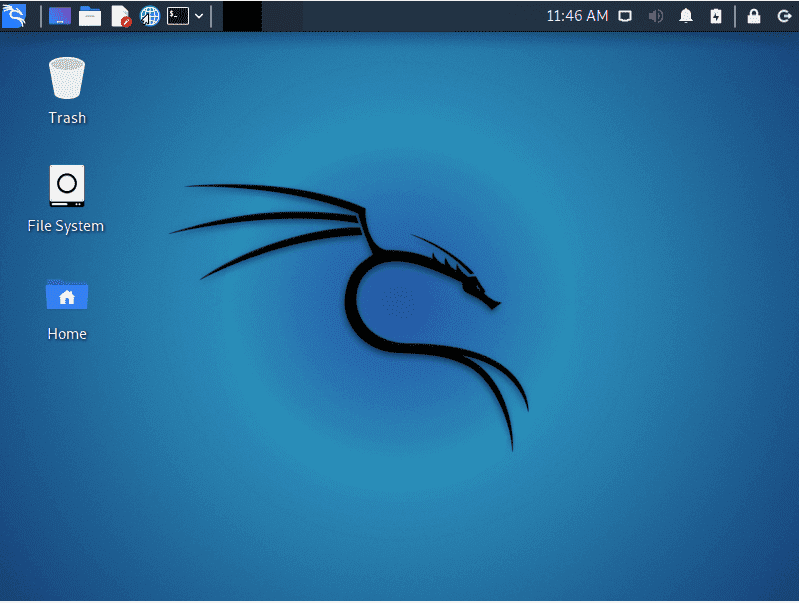
Kali Linux home screen
Note: If the Kali does not appear in the GRUB bootloader system, you will need to open the Linux system and type the command;
sudo update-grub
Relevance of Kali Linux
Kali Linux has a wide variety of essential tools at its disposal. However, it is still important to master the details of its operating system, from the Debian package management system and usage to security and finally usages. The primary relevance of Kali Linux is its ability to conduct penetration testing efficiently.
It uses more than 600 tools to analyze every niche of the security and forensic fields. It has meta-packages that will give a user the flexibility they deserve for assessing system securities. It can perform version tracking, which is a function for maintaining the outdated tools required for executing a specific task.
Using Kali Linux enables most IT professionals to make sure their security systems are impenetrable to unethical hackers. Not only is this an essential software with a dependable array of useful utilities, but it is also an easy-to-use software, and one would comfortably rely on it for information gathering to final reporting.
Conclusion
This in-depth article has covered the installation process of Kali Linux alongside the Windows operating system. All the necessary tools have been provided via external links. Therefore, we hope you will perform the installation process without any complications on your PC. In case you have any concerns, reach out via the comments section for help.