
I‘ve always been a sucker for learning new things and exploring the world of technology. As a dedicated Windows user for years, I hesitated to leap to Linux, but my curiosity was gnawing at me. Enter VirtualBox, a fantastic way to dip your toes into the Linux waters without leaving your cozy Windows world behind. In this post, I will share my experience installing Linux on a VirtualBox. Let’s get started!
What is VirtualBox?
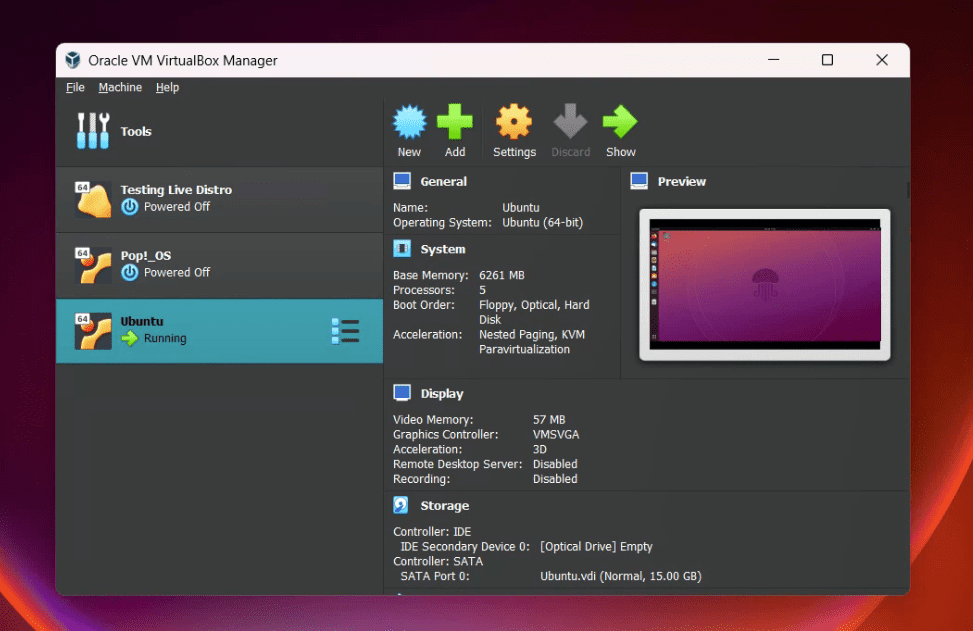
VirtualBox User Interface
Oracle VM VirtualBox is a powerful, open-source virtualization software that allows users to run multiple operating systems on a single computer. This means you can install and run Linux on your Windows or macOS machine without partitioning your hard drive or purchasing additional hardware. It’s an excellent solution for those who want to experiment with different operating systems, test software, or learn new skills without disrupting their main environment.
Why install Linux on a VirtualBox?
There are several reasons why you might want to install Linux on a VirtualBox:
Experimentation: If you’re curious about Linux but don’t want to commit to a complete installation, a virtual machine is an ideal way to explore the operating system without affecting your primary setup.
Learning: Installing Linux on a VirtualBox offers a safe environment to learn and practice new skills, such as system administration, programming, or troubleshooting.
Software testing: Running Linux on a virtual machine allows developers and testers to work with different software versions or test compatibility without needing multiple physical machines.
Security: A virtual machine creates an isolated environment, reducing the risk of malware or other threats from affecting your main operating system.
Why VirtualBox is preferred over VMware Player for Linux
While both VirtualBox and VMware Player are popular virtualization solutions, there are a few reasons why VirtualBox is often preferred for installing Linux:
Cost: VirtualBox is free for personal and educational use, whereas VMware Player offers a free version with limited features and requires a paid upgrade for more advanced functionality.
Open-source: VirtualBox is open-source, meaning users can inspect, modify, and contribute to its development. This fosters a strong community and ensures continuous improvements and updates.
Compatibility: VirtualBox supports a broader range of Linux distributions than VMware Player, making it more versatile for those experimenting with different Linux flavors.
Ease of use: In my personal experience, I found VirtualBox to be more user-friendly and easier to set up than VMware Player, making it a more approachable option for beginners.
Now that we’ve covered the basics let’s dive into the step-by-step process of installing Linux on a VirtualBox.
Installing Linux on a VirtualBox
Step 1 – Download VirtualBox and Linux
First, you’ll need to download Oracle VM VirtualBox, available for free on the official website (https://www.virtualbox.org/). VirtualBox is cross-platform software, meaning you can install it on Linux, Windows, Solaris, or macOS systems. I found the installation process to be a breeze. Remember to check for any updates to ensure you have the latest version.
Next, decide which Linux distribution you want to install. If you are a beginner, I recommend Linux Mint Cinnamon Edition. (https://linuxmint.com/download.php), which is one of the most popular distributions for newbies, and I must say, I’ve grown quite fond of it.
Step 2 – Create a new virtual machine
Once you have VirtualBox installed and your Linux distribution downloaded, open VirtualBox and click on “New” to create a new virtual machine (VM). Give your VM a name and the Linux Mint ISO file you downloaded earlier. Next, select the “Linux” type, and choose the appropriate version (e.g., “Ubuntu 64-bit”).
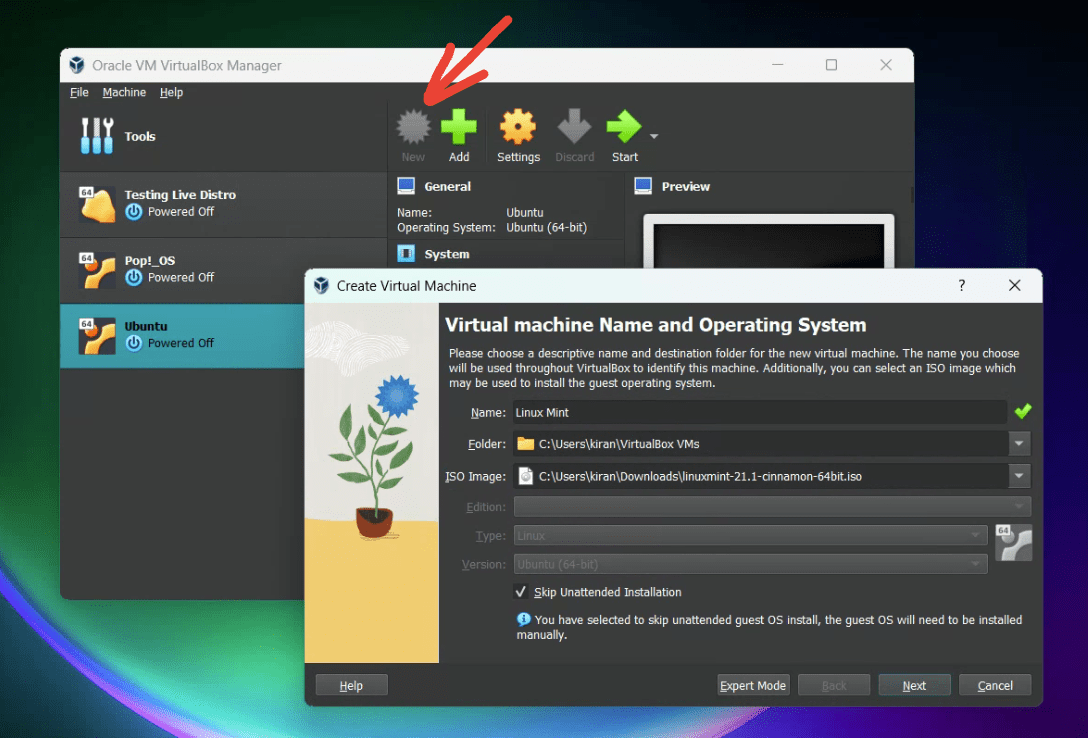
Creating a new virtual machine in VirtualBox
Choosing the right version for your Linux distribution
When creating a new virtual machine in VirtualBox, choosing the correct operating system type and version that corresponds to the Linux distribution you plan to install is essential. In this section, I’ll provide a cheat sheet for selecting the appropriate settings for some popular Linux distributions and discuss the importance of choosing the correct options.
Why it’s important
Choosing the right operating system type and version ensures that VirtualBox properly configures your virtual machine for optimal performance and compatibility. Incorrect settings may lead to issues such as slow performance, device driver problems, or even failure to boot the Linux distribution.
Cheat sheet for popular Linux distributions
Here’s a cheat sheet to help you choose the right operating system type and version for some popular Linux distributions:
- Ubuntu | Type: Linux | Version: Ubuntu (select the 32-bit or 64-bit option based on your downloaded ISO file)
- Debian | Type: Linux | Version: Debian (32-bit or 64-bit option)
- Fedora | Type: Linux |Version: Fedora (32-bit or 64-bit option)
- CentOS | Type: Linux | Version: Red Hat (32-bit or 64-bit option)
- Arch Linux | Type: Linux | Version: Arch Linux (32-bit or 64-bit option)
- openSUSE | Type: Linux | Version: openSUSE (32-bit or 64-bit option)
- Linux Mint | Type: Linux |Version: Ubuntu (32-bit or 64-bit option)
Note that some Linux distributions, like Linux Mint, are based on other distributions (in this case, Ubuntu) and share the same operating system version settings. If you’re unsure which option to choose for a particular distribution, consult the distribution’s official documentation or community forums for guidance.
Skip unattended installation in VirtualBox
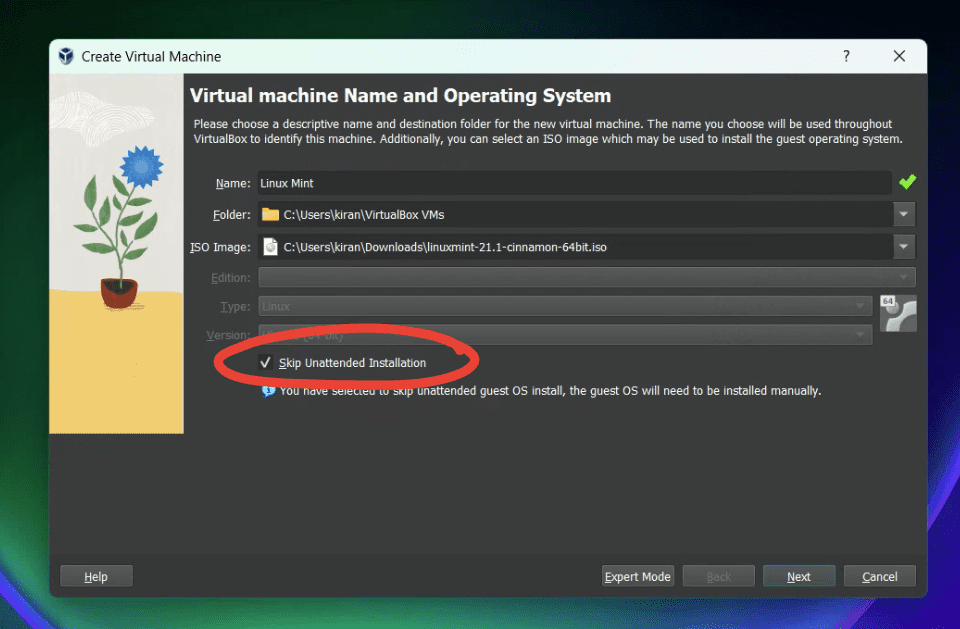
“Skip Unattended Installation” option in VirtualBox
When using VirtualBox to create a new virtual machine, you may encounter an option called “Unattended Installation.” This feature streamlines the installation process by automating specific steps and using predefined settings. While it can be a time-saver, you might prefer more control over the installation process and customize your Linux VM according to your preferences.
When you reach the “Unattended Installation” step, do not check the “Unattended Installation” checkbox.
By leaving the “Unattended Installation” checkbox unchecked, you can manually configure your Linux VM during the installation process.
Benefits of skipping unattended installation
- Customization: A manual installation allows you to configure partitioning, package selection, and localization according to your preferences.
- Learning experience: Going through the manual installation process can help you better understand how Linux works and the various options available during the installation.
- Troubleshooting: If you encounter issues during the installation, a manual installation allows you to identify and address problems more easily than an automated installation.
Step 3 – Allocate resources
During this stage, you must allocate resources to your VM, including memory (RAM) and storage. I recommend giving at least 2 GB of RAM, although 4 GB would be ideal.
Choose more than one processor if you have a multicore CPU (which is typical today!). I selected 5 in my example.
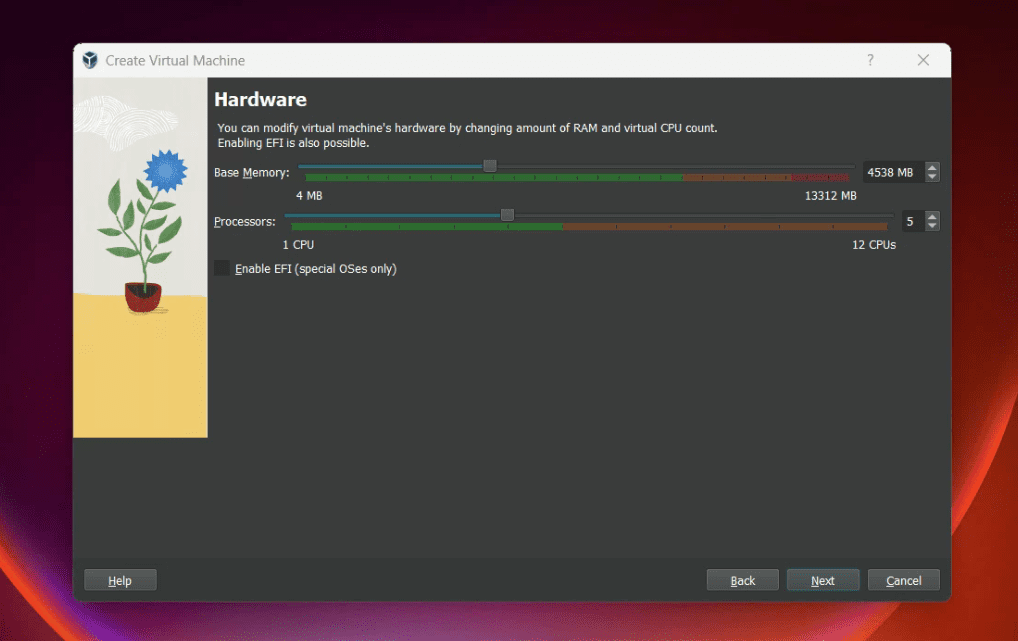
Allocating Hardware Resources
You might notice the “Enable EFI (special OSes only)” option. However, I recommend leaving it unchecked for most common Linux distros.
When to enable EFI in VirtualBox
EFI (Extensible Firmware Interface) is a firmware interface specification that replaces the traditional BIOS (Basic Input/Output System) used by many computers. EFI provides a more modern and flexible framework for managing system firmware and booting operating systems. In VirtualBox, enabling EFI can be helpful in certain situations when installing and running a Linux distribution. In this section, I’ll explain when to enable EFI in VirtualBox and how to do so.
When to enable EFI
You should consider enabling EFI in VirtualBox in the following situations:
UEFI-based Linux distributions: Some modern Linux distributions are designed to work specifically with UEFI systems. If you’re installing one of these distributions, enabling EFI in VirtualBox will ensure better compatibility and smoother operation.
Testing UEFI compatibility: If you’re testing or developing software and want to ensure its compatibility with UEFI systems, enabling EFI in your virtual machine can help you simulate a UEFI environment.
Dual-boot systems: If you’re using a dual-boot setup on your host machine that includes UEFI and legacy BIOS, enabling EFI in VirtualBox can help maintain consistency between your host and guest operating systems.
Keep in mind that not all Linux distributions require EFI to function correctly. You can often install and run Linux in VirtualBox without enabling EFI.
For storage, create a virtual hard disk with at least 20 GB of space. While you can allocate more resources, I found these to be sufficient for my experimentation.
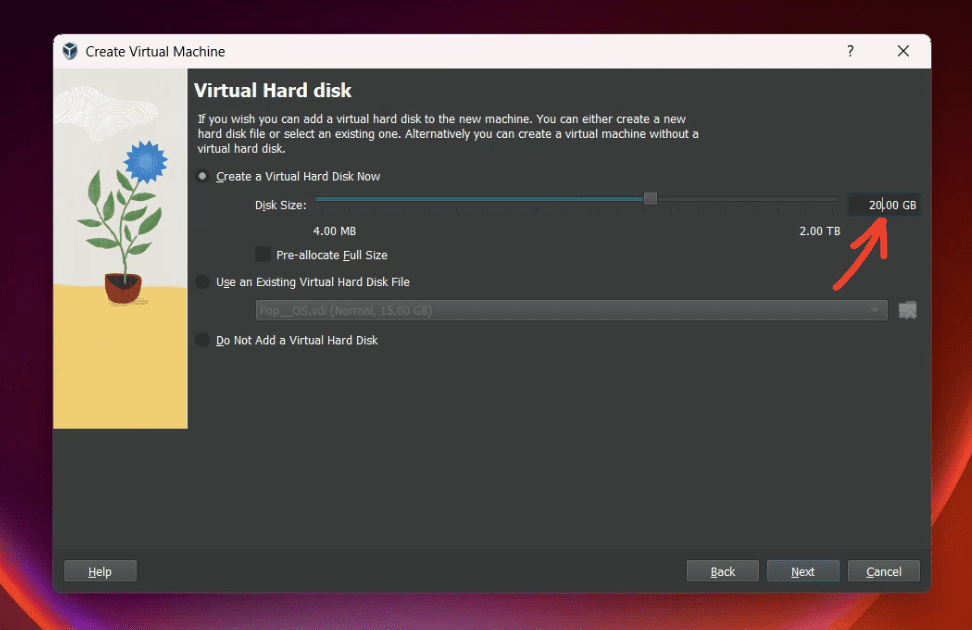
Allocating Virtual Hard Disk Size
Step 4 – Review summary
You will be presented with a summary of the configuration you have chosen for the new virtual machine. Review and click “Finish”.
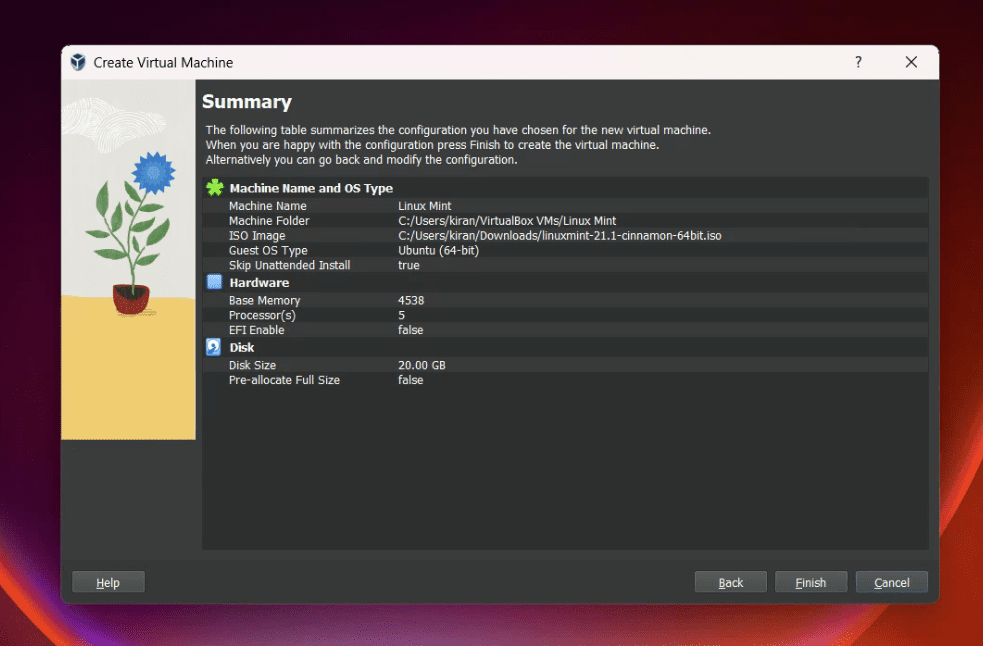
Summary of the virtual machine configuration
Step 5 – Configure virtual machine settings
Before you start your new VM, tweak its settings by clicking on “Settings” in the VirtualBox main window. In the “System” settings, enable the I/O APIC option under the “Motherboard” tab and increase the number of processors to at least two under the “Processor” tab for better performance. Trust me; you’ll appreciate the speed boost!
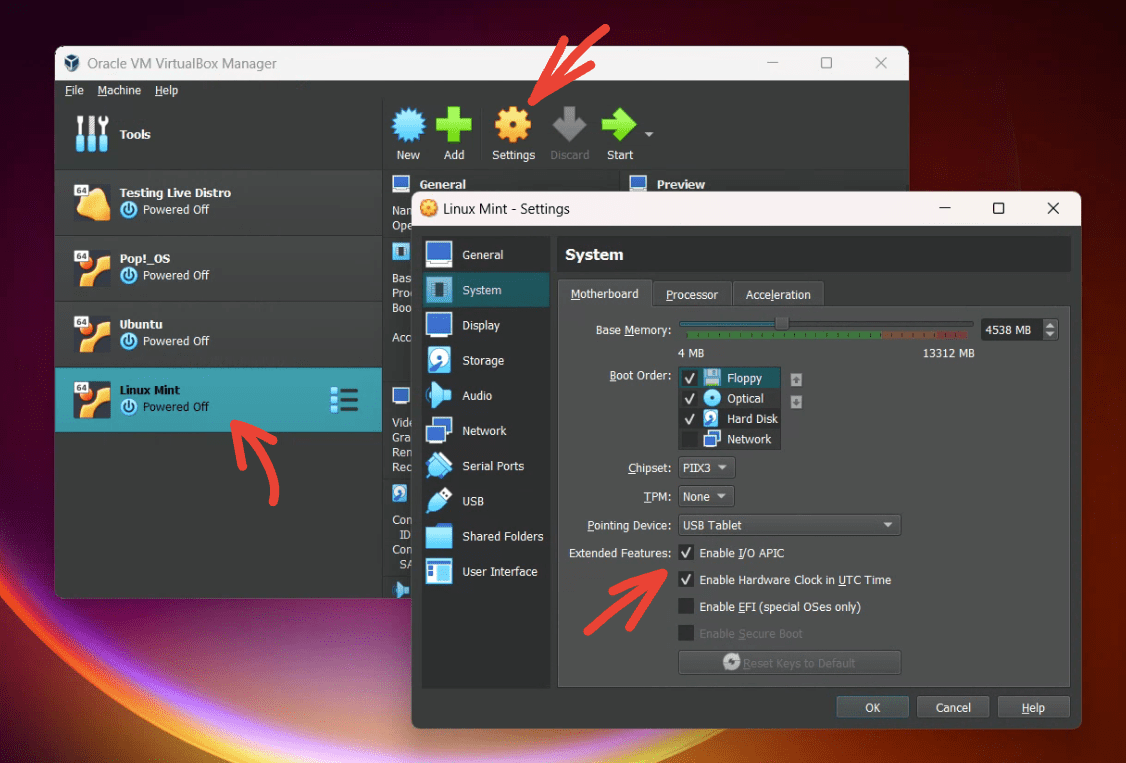
Virtual Machine Settings
Step 6- Start the installation
Now it’s time for the main event! Start your VM by clicking “Start” in the VirtualBox main window. You should see the Linux installer boot up.
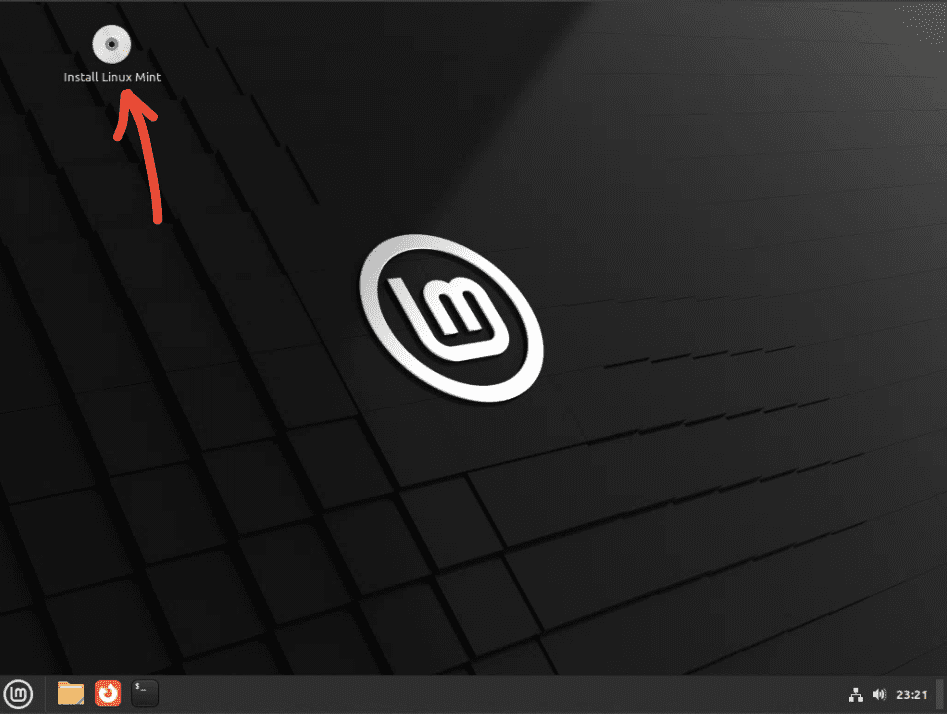
Installing Linux Mint
Follow the on-screen instructions to install Linux on your virtual machine. You will go through the language and keyboard layout type. I chose the “Erase disk and install Ubuntu” option for the installation type, which is perfect for a VM.
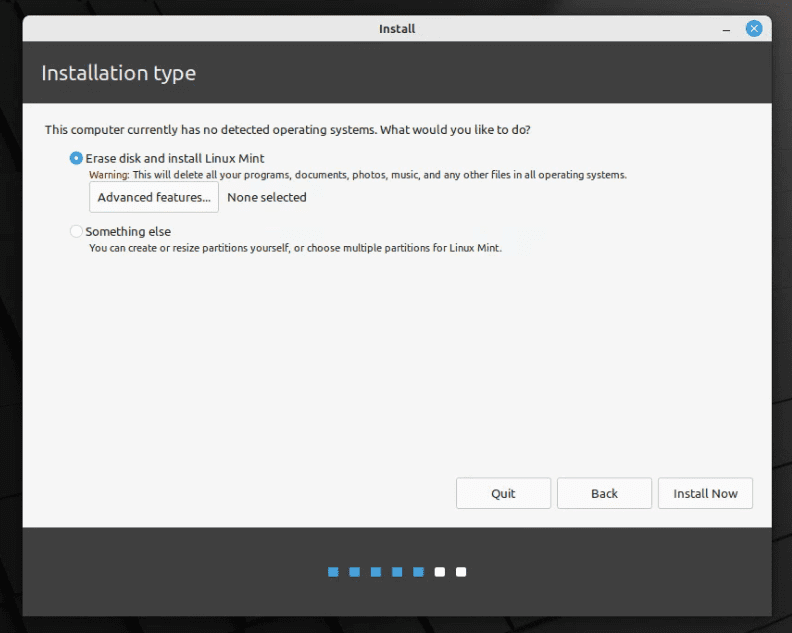
Installation type
Understanding LVM, erase disk, and use ZFS settings
While installing some Linux distributions, you may come across settings related to disk management, such as LVM (Logical Volume Manager) and ZFS (Zettabyte File System). It’s important to understand these settings and their implications before deciding.
LVM (Logical Volume Manager)
LVM is a disk management technique that allows you to manage multiple physical storage devices (such as hard drives or SSDs) as a single logical storage unit. This provides greater flexibility in managing storage space, as you can easily resize, move, and modify partitions as needed. LVM is particularly useful when you need to expand your storage capacity or create complex configurations.
When you select the LVM option during the Linux installation process, the installer will automatically set up your disk partitions using LVM. This can be a good choice if you anticipate needing to resize or manage partitions frequently or if you’re working with multiple disks. However, remember that LVM can add some complexity to the system and may not be necessary for basic installations or if you’re just experimenting with Linux in VirtualBox.
Erase disk
The “Erase Disk” setting is an option during the Linux installation process that completely erases the contents of your virtual hard drive and creates new partitions for your Linux distribution. This is useful if you want to start with a clean slate and ensure that any previous data or configurations are removed from the virtual machine. If you’re installing Linux on a new virtual machine in VirtualBox, this setting should not pose any risks, as it only affects the virtual hard drive allocated to that specific virtual machine.
Use ZFS (Zettabyte File System)
ZFS is an advanced file system and logical volume manager originally developed by Sun Microsystems. It offers features such as data integrity protection, snapshot support, and built-in RAID capabilities. ZFS is designed to be highly scalable and provide superior data management, making it an attractive choice for enterprise environments or situations where large amounts of data need to be stored and managed efficiently.
When you select the “Use ZFS” option during the Linux installation process, the installer will set up your disk partitions using the ZFS file system. This can be an excellent choice if you require the advanced features and robustness that ZFS provides. However, ZFS can be more resource-intensive than other file systems and may not be necessary for casual users or those just experimenting with Linux in VirtualBox.
I selected “None” and proceeded with the installation.
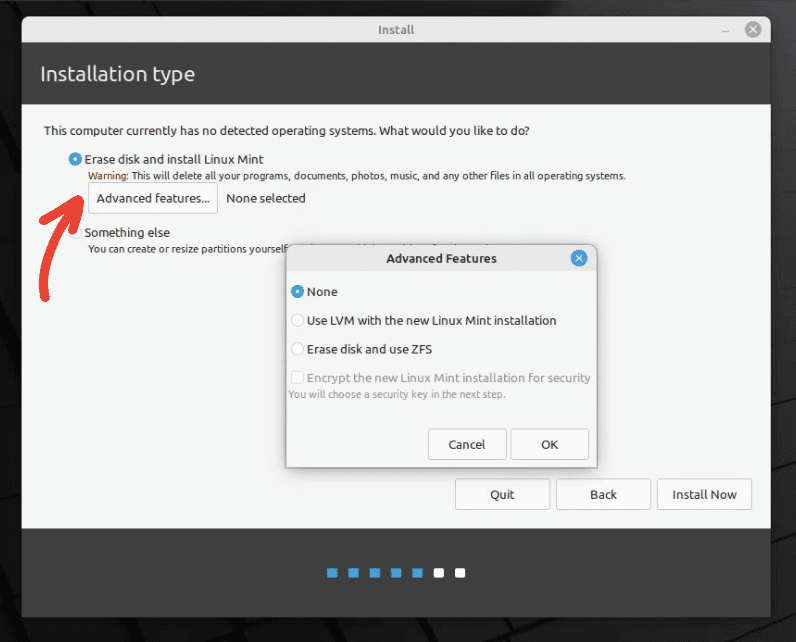
Advanced Features
While the installation process was smooth, I did run into some minor hiccups. My VM occasionally froze, requiring a restart. Just be patient and give it a few tries if necessary. You will be required to input your user account information on the way.
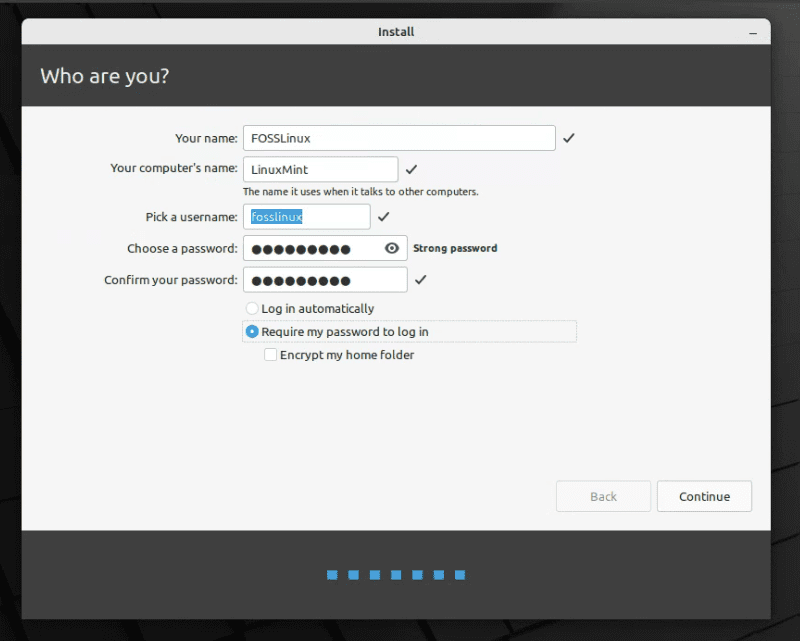
Enter account information along the way
Step 7 – Enjoy your new Linux VM
Once the installation is complete, you should see the Linux desktop within your VM.
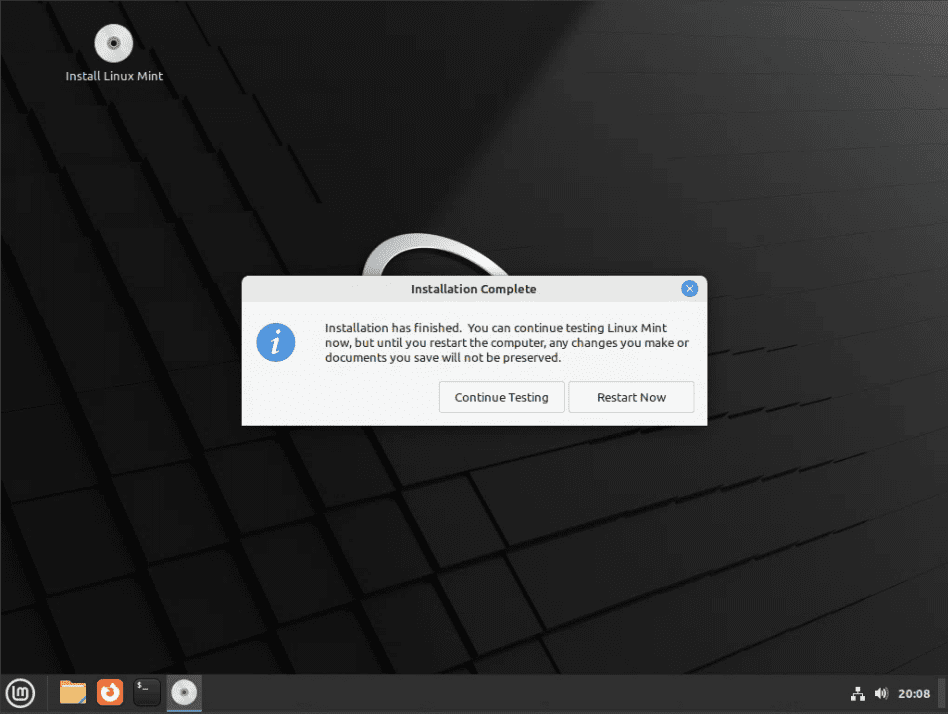
Installation Complete Notification
You may receive a prompt to remove the installation medium during the process. To do this, go to the VirtualBox menu and click “Devices.” Then, navigate to “Optical Drives” and select “Remove Disk from Virtual Drive.” After completing this step, press “ENTER” to continue.
Congratulations, you’ve successfully installed Linux on a VirtualBox! Now you can explore and learn about Linux at your own pace without compromising your main operating system.

Linux Mint Welcome Screen
Common Troubleshooting Tips & Tricks
Despite the overall smooth experience of installing Linux on VirtualBox, you may encounter some issues along the way. Based on my personal experience and the knowledge I’ve gathered from the community, here are some common troubleshooting tips and tricks to help you overcome any obstacles:
Stuck at boot or black screen
If your virtual machine gets stuck at the boot or displays a black screen, try changing the graphics controller. In VirtualBox settings, go to “Display” and select a different graphics controller, such as “VBoxSVGA” or “VMSVGA.” You may also want to increase the video memory for improved performance.
Slow performance
Consider allocating more resources if you experience sluggish performance in your Linux VM. Increase the RAM, processor count, or video memory to enhance the overall experience. Additionally, ensure that hardware virtualization (VT-x/AMD-V) is enabled in your computer’s BIOS settings.
Network connectivity issues
If your Linux VM has trouble connecting to the internet, try changing the network adapter settings. In VirtualBox settings, navigate to “Network” and select “Bridged Adapter” under “Attached to.” This will allow your VM to use the same network as your host machine.
Shared folders not working
To share files between your host machine and Linux VM, you’ll need to install VirtualBox Guest Additions. In your running VM, click on “Devices” in the VirtualBox menu and select “Insert Guest Additions CD Image.” Follow the on-screen prompts to install Guest Additions, and then reboot your VM. Afterward, you can set up shared folders through the VM settings.
Screen resolution issues
If your Linux VM’s screen resolution is too small or not adjusting correctly, ensure you’ve installed VirtualBox Guest Additions, as mentioned in the previous tip. Once installed, you can change the screen resolution within the Linux VM display settings.
Audio issues
If you encounter audio problems in your Linux VM, try changing the audio controller. In VirtualBox settings, go to “Audio” and select a different audio controller, such as “ICH AC97” or “SoundBlaster 16.” Additionally, verify that the audio driver is installed and functioning correctly within the Linux VM.
Remember, the Linux and VirtualBox communities are filled with helpful resources, so don’t hesitate to consult forums, tutorials, or blog posts if you need further assistance.
My recommended VirtualBox settings that work!
Throughout my Linux journey, I’ve experimented with various settings in VirtualBox to optimize my virtual machine’s performance. Here are my recommended settings that have consistently provided me with the best experience:
Memory (RAM): Allocate at least 2 GB of RAM, but ideally 4 GB, to your virtual machine. This ensures a smoother experience and faster response times when running multiple applications.
Processors: Assign at least 2 processors to your VM. This improves performance by allowing the VM to handle tasks more efficiently. You can increase this number depending on your host machine’s capabilities.
Graphics Controller: Choose the “VMSVGA” or “VBoxSVGA” graphics controller for better compatibility with Linux distributions. Also, allocate at least 64 MB of video memory for improved graphics performance.
Storage: Create a virtual hard disk with a minimum of 20 GB storage. This should be sufficient for most users, but if you plan to install large applications or store lots of data, consider increasing this amount.
Network Adapter: In the “Network” settings, use the “Bridged Adapter” option. This allows your VM to share the same network as your host machine, providing a more stable and reliable internet connection.
Audio Controller: Choose the “ICH AC97” audio controller for better compatibility with Linux distributions. This should provide adequate audio support for most applications.
Virtualization: Ensure that hardware virtualization (VT-x/AMD-V) is enabled in your computer’s BIOS settings. This significantly improves the performance of your VM.
Guest Additions: Don’t forget to install VirtualBox Guest Additions, which provides additional features like shared folders, better screen resolution support, and improved performance. To install, click on “Devices” in the VirtualBox menu and select “Insert Guest Additions CD Image” while your VM is running. Follow the on-screen prompts to complete the installation.
Bonus Tip!: Enabling clipboard copy-paste between host and VM and setting up shared folders
One of the most convenient features of running Linux on a VirtualBox is the ability to share files and clipboard content between the host and virtual machines. In this section, I’ll walk you through the steps to enable clipboard copy-paste and set up shared folders.
Enabling clipboard copy-paste
To enable bi-directional clipboard sharing between your host machine and Linux VM, follow these steps:
Ensure you’ve installed VirtualBox Guest Additions, as described in the “My Recommended VirtualBox Settings that Work!” section.
With your Linux VM powered off, select it in the VirtualBox main window, and click “Settings.”
In the settings window, navigate to the “General” tab and click the “Advanced” tab.
In the “Shared Clipboard” dropdown menu, select “Bidirectional.”
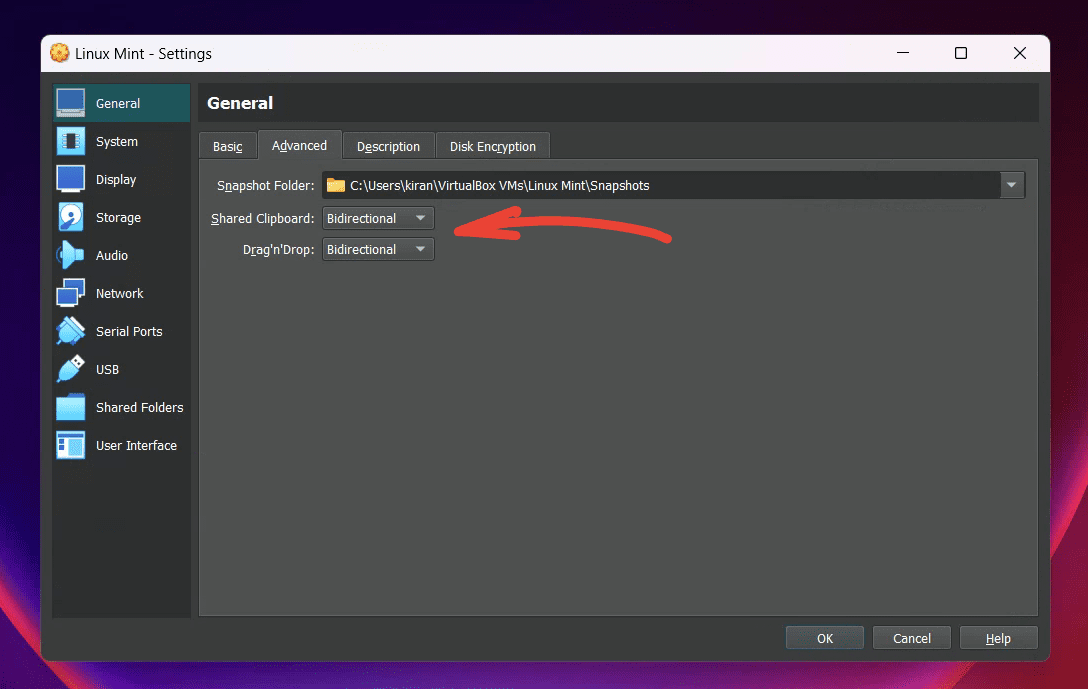
Shared Clipboard Setting
Click “OK” to save your settings.
Start your Linux VM. Now, you should be able to copy and paste text and images between your host machine and the VM seamlessly.
Setting up shared folders
Shared folders allow you to access files from your host machine within your Linux VM. To set up shared folders, follow these steps:
Ensure you’ve installed VirtualBox Guest Additions, as described in the “My Recommended VirtualBox Settings that Work!” section.
On your host machine, create a folder that you want to share with your Linux VM. For example, you can create a folder named “Shared_VM” on your desktop or another convenient location.
With your Linux VM powered off, select it in the VirtualBox main window, and click “Settings.”
In the settings window, navigate to the “Shared Folders” section.
Click the “+” icon on the right side to add a new shared folder.
In the “Add Share” dialog, click the folder icon next to the “Folder Path” field and browse the folder you created in Step 2.
Enter a name for the shared folder in the “Folder Name” field. You can use the same name as the folder on your host machine.
Check the “Auto-mount” option to ensure the shared folder is automatically mounted and available whenever you start your Linux VM.
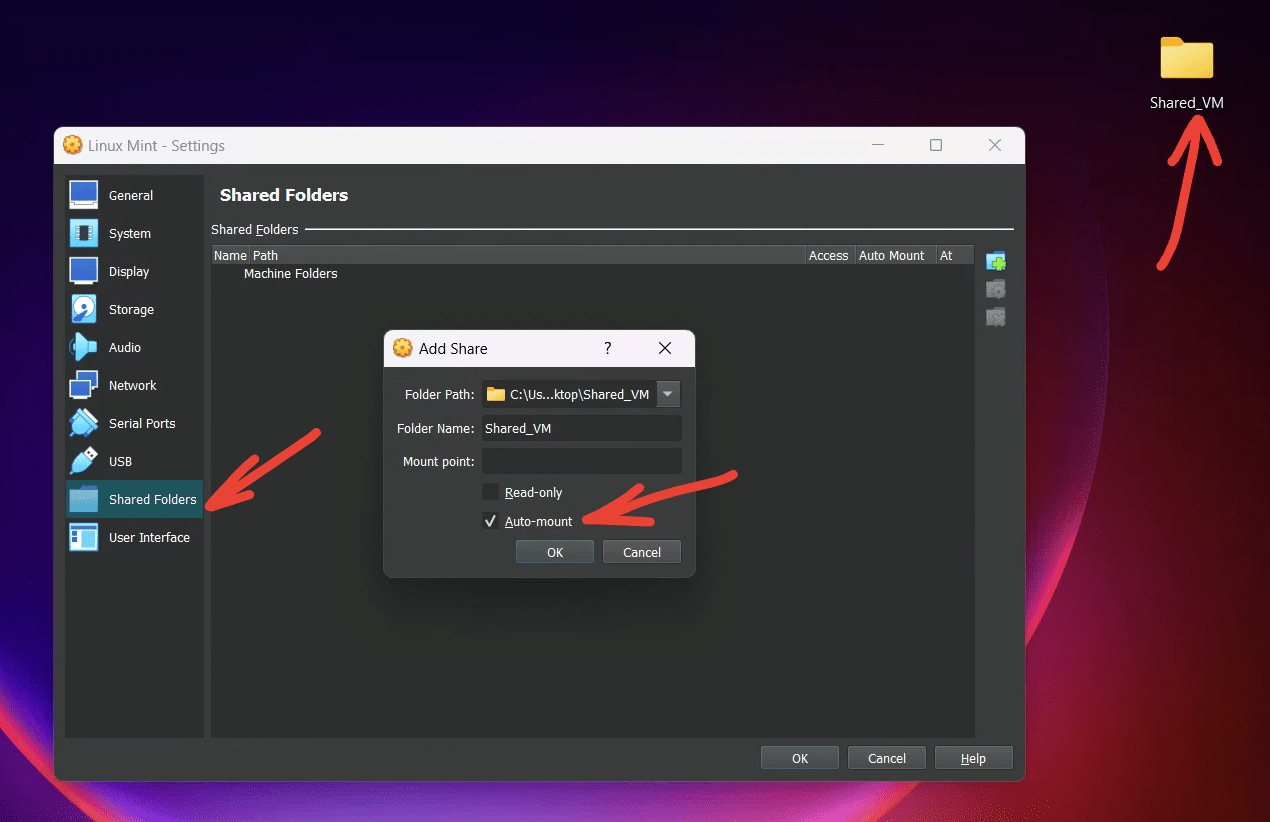
Setting up Shared Folder
Click “OK” to save your settings and close the “Add Share” dialog. Then, click “OK” again to close the settings window.
Start your Linux VM. The shared folder should now be accessible within the Linux file manager, usually found under the “/media/sf_<folder_name>” directory (replace <folder_name> with the name you assigned in step 7).
You can streamline your workflow by enabling clipboard copy-paste and setting up shared folders, and quickly transferring files and data between your host machine and Linux VM.
These settings have worked wonders for my Linux VM, offering a smooth and enjoyable experience. Remember that individual experiences may vary depending on your host machine’s specifications and your chosen Linux distribution. Feel free to experiment with these settings to find the perfect balance for your specific needs.
Conclusion
Overall, I found the process of installing Linux on a VirtualBox to be a fun and rewarding experience. While there were some minor annoyances, like the occasional freeze, I am thrilled to have taken the plunge into the world of Linux. VirtualBox has proven to be an excellent choice for my Linux journey, offering versatility, ease of use, and cost-effectiveness. With my recommended settings, troubleshooting tips and tricks, and this guide on enabling clipboard copy-paste and shared folders, you’re well-prepared to tackle any challenges that come your way. So go ahead, take the leap, and start exploring Linux on a VirtualBox today!