
Boot up in simple terms refers to the time from power on to the time of user start. This is achieved by using a boot script that contains instructions on which code to load and which processes and applications to start.
There are a few stages of Linux startup (before booting into systemd or System V init and before the desktop environment is loaded), and you can configure your own autostart script or program at any given stage where it could be a single command or rather a series of commands or an executable shell script. Nevertheless, it is informative to note that there could be some differences in startup procedure between various Linux distros and versions.
Modern versions of Linux will first boot into systemd while older versions utilize System V init. Both methods will run cron and rc.local before the desktop environments like KDE or GNOME are loaded. On the flip side, server-based Linux distros run the default shell, for instance, Bash, after the user logs in at the console instead of loading the desktop environment.
To appropriately add services and scrips at startup on Debian 11, you need to create Systemd units. This guide will focus on three methods to add scripts at startup on your Debian 11 machine:
- Using systemd
- Using cron
- Using rc.local
Let us get started.
What is a systemd unit?
Systemd units are configuration files encompassing information for the appropriate management or execution of certain system files. In systemd, a unit denotes any resource that the system knows how to operate on and manage. Systemd units are usually used to start, stop, manage services, organize boot processes, maintain tasks and processes, create sockets, automount points, swap files or partitions, mount file-system, and initialize hardware.
Systemd units are positioned under the directory /etc/systemd/system. Any script you want to run at boot using Systemd units must be indicated in a file (unit) under the above-mentioned directory.
To simplify the relationship between systemd and units better, contemplate systemd as a coach of a team then the units as the amenities and necessities in the team, for instance, balls, corns, gym, playing ground, playing kits, just but to mention a few. So to make a coach manage the team for it to perform better, they utilize the available equipment to improve the team profoundly. Similarly, the systemd uses units to control and manage the system processes and services.
Some of the Systemd Unit types include:
- Target – A collection of units that describes a synchronization point. The synchronization point is used at boot time to fire up the system in a specific state.
- Mount – A unit of this kind controls the file-system mount point.
- Device – A unit of this type gears device-based activation like a device driver.
- Socket – This unit type activates a service when the service gets incoming traffic on a listening socket.
- Path – This unit type monitors files/directories then activates/deactivates a service if the stated file or directory is retrieved.
- Timer – This unit type does the activation and deactivation of a specified service based on a timer or when the set time elapses.
- Scope – A unit that systematizes and manages foreign processes.
Listing systemd units
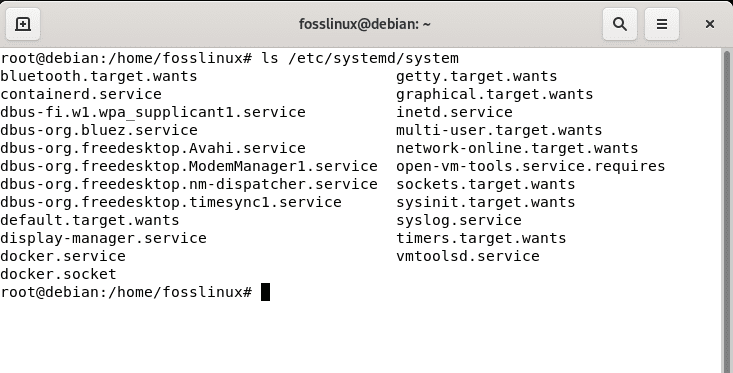
Below is a quick view of the existing systemd units in our system using the ls command.
ls /etc/systemd/system
listing systemd info
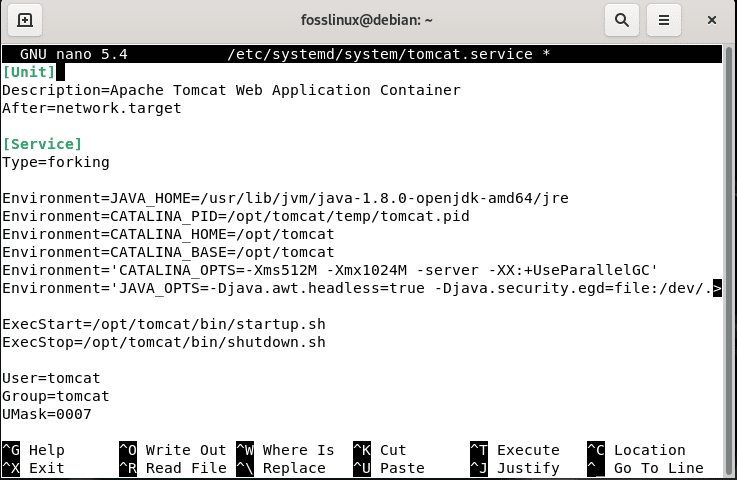
One of the files excluded in the snapshot above is the tomcat.service, whose contents are as displayed by the following image.
tomcat.service
To get familiarized with unit configuration files in the above snapshot, look at the following detailed info. Don’t worry about them since the unit you will create to run your script will be a bit simpler.
The unit directives include;
- Description: This directive usually permits you to append a description for a unit; here, you can set the unit name to be acknowledged.
- Wants: The unit dependencies are habitually specified here. A point to note is that there are various directives for this similar purpose. For instance, the directive Requires stipulates strict dependencies, without which the unit cannot function. Contrary to Requires, Wants is utilized in specifying dependencies without which the unit can keep operating.
- After: The current unit will start after the unit designated in this directive.
- Type: forking indicates the service shall be killed while keeping child processes that must be assigned a Process Identification (PID).
- Environment: Here, one can specify the unit environment variables.
- ExecStart: This directive permits you to specify the path and commands you want to execute.
- ExecStop: you can state the command used to stop the unit.
- SuccessExitStatus: This directive permits you to enumerate exit status and signals.
- User: you can identify the user owner of the unit.
- Group: you can enumerate the group owner of the unit.
- UMask: you can specify the user mask.
- RestartSec: If the unit restarts spontaneously, you can specify the time to wait to reboot the service.
- Restart: you can outline for Systemd when the unit should be restarted. The accessible options are always on-watchdog, on-failure, on-abnormal, on-success, and on-abort.
The [Install] directive in the instance above is WantedBy.
- WantedBy: This directive permits you to outline the unit as a dependency; it is akin to the Wants directive, but to designate if the current unit is well thought-out as a dependency by another unit.
Other usual directives in the [Unit] section which were not incorporated in the previous screenshot:
- Requires: In this directive, you can designate dependencies to avert boot failures. Opposing to the Wants directive, if a dependency designated with the directive Requires is not met, the unit will not function.
In the [Service] section:
- PIDFile: The forking directive necessitates the PIDFile directive, which has the path to the file PID of the child process for Systemd to detect it.
- StartLimitInterval: specifies that the unit has 60 seconds for 10 tries to restart upon failure.
- StartLimitBurst: This directive shows the attempts limit, in the previous example, ten attempts in 60 seconds.
You can visit this link for more info on Systemd units.
Run a script on boot up in Debian 11
Method 1: Using systemd unit to run a script on bootup
Running a script at boot may be straightforward and possess less configuration than the tomcat.service file we previously used to display the unit’s common content.
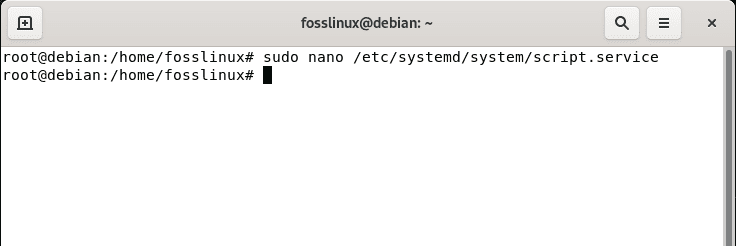
The files (units) having the info on scripts running at boot are positioned in the /etc/systemd/system. To express a script to run at boot, you must generate a new unit for this script. As such, you can utilize any editor for creation purposes. However, in our instance, we will go with the nano editor, in which we will create a unit named script.service. Note that this name can be changed to any of your preferences to identify your script conveniently.
sudo nano /etc/systemd/system/script.service
nano editor
After that, copy and paste the following code into the file you generated under /etc/systemd/system.
</PATH/TO/Script.sh> with the path to your script.
[Unit]

Description=Your Script Name here

After=default.target

[Service]

ExecStart=/PATH/TO/Script.sh

[Install]
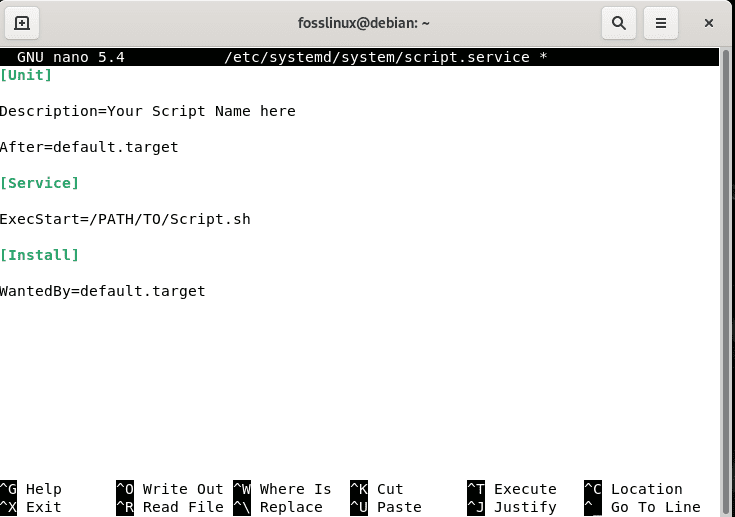
Copy-paste the following code.
After that, remember to replace <your script Name here> with your script name and </PATH/TO/Script.sh> with the path to your script as shown below:
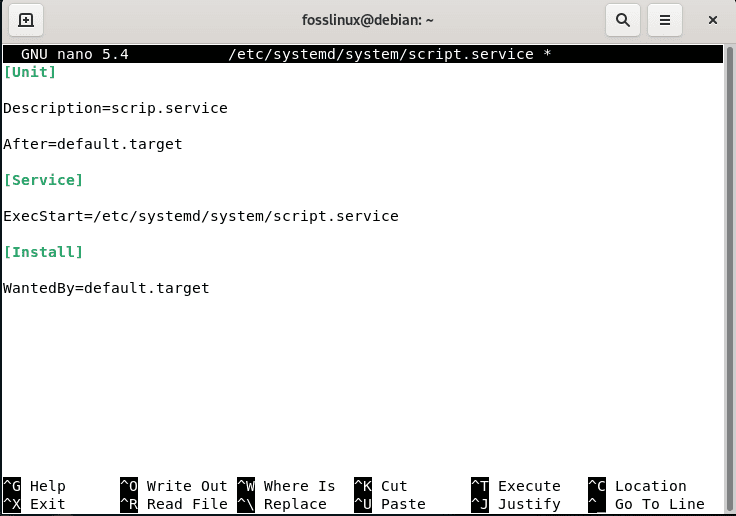
replaced file
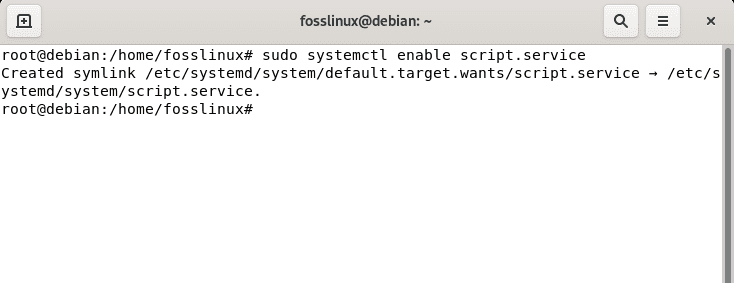
After copying the data into the file under /etc/systemd/system/, you should enable it via the systemctl command displayed below.
sudo systemctl enable script.service
enable file
Note: Remember to replace <script.service> with the appropriate name you assigned to the unit.
And boom! Now your script is ready to startup in Debian 11
Method 2: How to automatically run a program on Linux startup through Cron
Cron is a daemon used to run scheduled commands. The commands are stored in the crown job table or contrab and are peculiar for each user in the system. It is fired up during system boot either by System V init or systemd, and you can schedule your job or instead program to be executed right during the system boot itself by carefully going through the subsequent steps:
Step 1: Open the default contrab editor by running the following command:
crontab -e
If it is the first time you are running the contrab command, you will be required to pick an editor as shown by the next piece of code:
$ crontab -e
no crontab for user - using an empty one

Select an editor. To change later, run 'select-editor'.
1. /bin/nano <---- easiest
2. /usr/bin/vim.basic
3. /bin/ed

Choose 1-3 [1]:
Upon selecting the given number of options, a contrab will be created for you and executed using the user’s privileges. In case you need your program to run as the root user, run contrab -e as the root user itself
Step 2: Add a line starting with @reboot
# m h dom mon dow command
@reboot
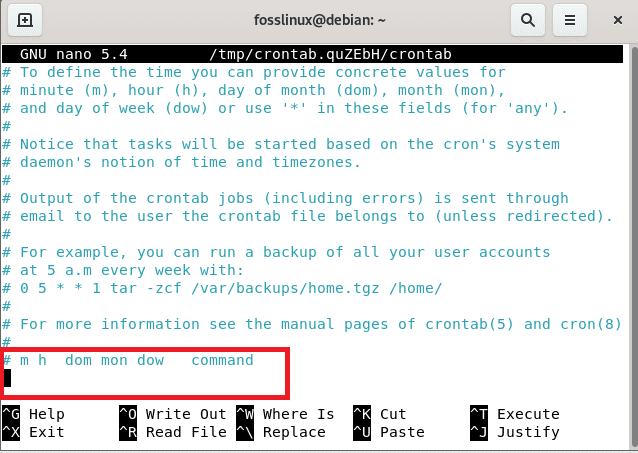
add a starting line
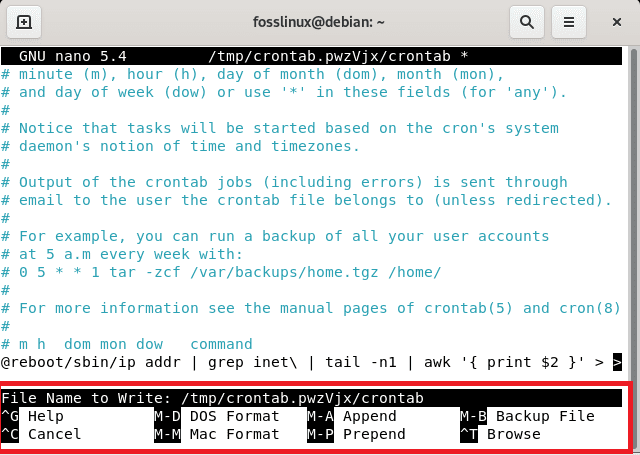
Step 3: Insert the preferred command to start your program after the @ reboot as shown below:
@reboot /sbin/ip addr | grep inet\ | tail -n1 | awk '{ print $2 }' > /etc/issue && echo "" >> /etc/issue
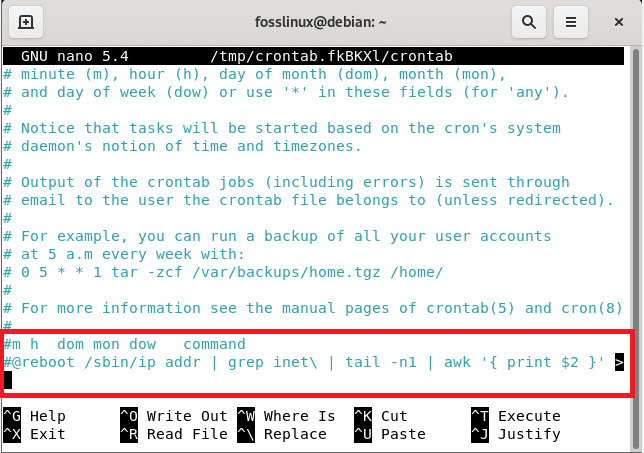
insert command to start a program
@reboot defines the task to be executed during the system boot.
Note: Ensure to use the full path for your programs whenever possible and write your commands in a single line to avoid conflicts with the system.
Step 4: Save the file
After closing down the editor using the “Ctrl + x” as shown below
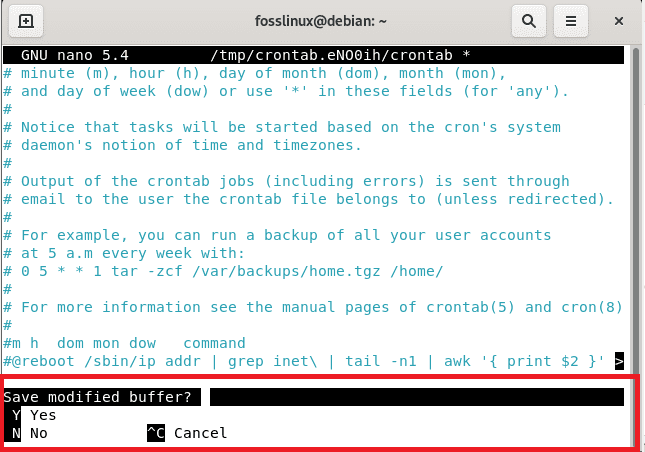
Press Ctrl + x
then “Y” to save,
y to save
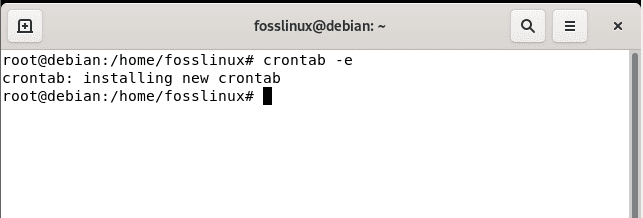
You should see a command saying “installing new contrab” in the terminal as shown below:
new contrab installed
Step 5: Configuration
Finally, you can run a check to confirm if the contrab was configured correctly. However, it is essential to note that this step is not mandatory
crontab -l
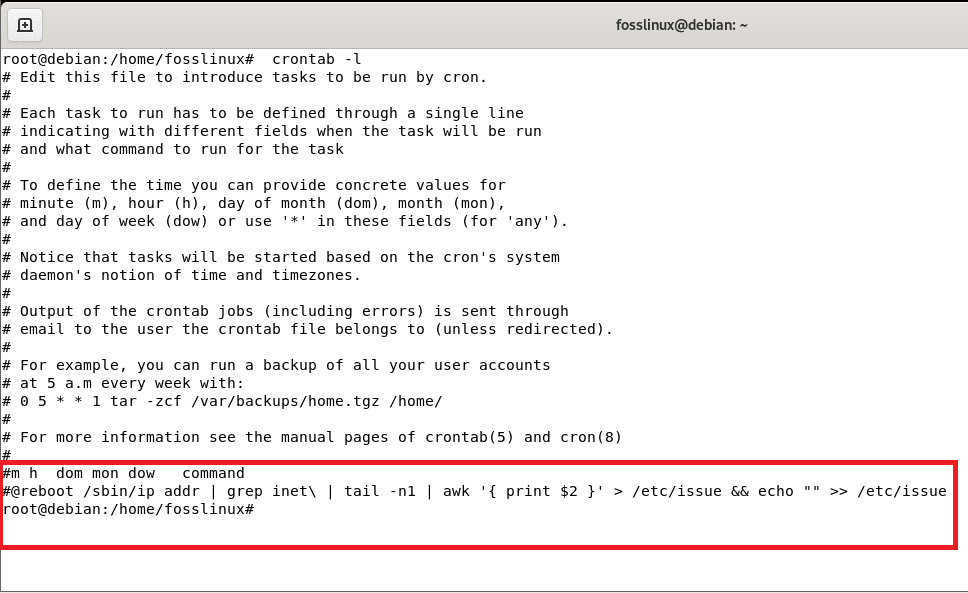
configuration check
And that should do it, guys!
Method 3: How to automatically run a program on Linux startup via RC.LOCAL
rc.local is simply a legacy from the System V init system. It is the last script to execute before proceeding to a login screen for the desktop environment or a login prompt at the terminal. It is usually a Bash shell script, and you can also run anything from the script. Use the following steps to configure your local rc.local script.
Step 1: First, create the /etc/rc.local file if it does not exist in your system using your preferred editor and as the root user. In our case, we will go with the Vi editor by running the following command:
sudo vi /etc/rc.local
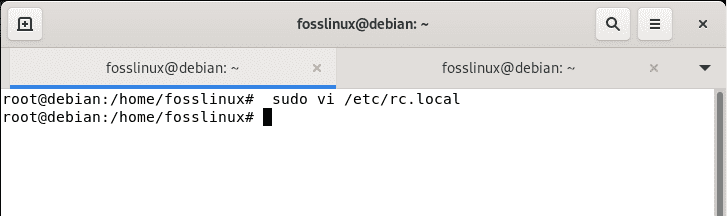
open vi creator
Step 2: Add placeholder code
After that, append the following placeholder code into the file
#!/bin/bash

exit 0
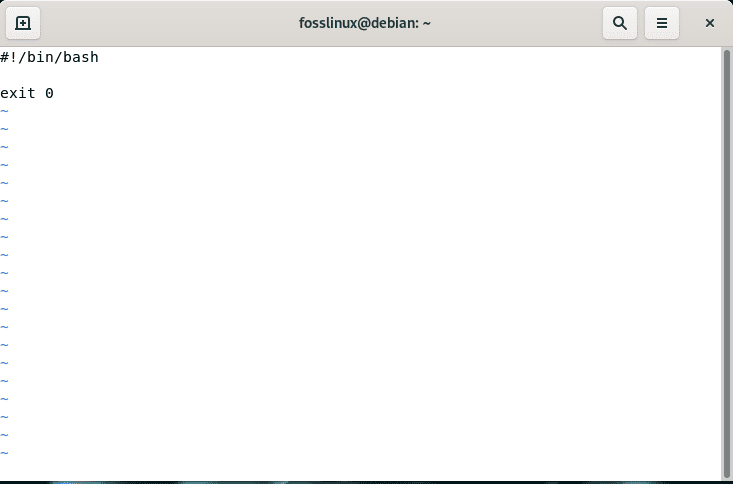
add the command
It must begin with the interpreter (/bin/bash) and ends with an exit code (0 that designates success).
Step 3: Add command and logics
Here, you will add command and logics to the files as necessary.
/sbin/ip addr | grep inet\ | tail -n1 | awk '{ print $2 }' > /etc/issue
echo "" >> /etc/issue
Have a glimpse of how this is done in the following snapshot.
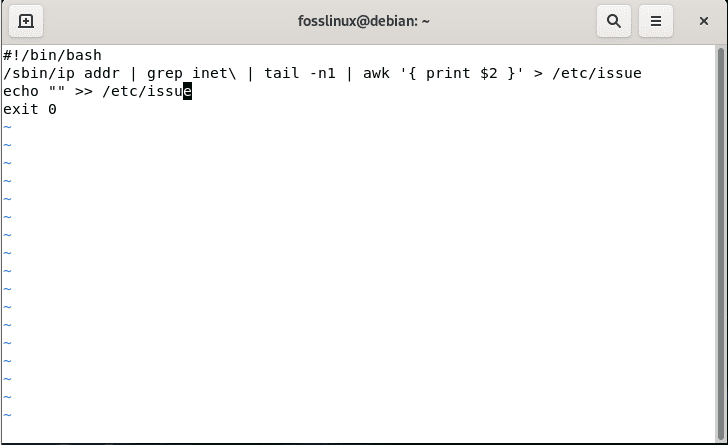
add command and logics to the file
Step 4: Save and exit Vi Editor
To save and quit a file in Vim editor, use the “:wq” command. We want to save the file and exit the editor concurrently to run the command that makes the file executable. As such, press ESC which will switch to normal mode. After that, type :wq and hit “Enter.”
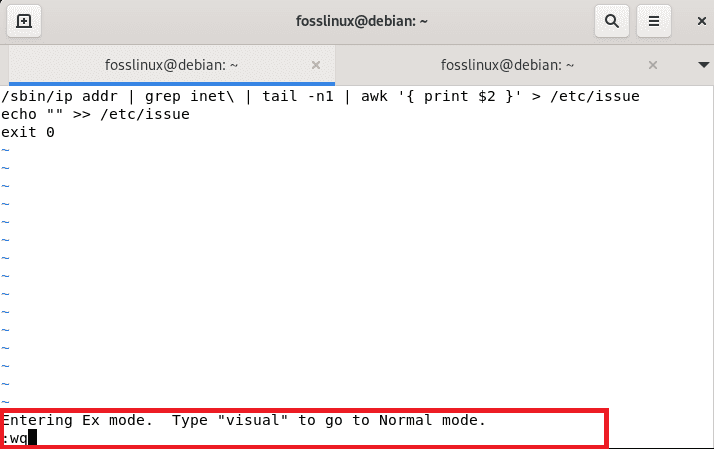
save and exit
Step 5: Make the file executable
After saving the file, we need to make it executable using the following command:
sudo chmod a+x /etc/rc.local

make the file executable
The file should then be executed as the root user during system boot.
Conclusion
In conclusion, running scripts at boot in Debian 11 using Systemd, cron, and rc.local is relatively easy. Any Linux user can quickly complete this task by creating a simple file within the units directory. This article has gone through different ways of running a script at a startup in the Linux distro, specifically Debian.
Each has its advantages and disadvantages, but generally speaking, systemd and cron should be the most preferred options. On the other side, you can also use rc.local that we also looked at.
2 comments
“script.service” -> confused and sloppy description – better go and have a pizza
I think you need add string “WantedBy=default.target” to the listing of script.service