
Linux Mint is by far one of the best Linux distros for beginners, especially for users coming over from Windows. It provides a “ready to go” out-of-the-box experience so new users can get on with their work without thinking too much. But with that being said, it does require you to configure a couple of things manually to get the best experience.
For instance, let’s say you need to work on a document and send it to your colleague who is using MS Office. But when creating your document in LibreOffice – Linux Mint’s default Office Suite, you will notice there are no Microsoft Fonts like “Times New Roman.” And so, to avoid these types of issues, we recommend users install MS Fonts right out of the gate.
Now, this is just one of the many issues you will run into if you continue using Linux Mint in its default configuration. As such, we have put together a comprehensive list of the 15 things you must do after installing Linux Mint.
15 Things to do after installing Linux Mint
Disclaimer: As you know, Linux Mint is available in different flavors like XFCE, Cinnamon, and Mate. We have used Cinnamon for the demonstrations. However, everything we discuss will still be the same for whatever desktop environment you pick.
1. Use Timeshift to create system snapshots
You have successfully installed Linux Mint on your system, and everything is working perfectly. This makes it an excellent time to create a system snapshot (back up), so you have a “checkpoint” to return to if anything goes wrong.
Now, Linux Mint comes with one of the best System Snapshot tools out there – Timeshift. To open it, go into the app menu by pressing the windows button and search for “Timeshift” using the search option. Now click on Timeshift as shown in the image, and it will start the “Setup Wizard”.
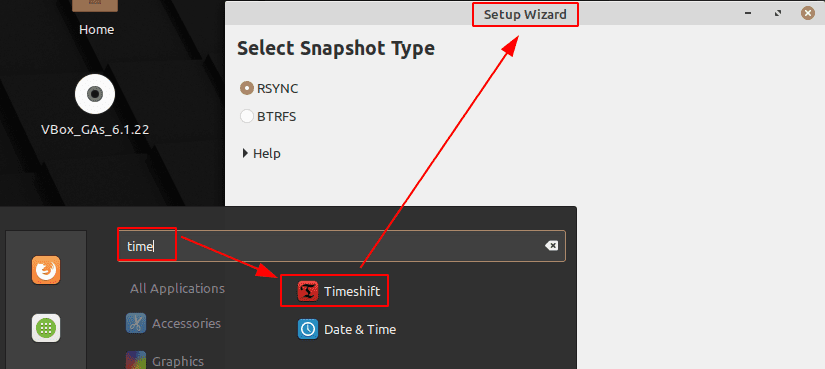
Launch Timeshift
We have already created a detailed guide on how to backup and restore using Timeshift. It is created for Ubuntu users, but since Linux Mint is based on Ubuntu, the tutorial will translate seamlessly for your system.
Once you have Timeshift setup and created your first system snapshot, it is time to head on to the next step.
Note: We recommend creating a snapshot before installing/updating apps or doing any complex configuration on your system. This ensures that you will have a stable point to revert to in case of an accident.
2. Update your system
After your first boot, you will notice a bunch of pending software updates for your system. To access these updates, click on the update icon at the bottom-right corner of the screen, as shown in the image. This is going to open the “Linux Mint Update Manager”.
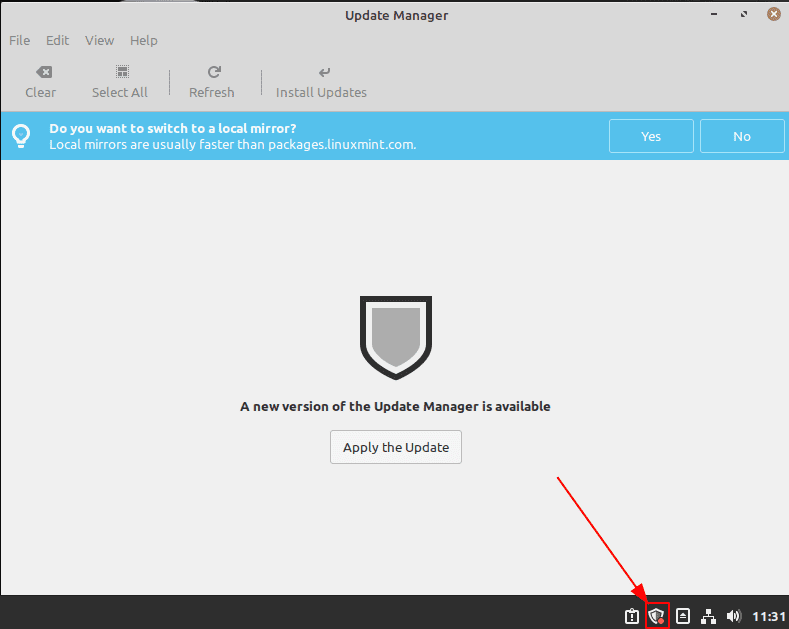
Linux Mint Update Manager
If this is your first time opening the update manager, it will ask you whether you want to switch to a local mirror, allowing you to download updates faster.
Click on “Yes,” and it will open a new window where you get to select which mirror you wish to use.
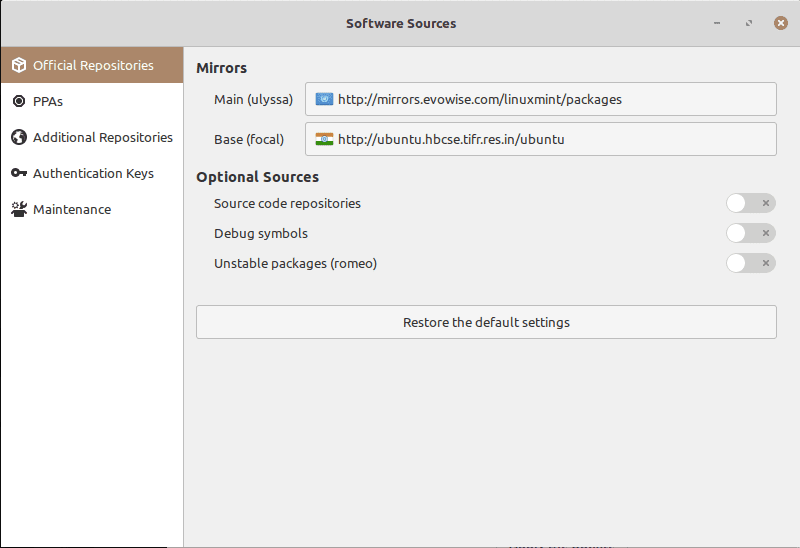
Update Mirrors
Once you are done updating the mirrors, close the window.
Next, inside the Update Manager, you should see a bunch of pending updates for your system. Click on the Install Updates button as highlighted in the image, and all of them will start downloading and installing.
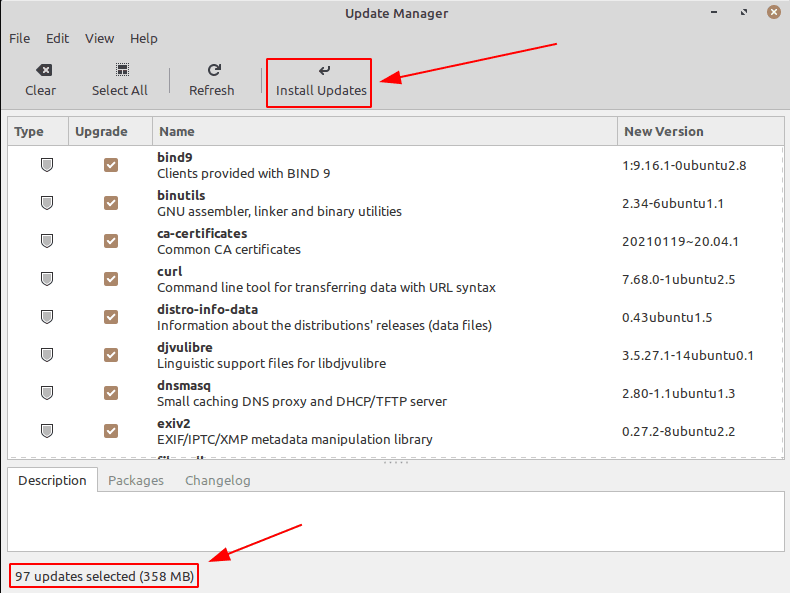
Install updates
Depending on the speed of your internet connection and how many updates were pending, this can take anywhere between a couple of minutes to around half an hour. It is recommended that you wait for the updates to finish before you start using the system.
Once it’s done, move on to the next step.
3. Install necessary drivers
Having the right up-to-date drivers is necessary to ensure that your operating system and hardware are communicating properly. If you don’t have the right drivers installed, it can result in compromised performance, suffering from glitches, lags, and outright unresponsiveness.
Now with that being said, Linux Mint comes with a GUI tool called Driver Manager that lets you see which drivers you have installed on your system, which drivers you can install, and of course, lets you install those drivers.
You can find the Driver Manager by searching for it in the app menu.
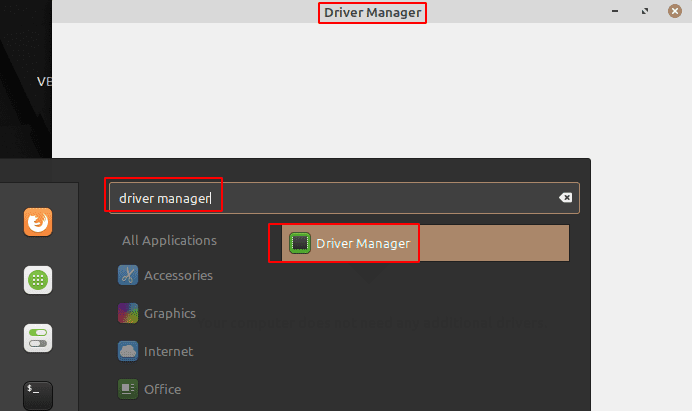
Driver Manager
Here you will find a list of drivers that you can install on your system, with some of them labeled as “recommended.” Needless to say, you should install all of these drivers to ensure optimized performance.
4. Configure Hi-DPI display
Hi-DPI (High Dots Per Inch) displays are becoming more and more common. If you own a Hi-DPI display and use a standard resolution, you are going to face pixelation issues. Thankfully, Linux Mint comes with an in-built fractional scaling option that lets you configure your display to the correct resolution.
Now, open “System Settings” from the app menu and head on over to “Display” settings to access the option.
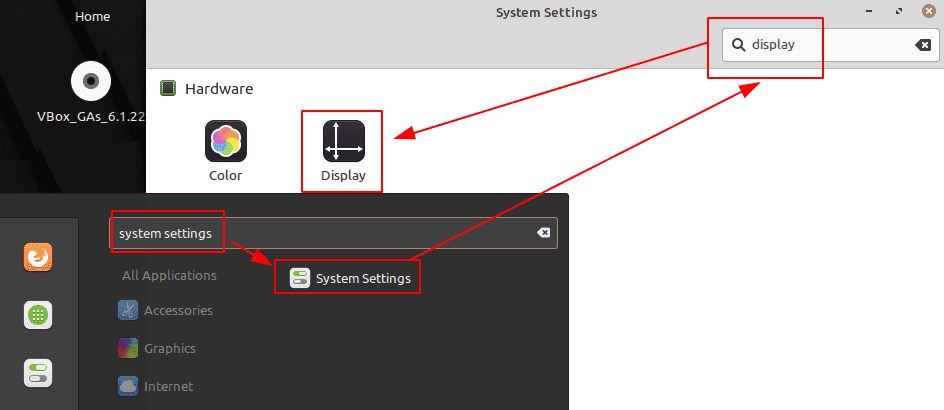
System Settings – Display
From here, change the User Interface Scale to “Double (hi-DPI)” and enable “Fractional Scaling” followed by selecting the “scaled resolution”.
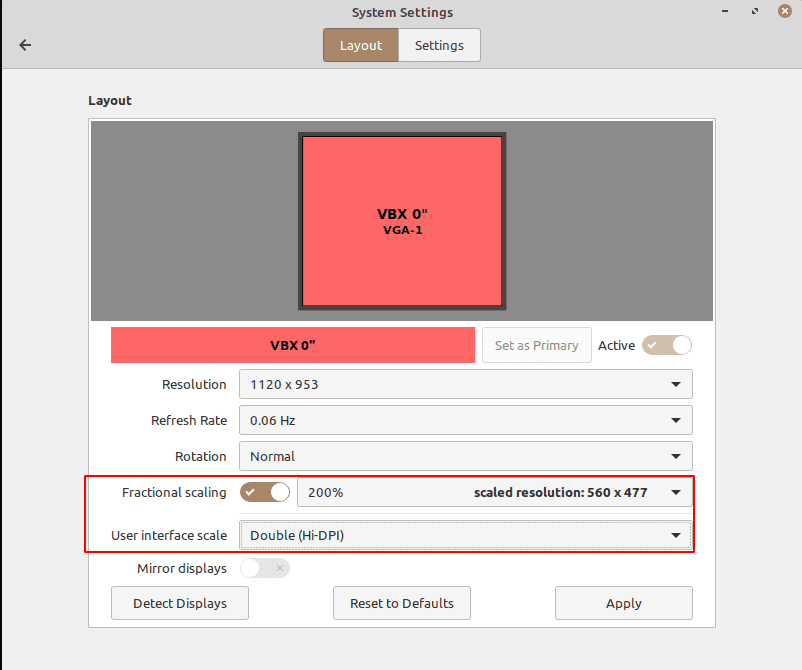
Enable Fractional Scaling
Once done, hit the “Apply” button. This will temporarily apply the settings, and a popup window will appear whether you prefer this new configuration. If yes, click on “Keep this configuration.” If not, click on “Restore the previous configuration” and play around with different scaled resolutions to see which one fits best.
5. Install Microsoft Fonts
Coming to the point, we discussed at the start of the article, you will want to install MS Fonts if you intend on using your system to write and share documents.
If you write a document with an open-source font type (the ones that come with Linux Mint) and then share it with someone who opens it on a Windows system with MS Word, then it is likely those glitched boxy characters will greet them. The same can happen if you try to open a document written using MS fonts.
To avoid these types of issues, it is important that you install Microsoft Fonts right out of the gate.
To do this, open the Synaptic Package Manager as shown in the image and search for mscorefont.
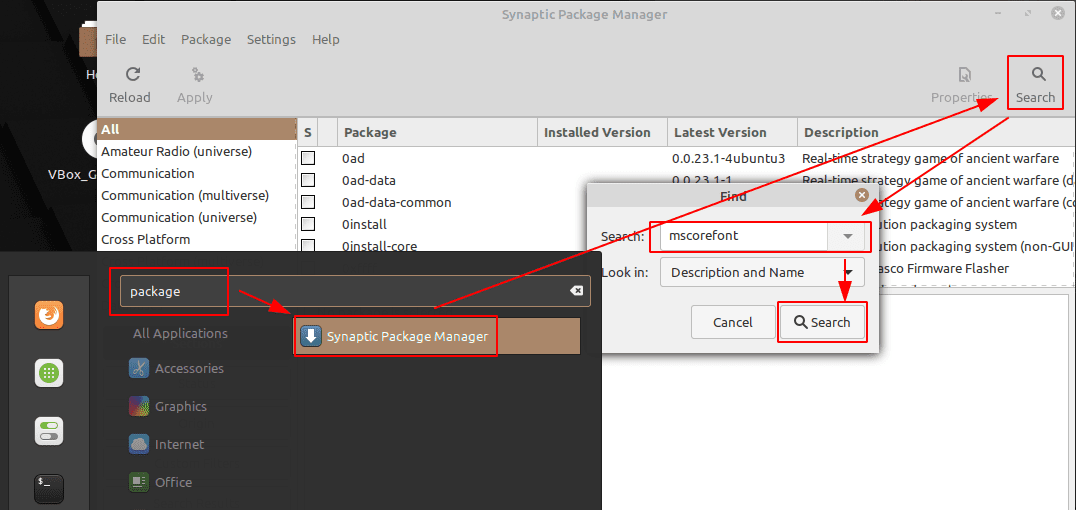
Search for Microsoft Core Fonts
This is going to bring up the package ttf-mscorefonts-installer. Select and click on “Apply” to install it on your system.
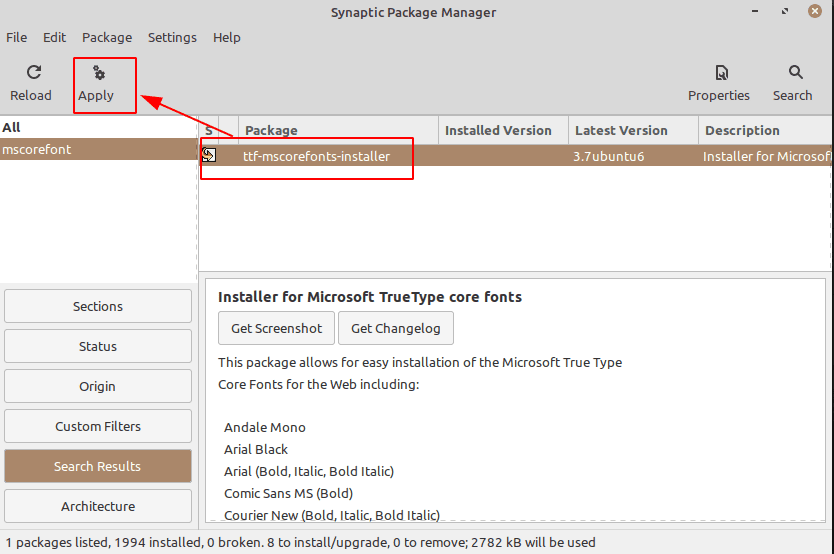
Install MS Fonts
Wait for the installation to complete, and there you have it – MS Fonts are installed on your Linux Mint system. You can now write and read documents that use MS Fonts.
6. Set up a Firewall
Linux is inherently extremely safe and secure. However, in this age of increasing cyberthreats, one can never be too safe. As such, it is wise to set up a firewall to add an extra layer of security, protecting your system from outside attacks and hackers.
Thankfully, Linux Mint already comes with an in-built firewall – UFW (Uncomplicated FireWall), which is a command-line tool and its GUI implementation – GUFW, for users who are not yet comfortable with the terminal.
Now to enable GUFW, search for Firewall in the app menu and open the highlighted app as shown in the image below.
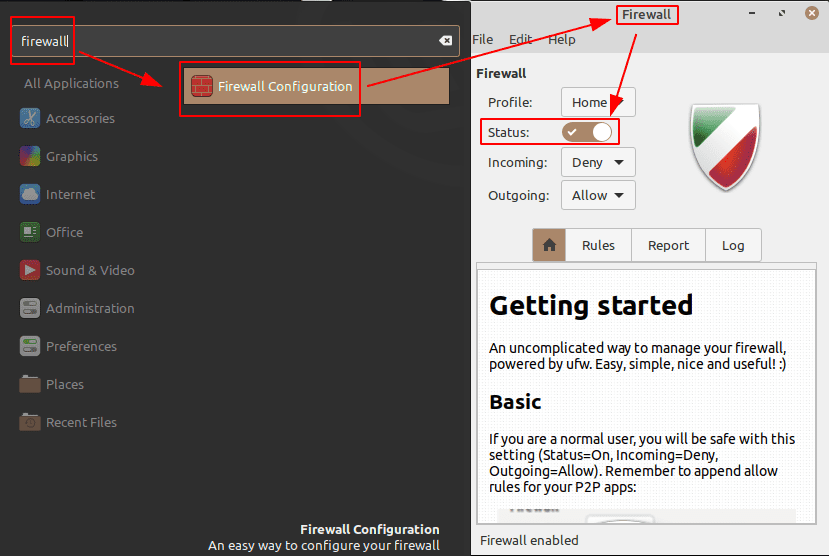
Enable GUFW Firewall
Next, click on the “Status” pill button to enable the service. By default, it will be set to “Deny Incoming traffic” and “Allow Outgoing traffic.” This is perfect for standard users, and there’s no need to change it.
However, if you want more control over the firewall settings, you can add custom Rules to allow /deny specific ports. For more information, you can check out our detailed, in-depth guide on how to configure UFW.
Now, by enabling the Firewall using GUFW, it should autostart with every system bootup. However, we have received comments from some users stating that the firewall gets disabled on every system reboot.
If this happens with you as well, then open the terminal and type in the following commands one after the other:
sudo ufw enable
sudo systemctl enable ufw
This will ensure that your firewall autostarts on every system reboot.
7. Decrease swap usage (Swappiness)
Disclaimer: Only recommended for users with >=16GB RAM.
If you hadn’t manually opted to go with “no Swap,” then your Linux Mint system will automatically dedicate a particular amount of space as the “Swap partition.” By default, Linux is configured to move inactive pages/processes out of the RAM and into the Swap partition. When that particular page/process is again called, it will load it back from the Swap partition to the RAM.
In theory, this mechanism is designed to improve performance by freeing up RAM so that apps and processes that need it can now use it efficiently.
There is another feature called swappiness, where the Linux kernel actively controls how much and how often the RAM content gets moved to the swap partition. It uses a parameter value between 0-100 where 100 indicates aggressively moving RAM content into the Swap partition.
By default, the swappiness value is set to 60. This is good if your system uses <4GB RAM.
You can check the swappiness value on your system by typing the following command in your terminal:
cat /proc/sys/vm/swappiness
However, if your system has more than 16GB RAM, then such high swappiness will do more harm than good. Since RAM is a much faster form of memory than regular storage space, having files moved to the Swap partition will result in loss of performance when you already have enough RAM available.
As such, it is advised you keep the swappiness value down to 10.
Now to change the swappiness value to 10, open the sysctl.conf file by type in the following command in your terminal:
sudo nano /etc/sysctl.conf
Add the line vm.swappiness=10 at the bottom of the file, as shown in the image.
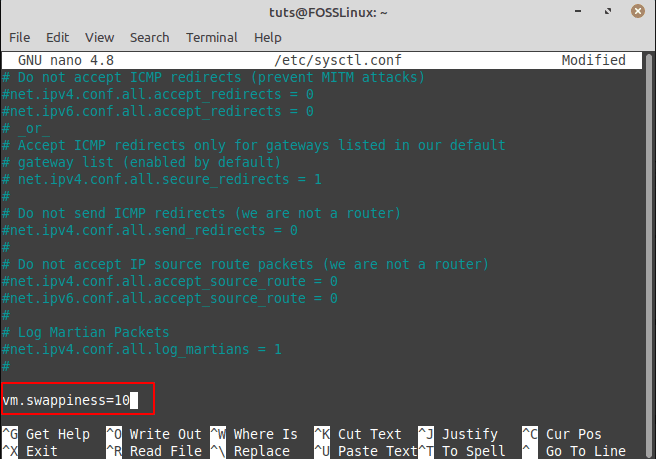
Change swappiness value
Now press ctrl+x to exit the file, followed by pressing Y and Enter to confirm saving the changes.
8. Optimize battery life (laptops only)
If you are using Linux Mint on a laptop, you might be concerned about extending and optimizing the battery life on your system. Well, doing this is as simple as installing an additional package on your system – TLP, which will auto-implement Powertop’s battery life optimization recommendations.
Now to install TLP on your system, head on over to the Synaptic Package Manager from the app menu and search for “TLP” as shown in the image.
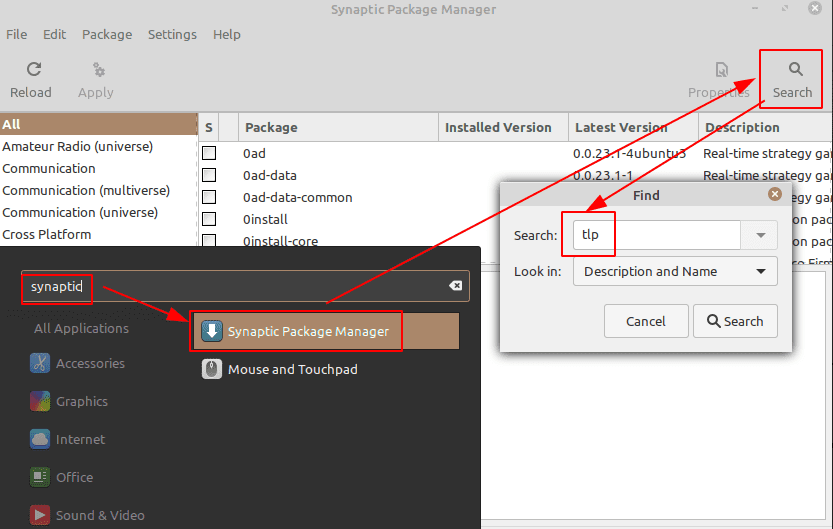
Search for TLP
Next, scroll down till you find the highlighted package. Select it and click on Apply.
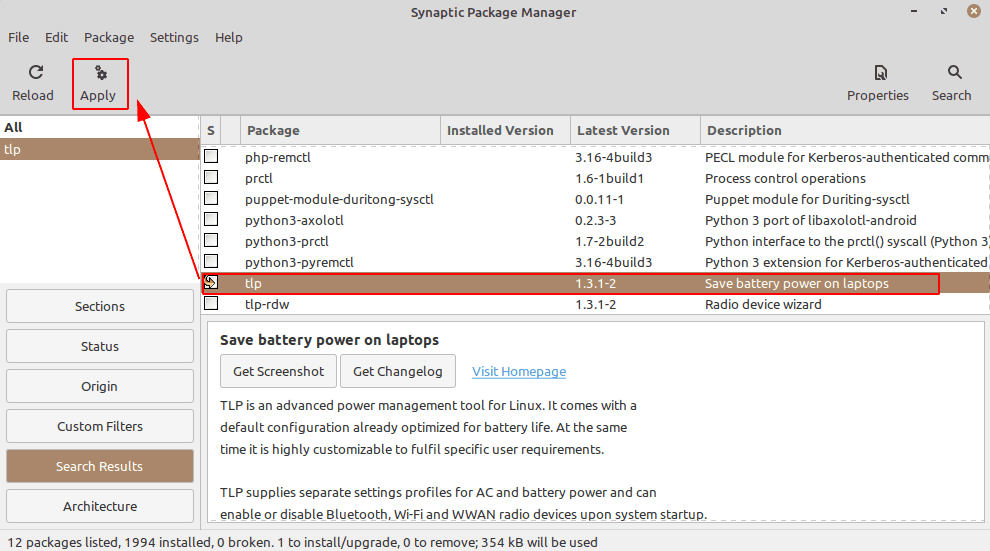
Install TLP
Please wait for the installation to complete, and that’s it! TLP will automatically optimize your laptop’s battery life.
9. Enable TRIM for SSD
Note: This step is meant for users who are using an SSD. If you are not, you can skip this step.
If you are using an SSD, you must be concerned with how to increase its longevity. The most effective way to do this is by ensuring it has a sufficient amount of free space available. In fact, some manufacturers achieve this internally by blocking off some memory cells from user access, a technique known as “over-provisioning“.
But that being said, you too should consider freeing up space on your SSD and increasing its life expectancy even further. Now by this, we don’t mean you should stop installing apps or store data on your SSD. On the contrary, we recommend enabling TRIM for SSD.
TRIM is a command that allows the OS to directly communicate with the SSD and erase data blocks that are no longer in use. That way, you are automatically freeing up space by clearing junk you don’t use. Cool, isn’t it?
Now to check if TRIM for SSD is enabled on your system, type in the following command in your terminal:
sudo systemctl status fstrim.timer
If it’s disabled, type in these commands to enable it:
sudo systemctl enable fstrim.timer
sudo systemctl start fstrim.timer
TRIM is now enabled and is working to discard unused blocks from your SSD.
10. Enable HDD drive caching
Enabling HDD Drive caching can noticeably improve overall system performance by reducing the delay between data writes. But on the downside, it can lead to potential data loss if your computer suddenly turns off because of a power failure.
As such, only use this feature if you write a lot of data and have some power backup (UPS or Inverter) connected to your system.
With that being said, to enable HDD Drive Caching, go to the app menu and search for Disks. Open the app as shown in the image below, click on the three-dot button, and go to Drive Settings.
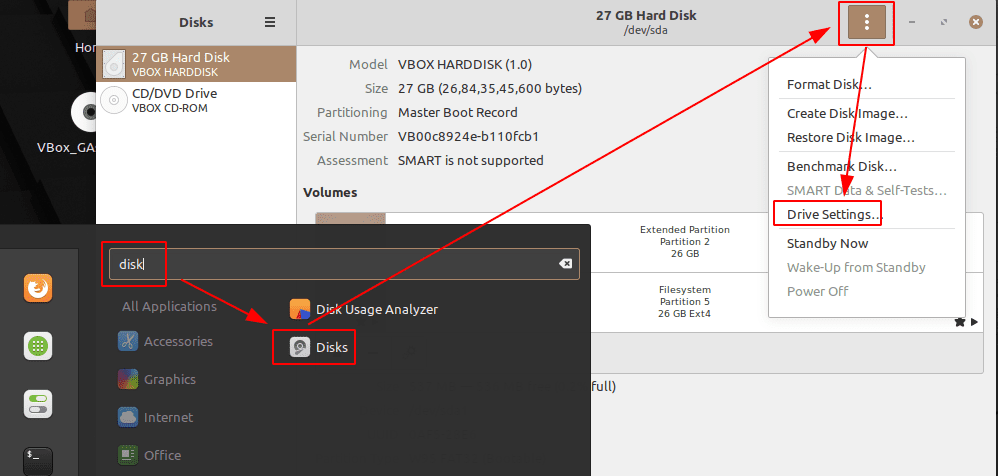
Go to Drive Settings
Switch to the Write Cache tab and enable the option “Apply Write Cache Settings.”
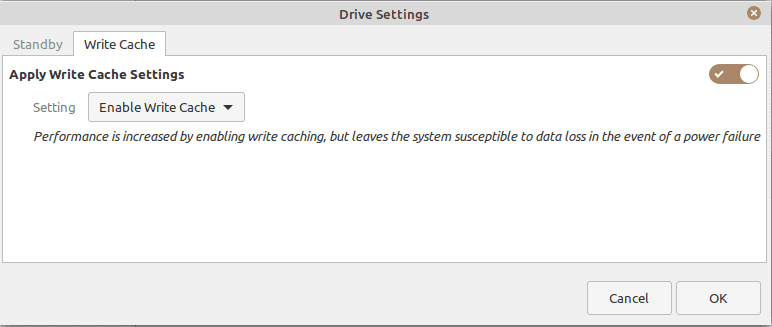
Enable HDD Drive Caching
Click on “OK” and exit the Disks app. HDD Drive Caching is now enabled.
11. Enable Snap (Optional)
Snaps, although convenient, are a bit controversial.
Here’s the thing – Snaps are cross-distribution application packages that will run on all major Linux distributions. This is why most developers are building apps for Snap to avoid creating different packages for different distros.
But on the flipside, Snap packages are a lot heavier. For example, let’s say an application was available in your distro’s official repo as well as in Snap. You can bet that the version in the official repo will be much lighter than its Snap counterpart. Many users dislike using Snap as they take up too much space on their hard drives.
Additional Reading: Snap vs. Flatpak vs. AppImage: Know The Differences, Which is Better?
There is a lot more critique to using Snap, like they are slower to install, slower to start, consume more RAM, auto-updates themselves without asking, and the lot. So why do people use it? Because it provides access to tons of packages, all secure, and can be easily installed with a single click/command.
Now, in this heat of debate and controversy, the Linux Mint team stands against the use of Snap. As such, they configured APT to disallow snapd, which disables out-of-the-box snap support. This also makes it difficult to install and run Snap apps on your Linux Mint system.
However, if you find that you do want to use Snap apps, then you can type in the following commands in your terminal and enable Snap support:
sudo rm /etc/apt/preferences.d/nosnap.pref
sudo apt update
sudo apt install snapd
To complete the installation, you will need to either restart your system or you can log out and log in again.
And that’s it! You will now be able to install Snap apps to your Linux Mint system. To install Snap packages, type in the following command:
sudo snap install <packagename>
Alternatively, you can also use the Snap Store, which offers a GUI to help you install, uninstall, and manage your Snap packages. To install the Snap Store, type in the following command in your terminal:
sudo snap install snap-store
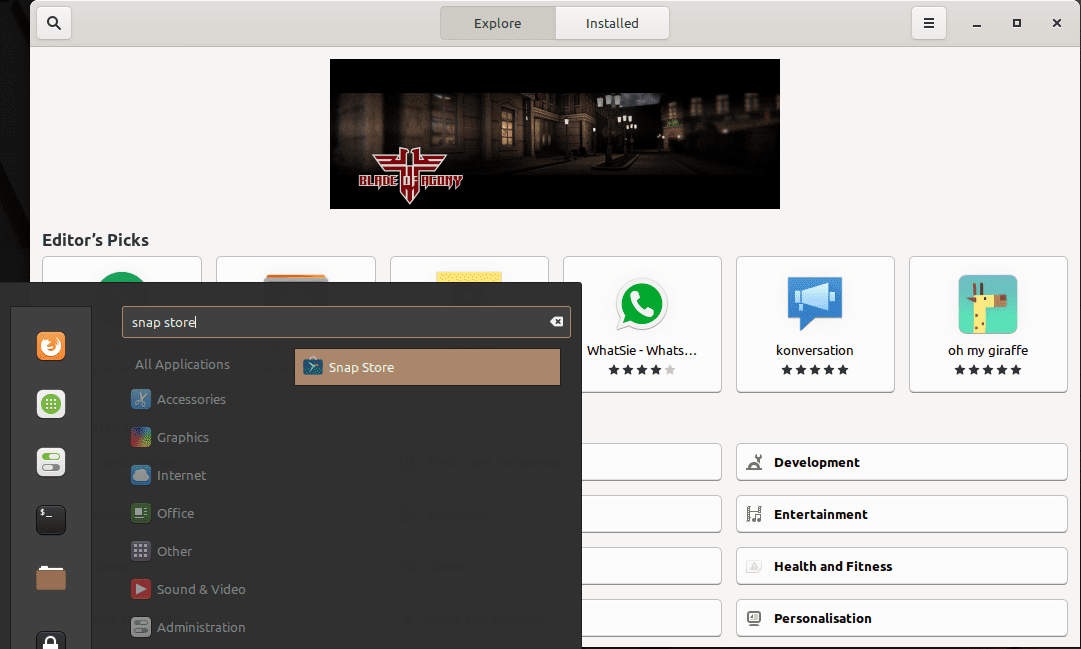
Snap Store
Important: Although the use of Snap is convenient, the critiques of Snap packages also hold ground. As such, when trying to install an app/package, try to see if it’s available in the Linux Mint repo first or whether you can install it by adding a PPA. Only install Snap packages if it’s exclusively available as a Snap, or you find other installation methods too difficult.
12. Install useful software
Linux Mint comes with a ton of apps and packages for general users right out of the box. However, it won’t have those specific apps that you use or need in your workflow. As such, it is advised you install all those apps after installing Linux Mint.
Now with that being said, we don’t know the apps you use. Furthermore, if you are coming from Windows, many proprietary Windows-exclusive apps like MS Office or Adobe Creative Cloud won’t work here.
As such, we have put together a quick list of some of the must-have apps that are not bundled in with Linux Mint that you might want to install on your system.
- GIMP – A Photoshop Alternative.
- Chromium – An open-source web browser. Google Chrome is based on Chromium, and all Chrome extensions are compatible with Chromium.
- VLC – Media Player for your Videos and Music.
- Stacer – System Monitor.
- Skype, Telegram, Discord, Signal – Basically your messaging apps.
- Steam – For all you gamers out there.
- gzip – A fast file compression utility. For opening .zip files.
- Catfish – A fast and simple file search utility.
- Spotify – Music streaming app.
- MailSpring – Email Client.
- Super Productivity – An awesome to-do list manager and Pomodoro timer app.
13. Customize your desktop’s look and feel
One of the best things about using Linux is that it’s extremely customizable. If you want to, you can make your Linux PC look and feel completely different from how it did initially – letting you create a truly “personal” computer.
However, most of the customization potential depends on what desktop environment you use. For example, with Linux Mint, you have the option to choose between Cinnamon, Mate, and XFCE desktop environments. Out of these three, Mate is the least customizable, followed by Cinnamon and XFCE.
Now going over how to customize each of these DEs is beyond the scope of this article. However, if you are interested in customizing your desktop, you can look at these videos, which provide a comprehensive step-by-step guide on how to customize each of these DEs to look futuristic and aesthetic.
Customize Linux Mint Xfce Edition:
Customize Linux Mint Cinnamon Edition:
Customize Linux Mint Mate Edition:
You can also go and check out the subreddit – r/unixporn – The Home for *nix Customization. Here you will find some amazing design ideas and customization tutorials that give your Linux Mint system a complete design overhaul.
14. Manage your startup apps
By default, Linux Mint has many apps, processes, and daemons enabled at system startup. If you don’t know, this means that as soon as your system starts, these apps and processes will also boot into memory.
This feature is meant to offer a layer of convenience, so you don’t have to manually startup all the apps you commonly use after booting up your system. But on the flip side, having too many startup apps can also slow down the boot time, which can be really annoying.
To solve this issue, open the “Startup Applications” app as shown in the image.
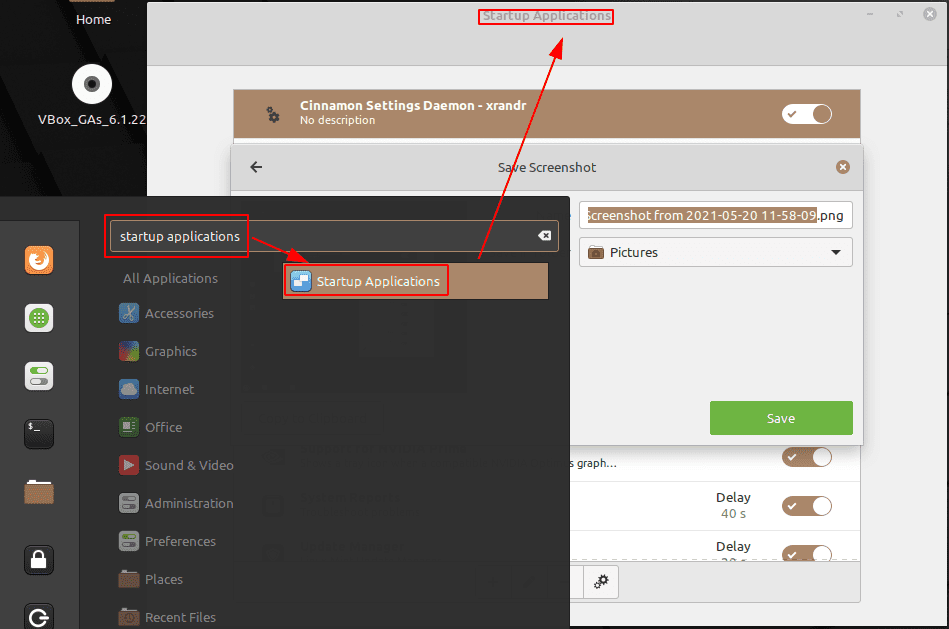
Startup Applications
From here, you can select which apps you want to enable/disable on system startup. You can also add new apps or processes to system startup by using the “+” button.
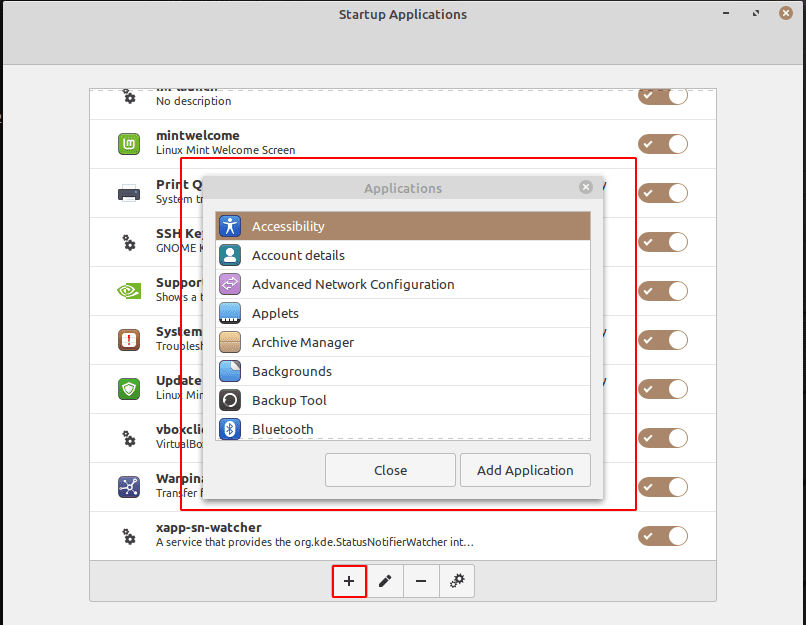
Add an App to System Startup
Disclaimer: As a rule of thumb, if you don’t know what an app or process in the autostart list does, then leave it as it is.
15. Clean and optimize your system
By now, you have downloaded a lot of extra apps & packages and made so many changes to your Linux Mint installation. As such, this is the perfect time to clean your system of unnecessary junk files and optimize overall performance.
For this, you can try out the following commands:
To clean up unused dependencies on your system:
sudo apt-get autoremove
To clean up apt-cache:
sudo apt-get clean
And to clean partial packages:
sudo apt-get autoclean
You can also read this detailed article on the 5 Best Ways to Free Up Hard Disk Space to keep your Linux Mint PC neat and tidy.
Pro Tip: It is advisable to clean your system every couple of weeks routinely. But this can seem like a chore. Luckily, you can automate Linux to weekly clean up your system using Crontabs.
Wrapping Up
So this was our list of the top 15 things to do after installing Linux Mint. We hope you found this useful and that it helped you get a better experience from your Linux Mint PC.
Although it is not necessary to go through all of these steps at once, you should notice that the stuff we mentioned is fairly simple and easy to do. It would hardly take you more than a couple of hours to get everything configured and start using your new personal Linux PC.
That being said, if you do come across any issue while following these steps, don’t hesitate to write to us in the comments below. We would try our best to solve your problems as soon as possible.
6 comments
I tried to change the swappiness in my mint 20.2 installation to 10 using your instructions, 4 times just to be sure I had it right, and had no success. What am I doing wrong?
The swappiness change did not work for me.
I can’t enable the snap store in 20.2 with the above commands.
swappiness did not work for us – Linux Mint 20.3 Mate
try to edit using nano
Good job, but I installed mscorefont on my Linux Mint 20.3 Una and still haven’t gotten these fonts, like Times New Roman. Ideas?