
Manjaro is by far one of the most popular and widely recommended Linux distros for beginners. This is why we see so many new users pick up Manjaro as their introductory distro to the Linux space. However, despite Manjaro’s user-friendly and welcoming environment, absolute beginners might be a little lost on what to do after a clean installation.
For example, updating your system is always a good idea, and we all know that. But did you know pointing to the fastest mirrors before an update can significantly boost the update speed? Similarly, if you’re coming from Windows, you might not know that you have free control over which Linux Kernel you use. And depending on the kernel, you will get varying levels of system performance. Cool right?
So with this in mind, we have put together a detailed guide going over the 15 things we think you should do after installing Manjaro. And don’t worry, everything is arranged sequentially in order of importance. So just start with the first one and keep moving down gradually till you have everything configured.
Things to do after installing Manjaro
Disclaimer: We will be using the Manjaro GNOME edition for this tutorial. However, everything discussed here applies to all other versions of Manjaro.
1. Point to the Fastest Mirror
Right after your first boot into Manjaro, you will be greeted with the following “Update Available” message:
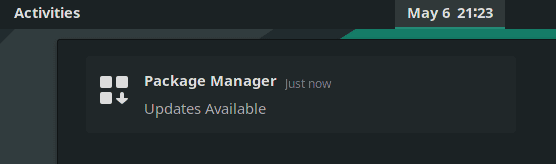
Manjaro Updates Available
However, before updating your system, we recommend switching to the fastest mirrors.
But what’s a mirror, you ask?
Well, to put it simply, a mirror is another server that clones (mirrors) everything on the main server. The mirror servers are typically positioned at a geographically different location from the main server.
This gives users the option to download software from a server (mirror) that’s located close to them. Needless to say, download speeds from a physically close mirror are going to be faster compared to those located on the other side of the globe.
- Suggested Read: To learn more, read this article – Manjaro Mirrors.
Now to locate the closest (or the fastest) mirror for updating your Manjaro system, type in the following command into the terminal:
sudo pacman-mirrors --fasttrack
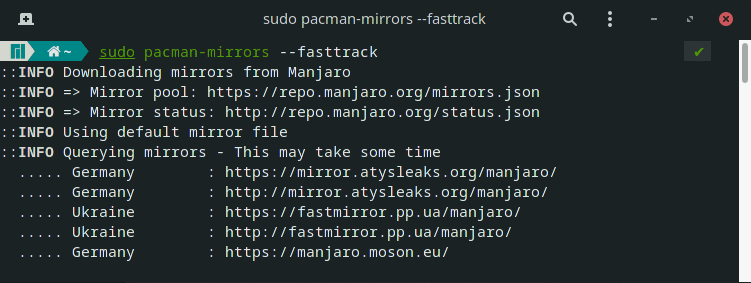
Finding Fastest Pacman Mirrors
The process can take anywhere from a few seconds to a couple of minutes. So just sit back, and let it do its thing. Once the process completes, you are ready to update your system. So let’s move on to the next step.
2. Update Your System
The Manjaro ISO you used to install the Manjaro OS might be old. As such, all the packages and software that are pre-installed on the ISO might be outdated, which opens up chances of security vulnerabilities or performance issues.
This is why it is super important to update your Manjaro right after the first boot. Now with that being said, updating Manjaro is super simple.
Just type in the following command into the terminal, and that’s it:
sudo pacman -Syyu
Depending on how many packages the system needs to update, the process is going to take a while.
We also recommend that you check out this read on how to update and upgrade your Manjaro Linux to learn about the best practices to ensure you don’t face any errors or issues.
3. Set Time and Date Automatically
Some people have documented facing problems with the time and date synchronization on Manjaro. To ensure these types of issues don’t happen to you, we advise that you set Manjaro to update the date and time automatically.
To do this, head to Manjaro Settings Manager > Time and Date. Check the option “Set time and date automatically,” as shown in the image.
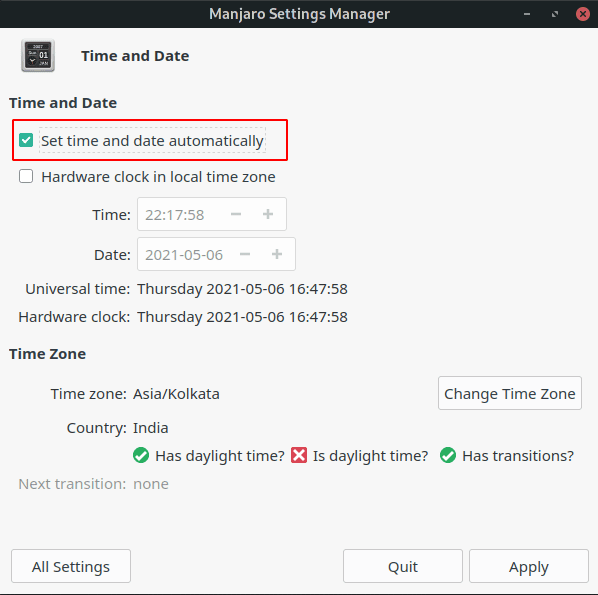
Set time and date automatically
Once done, click on “Apply”, and that’s it.
4. Install Drivers
Up next, you should make sure that your system has all the necessary drivers and whether it’s also running the latest ones. This is where the beginner-friendly nature of Manjaro shines.
Just head on over to the Manjaro Settings Manager > Hardware Configuration. From here, the system will automatically detect which drivers you need and then recommend them for download.

Install Drivers
As you can see, the application will show you which drivers are already installed and which ones need to be installed.
To install a driver, you can just right-click on it and press the pop-up “Install” button.
Alternatively, you can click on the “Auto Install Open-Source Driver” at the top of the screen. It will automatically install all the necessary drivers for your system that’s open source.
Also, notice the “Show All Devices” option near the bottom-left corner of the window. It will show you a list of all devices installed on your system.
5. Enable SSD TRIM
Note: This step is only required if you are using an SSD. HDD users can skip this step.
Before we show you how to enable TRIM for SSD, let’s first understand what it is and why we need it.
TRIM is a command that enables the operating system to communicate with the SSD and tells it which data blocks are no longer in use so that it can erase them. Using TRIM can significantly improve the writing speed of the SSD and also boost its longevity.
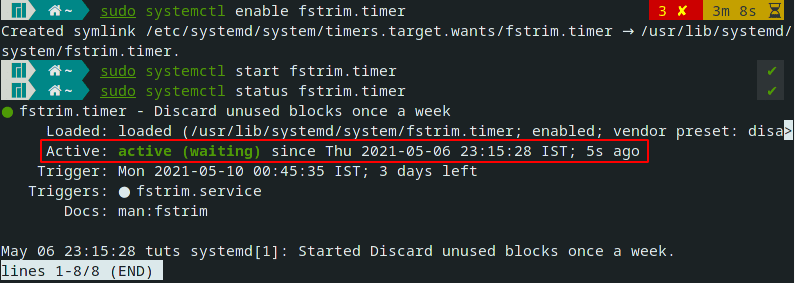
First, let’s check if SSD TRIM is enabled on your system. To do this enter the following command in your terminal:
sudo systemctl status fstrim.timer
Here is the output on our system:
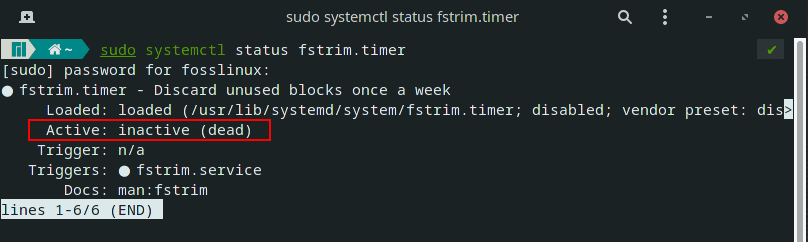
SSD TRIM Status
As you can see, SSD Trim is “inactive(dead)” on our system.
So to enable it, we enter this command:
sudo systemctl enable fstrim.timer
sudo systemctl start fstrim.timer
Enable SSD TRIM
And that’s it! TRIM is now enabled and running – optimizing the performance and longevity of your SSD.
6. Reduce Swappiness
Note: This is recommended for users with >=16GB RAM.
When installing Manjaro you might have allocated a particular amount of space to the “Swap partition.” Or, you might have selected the “Erase Disk” option in which case the installer automatically created a “Swap partition or file.” But what is this “swap”?
Well, the swap space is a reserved space on your disk which can either be in the form of a partition or a file. In order to free up physical RAM memory, the Linux OS moves inactive pages from the RAM and into the swap space. As such, in principle, swap is intended to improve system performance and keep things running snappy.
Now swappiness is a property of the Linux kernel that controls how much and how often the operating system will move RAM content into the swap space. It can have a parameter anywhere between 0-100, where 100 means aggressively moving files from RAM to swap space.
By default, most distros have swappiness set to “60”. You can check the swappiness value on your system by entering this command into the terminal:
cat /proc/sys/vm/swappiness
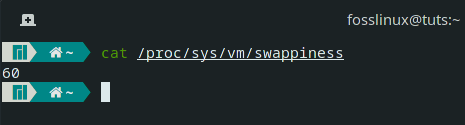
Default Swappiness Value
So what value of swappiness should we have? And why should we reduce it?
Well, think about it! Your RAM is much faster than your HDD (or even SSD). So calling files stored in RAM is going to be much faster than calling them from your storage device. As such, having high swappiness might mean better performance on your current program, but it can result in somewhat of a sluggish experience when trying to multitask.
As such, when using your system if you find that you have a lot of free RAM, then having a high swappiness doesn’t make sense.
Conversely, if you’re tight on RAM – your system has <4GB RAM – then you should leave your swappiness parameter as it is.
With all that being said, if your system has >=16GB RAM, we recommend keeping the swappiness value at 10. To do this, open the terminal and enter the following command:
sudo echo "vm.swappiness=10" > /etc/sysctl.d/100-manjaro.conf
After running the command, reboot your system. The swappiness value should now be set to 10. You can check by using the previous command.
7. Test Your Microphone and Webcam
Everybody tests the cameras and call quality almost immediately after getting a new smartphone. However, we don’t seem to have the same level of dexterity with our laptops or desktops. This is likely because we don’t use the webcam and microphone attached to our computers too often.
But with video calls and online conferences slowly becoming the norm, we shouldn’t wait to check if our equipment is working right before we need to use them.
Now to check if your microphone is working or not, you can just open up Skype and give your friend a call. Or you can use an app – PulseAudio Volume Control. It should be installed on Manjaro by default. But if it’s not, then you can easily download it by using the following command:
sudo pacman -S pavucontrol
Once the app is installed, open it, and go to the “Input Devices” tab, and select your Microphone from the “Port” drop-down menu.

Checking Microphone
Now start speaking, and you should see that the bottom bar starts to move. This means that the Microphone is working and it’s picking up on your voice.
Good job!
Now, let’s move on to check if the webcam is working.
Again, the simple way to do this would be to make a Skype call and see if the opposite side can see your face. Alternatively, you can use search for the Cheese app in your Application library.

Cheese app
It’s a camera application that should capture images from your webcam.
What if the microphone and camera are not working?
In case you find your microphone isn’t reading audio and your camera isn’t capturing any footage, then it’s time to troubleshoot. It’s hard to pinpoint a particular flaw causing this issue. We recommend heading over to the Manjaro forum and asking for support (don’t forget to mention your hardware).
8. Enable AUR Support in Pamac
Pamac is Manjaro’s Package Manager. It’s a GUI app that will help you to add and remove software and packages from your Manjaro system.
Now, by default, Pamac gives you access to the official repository. It contains a carefully curated collection of highly popular software. It’s decent, but not nearly as big as AUR (Arch User Repository) which contains literally tens of thousands of software and packages.
AUR is a community-driven repository where community members contribute new software and packages. Eventually, if a package or software becomes popular in the AUR, it gets added to the official repository.
As such, AUR does have some buggy software that can cause you some problems. This is why AUR is disabled by default on Pamac. It is recommended that users who are completely new to Linux should stay clear from AUR.
However, if you are a smart Arch user, and you are familiar with how to check the .install files for malicious code prior to installing them, then you can enable AUR without too much worry.
We already have a detailed guide on how to enable AUR in Pamac.
In short, all you need to do is open Pamac (search for add/remove software) and click on the three vertical dots on its top panel. From the drop-down menu, click on preferences and this is going to open up the following pop-up window:
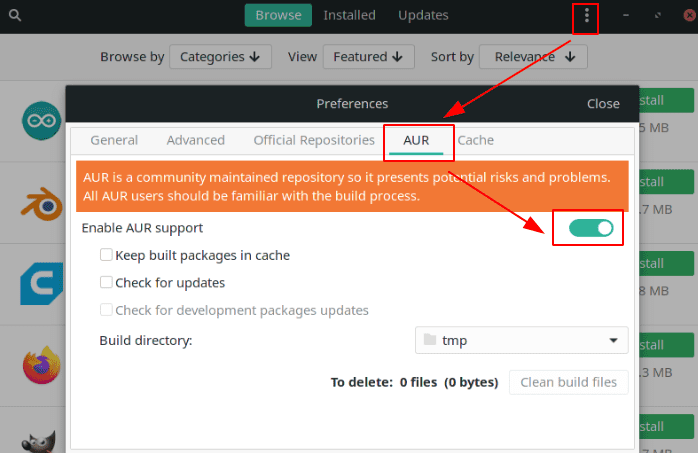
Enable AUR
Now go to the “AUR” tab as shown in the image and enable it.
You can now use Pamac to install software and packages available on AUR.
9. Install Microsoft True Type Fonts (ttf-ms-fonts)
Microsoft Office is the defacto office suite in the world, there’s no point arguing about that. Therefore, if you are working with office software, sending word documents back and forth, you will need support for Microsoft True Type Fonts (ttf-ms-fonts) like Times New Roman.
If your Manjaro PC doesn’t have support for ttf-ms-fonts, then word documents using this font will come out as gibberish and you won’t be able to read them.
Now to install this font family, open Pamac and type in “ttf-ms-fonts” in the search bar and click on Build followed by Apply.

Install ttf-ms-fonts
With the package installed, you will now have access to all of the core Microsoft fonts on your Manjaro PC.
Important: Notice how below the package name it’s written “AUR.” That’s because this is an AUR package and not available from the official repository! So this doubles to show you the benefits of having AUR enabled.
10. Remove Orphaned Software and Packages
Orphaned software and packages are basically applications or files that aren’t being used by anything on your system – neither the OS, nor the installed apps, nor you. As such, it makes sense to remove these files to free up space and optimize your system.
Now, you will find a complete list of all orphaned files by opening Pamac > Installed > Orphans as shown in the image:
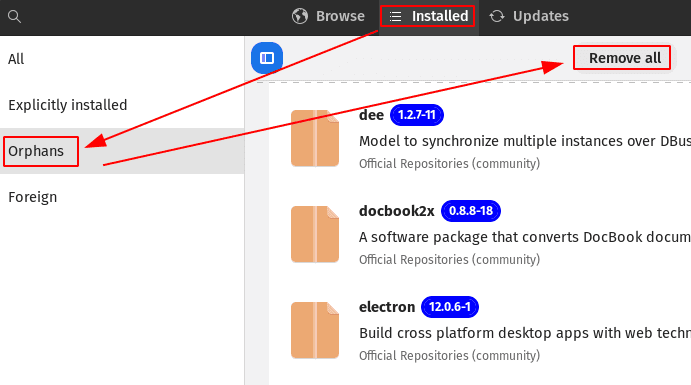
Remove Orphan files
From here, click on the “Remove all” button, and all the orphaned software and packages will be removed/uninstalled.
11. Enable Firewall Protection
Yes, Linux is an extremely secure operating system by default. You don’t need to worry about malware nor go through the trouble of installing anti-virus software. However, enabling a firewall is advisable as it makes your system even more robust and secure.
Now, Manjaro already ships with a firewall configuration tool by default – UFW (Uncomplicated FireWall). It is a command-line utility but a GUI implementation of the tool is also installed on Manjaro called GUFW.
In case UFW or GUFW is not installed, you can do it easily using these commands:
sudo pacman -S ufw

sudo pacman -S gufw
We have a detailed article on how to work with UFW that you can check out – How to Enable UFW on Linux.
Note: One of the issues raised by our readers is that GUFW automatically turns off the Firewall on system bootup. This might happen on some systems. To avoid that it is advised to enable UFW through the command line.
Here is a quick list of all the commands you need to know to enable UFW and also program it for autostart.
Check UFW status (disabled or enabled):
sudo ufw status
Enable UFW:
sudo ufw enable
By default, it is configured to:
- Deny all incoming traffic.
- Allow all outgoing traffic.
This is perfect for the regular user, and you don’t need to change anything.
Autostart UFW on reboot:
sudo systemctl enable ufw
Disable UFW:
sudo ufw disable
12. Backup Your System
You are almost done setting up your Manjaro PC after its first boot. All the steps we discussed above should have hardly taken you around an hour or so to complete. As such, it’s time that you create a system backup.
The steps we are going to discuss next involves tweaking the OS core, installing additional apps, and customizing the system. In case anything goes wrong during that process, you want to revert back to a stable and working condition of the system. And to do that, we need to create a backup.
Now, the best backup and restore tool for Linux is known as Timeshift. The app should be installed by default on your Manjaro system. But in case it’s not, you can easily install it using the following command:
sudo pacman -S timeshift
Now Timeshift is a feature-rich app with a lot of options and functionalities. If you are not familiar with Timeshift, then creating a full tutorial here will unnecessarily lengthen this article.
As such we recommend that you check out this guide – How to backup and restore Ubuntu with Timeshift. Even though the tutorial is targeted at Ubuntu users, the process is exactly similar to what you need to do on your Manjaro system. The only difference is how you install Timeshift, and we have already covered that here.
Once you have created a system backup point, it’s time to move on to the next steps.
Note: The following steps are a bit complex. It is advised that hereafter, as soon as you complete a step and see that your system is working fine, you create a system backup as a checkpoint.
13. Install the Latest Kernel (or an Older LTS Kernel)
The fact that Manjaro is an Arch-based distro means it gets access to all the bleeding edge releases in terms of both software and Linux kernels. Now, you most probably understand the benefit of having access to the latest and greatest software, but why should you be interested in kernels?
Well, the stock Linux kernel is available in two flavors – the LTS (Long Term Support) version and the non-LTS support. Linux Kernel 5.10 is the current LTS version released in Dec 2020. Manjaro, by default, ships with the LTS version.
But the latest Linux Kernel available is version 5.12 which includes a lot of improvements over the LTS release. And if you want to take advantage of these improvements, you need to install it on your system.
Now, one of the beauties of using Manjaro is that you have a dedicated UI tool that lets you install and use any kernel that you want. Just head on over to the “Manjaro Settings Manager” and click on “Kernels”. Here you will find a list of Kernels that’s available for your system.
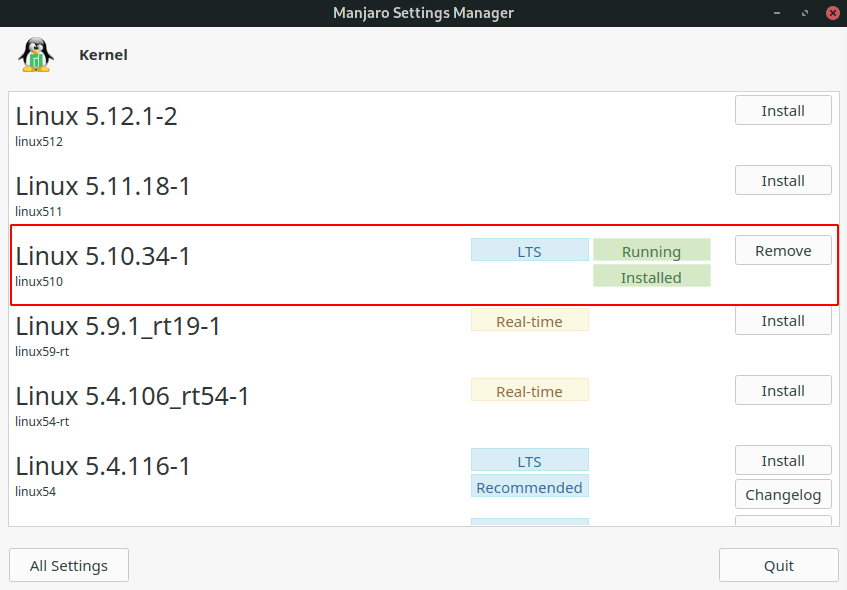
Switch to a custom Linux Kernel
As you can see, our Manjaro system is using Linux Kernel 5.10. But we want to use version 5.12 which is displayed at the top. So we click the install button to download it on our system.
Disclaimer: Do not delete the LTS kernel after downloading other kernels. The LTS version is the most stable version. In case you run into any issues or errors while using the newer models, you need to have the LTS version to revert back to it.
Now, even after installing Kernel 5.12, your system will still be using Kernel 5.10. To switch to the newer kernel, you need to make some tweaks.
First, open your terminal and type in the following command:
sudo nano /etc/default/grub
This is going to open the /etc/default/grub file. From here, change GRUB_TIMEOUT_STYLE=hidden to GRUB_TIMEOUT_STYLE=menu.
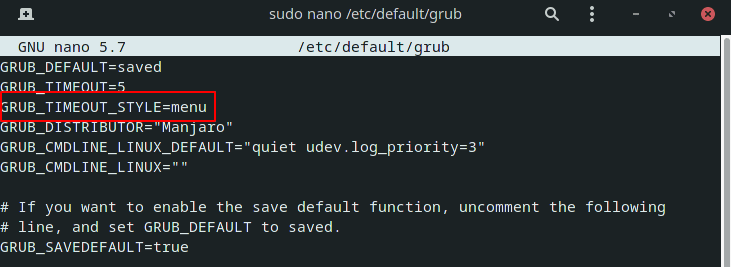
Tweak GRUB menu
Now press Ctrl+X to exit, followed by Y and Enter to save the file.
Once done, regenerate the GRUB config file by entering this command:
sudo update-grub
After this, reboot your system, and on the GRUB menu you will see a new option “Advanced options for Manjaro Linux.”
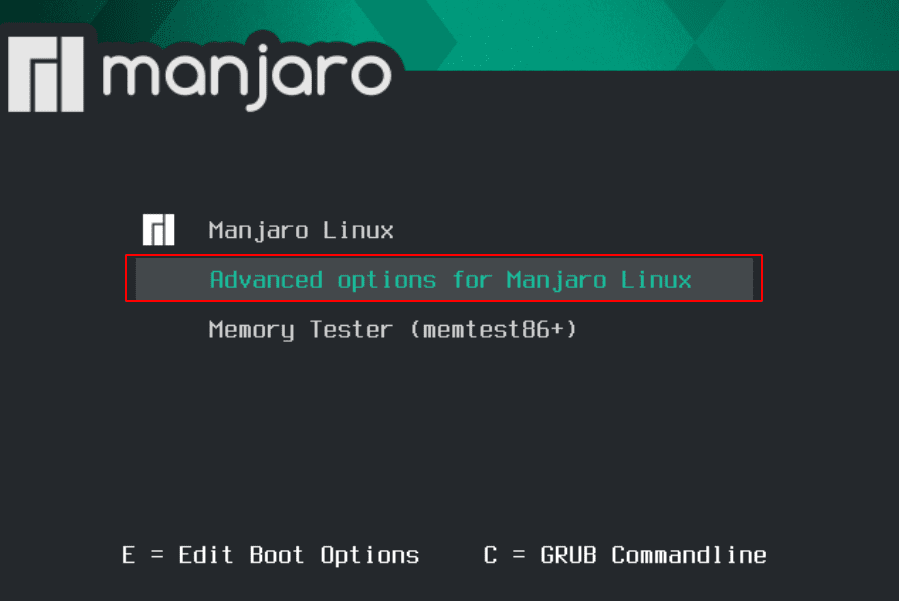
Advanced options for Manjaro Linux
From here you can see all available kernels and choose which one the system boots into.
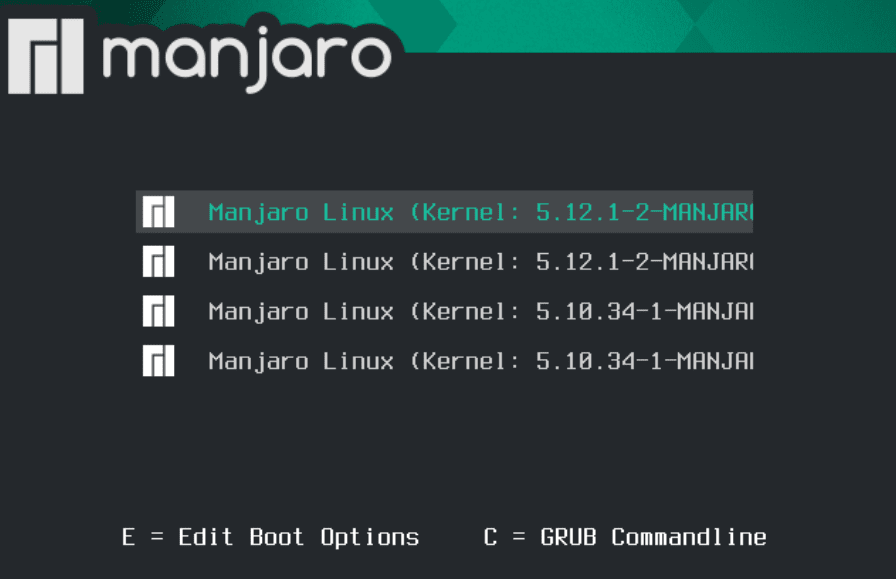
Pick Kernel Version
Once the system boots up again, head over to Manjaro Settings Manager > Kernel and check which Linux Kernel is running.

Kernel version updated
Note: If you don’t like seeing the GRUB menu every time you turn on your system, then you can disable it by updating the /etc/default/grub file with the parameter GRUB_TIMEOUT_STYLE=hidden as it was before.
14. Install the Apps That You Use
By default, Manjaro comes pre-bundled with tons of useful apps for your everyday use. But these might not be the apps you are accustomed to using daily. As such, the next thing you should be focused on is to install all the apps that you use to recreate your workflow.
Disclaimer: If you are coming over from Windows, then be aware that some native Windows apps won’t work on Linux. For example, there’s no way you can smoothly run MS Office or the Adobe suite on Linux. However, you can still run plenty of Windows apps on Linux using a Windows compatibility layer called Wine.
Now, if you are new to Linux and don’t know what apps to install, here is a list of some of the must-have Linux apps that you should consider having on your Manjaro system.
- GIMP – Image processor. Alternative to Photoshop.
- Chromium – The open-source browser on which Google Chrome is based on.
- VLC – Media Player. You already know what it is.
- Stacer – System monitor.
- Skype, Telegram, Discord, Signal – Almost all popular messenger apps are supported.
- Steam – All you gamers already know what it is.
- Spotify – For your music needs.
- MailSpring – Email Client. More feature-rich than the default ThunderBird.
- Super Productivity – An awesome to-do list manager and Pomodoro timer app.
15. Customize Your System
Linux allows you to customize your PC like no other operating system. You can truly make your computer “personal,” and have complete control over how everything looks and feels.
But that being said, much of the system customization relies on which Desktop Environment (DE) you are using. Officially Manjaro supports three DEs – XFCE, Gnome, and KDE. There are also community-supported flavors with other DEs like Budgie, Cinnamon, Mate, etc.
Depending on which DE you are using, there are going to be some specific tools and packages available to help you customize your system. It is beyond the scope of this guide to go through all of these options.
However, we can leave you with some awesome in-depth video tutorials that you can use to make your Manjaro desktop look fancy and aesthetic.
Customize Manjaro XFCE edition:
Customize Manjaro KDE edition:
Customize Manjaro Gnome edition:
We also highly recommend this subreddit where you can find some amazing ideas on how you can customize your Linux PC – r/unixporn – The Home for *nix Customization.
Wrapping Up
So this was our list of the top 15 things you should do after installing Manjaro Linux. We hope you found this read useful and that it has helped you in creating a more “personal” PC.
It isn’t necessary that you go and do all the steps at one go. The first 10 or so steps are fairly easy to follow and you should have them done in 1+ hours. But the latter steps can be a bit technical and somewhat foreign if you have never used a Linux system. In that case, take your time and slowly work on it.
Also, if you are new to Linux, then don’t forget to check out our series of Learn Linux articles.
5 comments
Halo, there is a big problem in the following tip:
10. remove Orphaned Software and Packages.
After that Manjaro does not start anymore, it is completely broken:
Faild to start Load Kernel Modules.
Probably because pamac in the orphans also deleted “linux-latest – The latest kernel and modules”.
Please correct the recommendation so that others do not also get these problems.
This should not happen… The problem seem to be in the orphan list.
Tepmrary help: You could mark the package as “manual installed”.
# pacman -D –asexplicit package
(as root)
Nitish, you didn’t want users that they shouldn’t install the vesa driver! It leads to a black screen on boot!
Luckily there are guides on the forums on how to remove it, but this is entirely your fault, please update the article so that it warns you about that!
I know the box isn’t ticked in the picture, but there’s no explicit warning not to do it, which might mislead people.
gnome what wish you left a link of all your files idk where to get arc menu been stuck for a whilte
Garuda, Arch and Manjaro have bee n giving me nothing but crashes. Fedora wont even install. its an Asus2018 X541auk Laptop. whenever I click on settings and download new themes. After distro hoping for the past 8 months ans 20 different distros. Kali and Parrot Os are the only ones fully compatible with my hardware. if theres anything I can do to help please let me know. not giving up on Manjaro. Worst case is I go back to Debian but not without trying Arch again. WiFi is the only issue with Arch for the installation but im learning the commands.
Thank You.